Lyonsden Blog

Category - Gaming

A look at the new Zzap! 64 2021 Annual

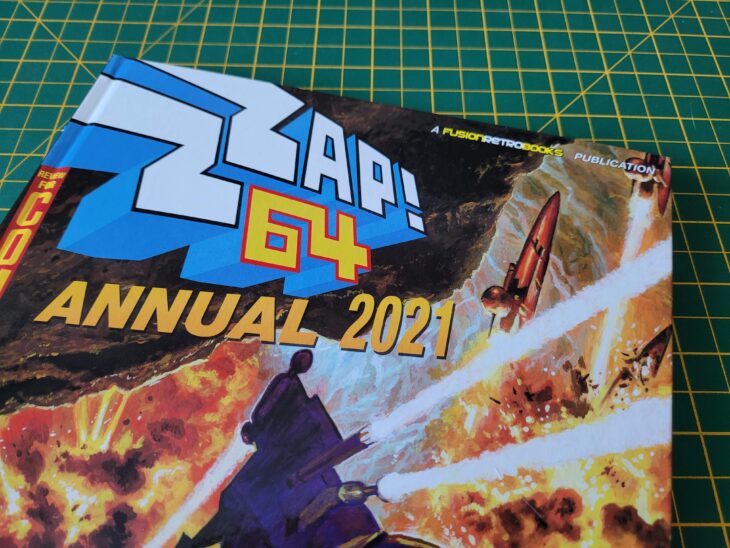
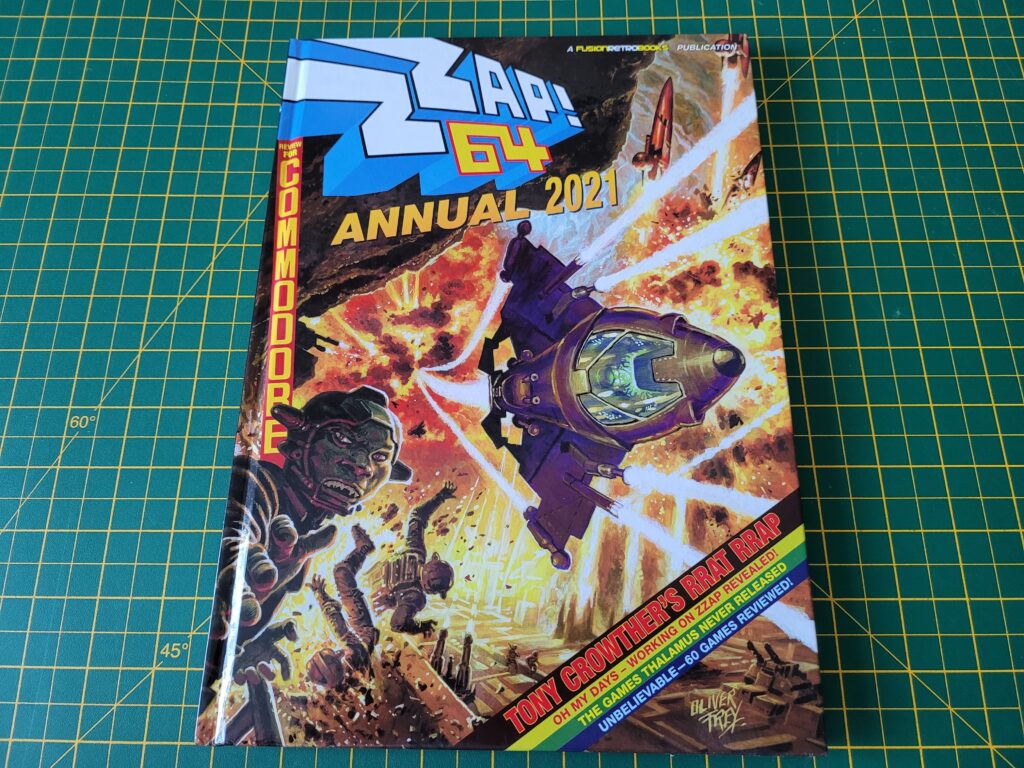
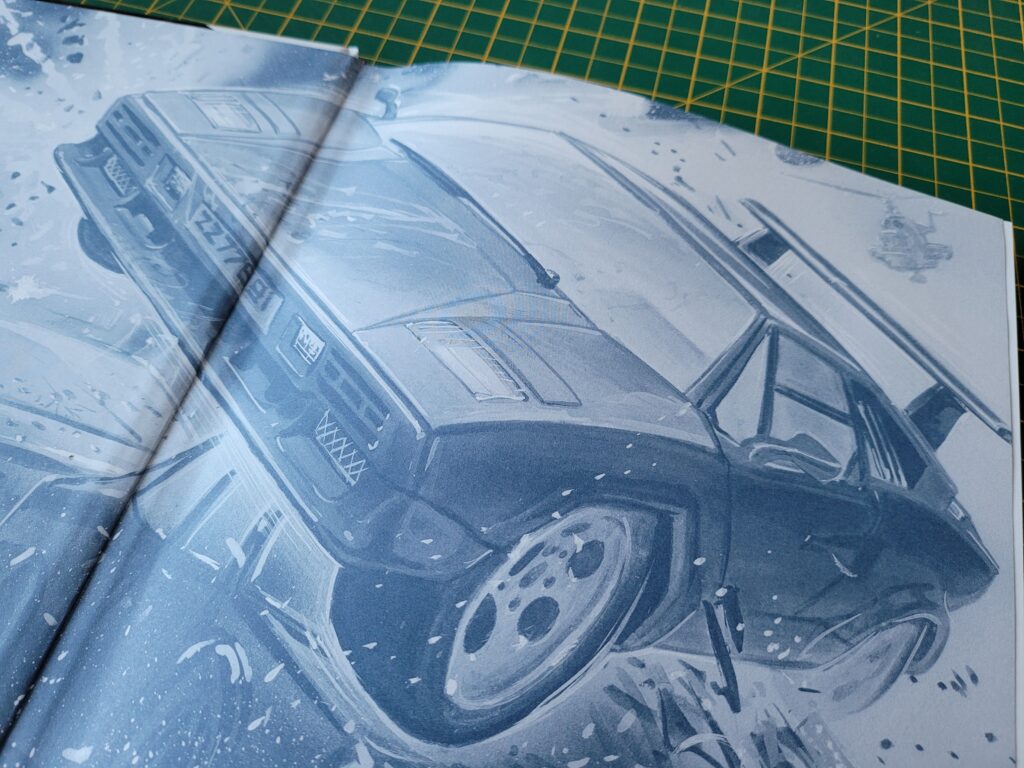
Picked up a copy of the latest Zzap 64 2021 Annual last week so thought I share a little look at what’s inside. Let’s start with the awesome front cover artwork by Oliver Frey, the exact same artist from the original Zzap! 64 magazines of the 80’s.


Zzap 64 2021 Annual

Front cover of the 2021 Zzap! 64 Annual.


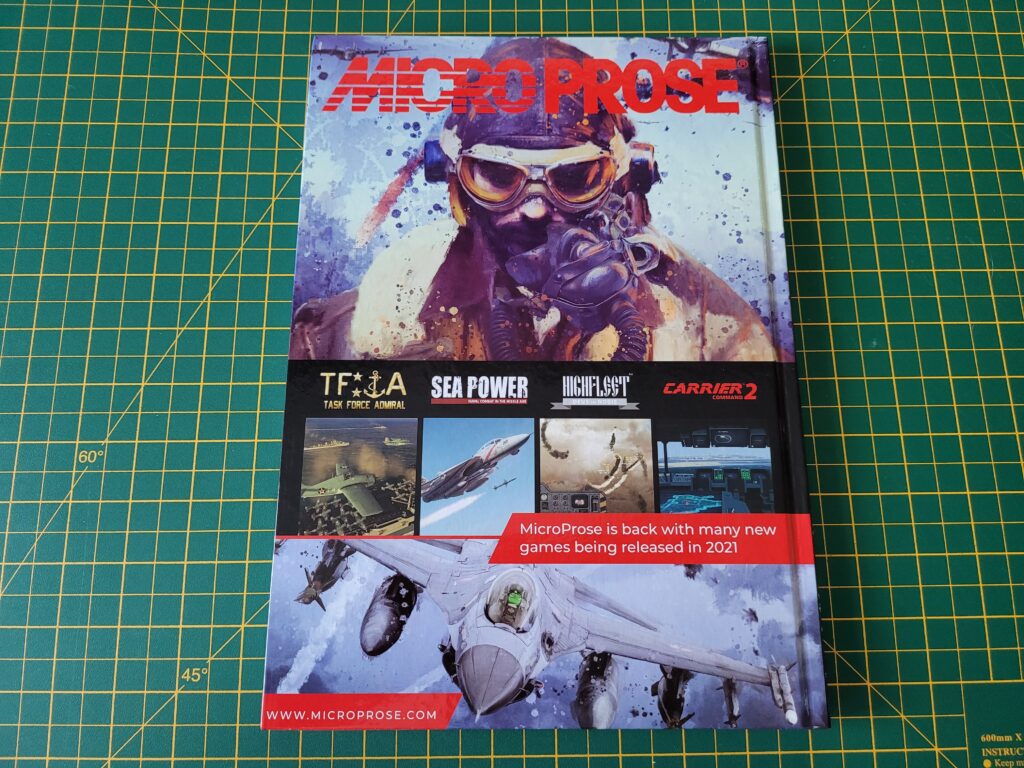
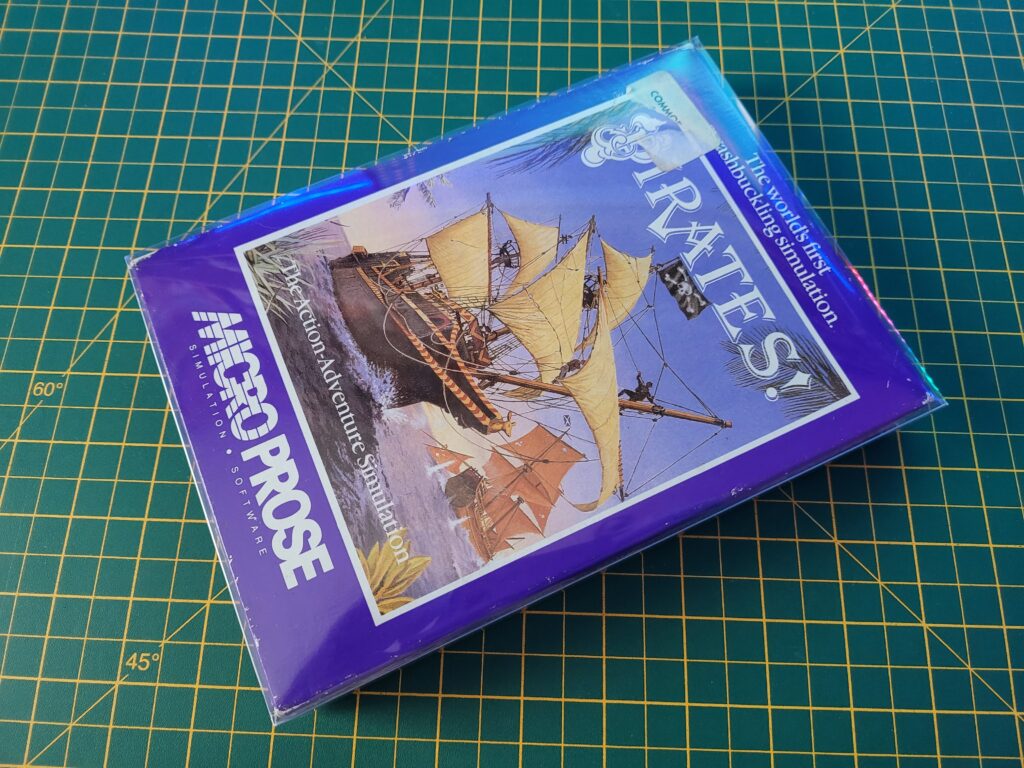
Flipping over to the back cover we find a very interesting advert that appears to herald the return of MicroProse simulation games. MicroProse was a big player in the Commodore market (especially on the Amiga) and produced some of my favourite C64 games such as Silent Service, Gunship and Pirates!

Sadly, but not at all surprising, these new games will be coming to Windows PC’s and not the C64 or Amiga. Even so I’m still looking forward to seeing what MicroProse produces. To be honest that’s probably what they are banking on too otherwise why else would they pay for such a prominent advert in a book about 40 year old computers!


Zzap 64 2021 Annual

Interesting advert on the back!


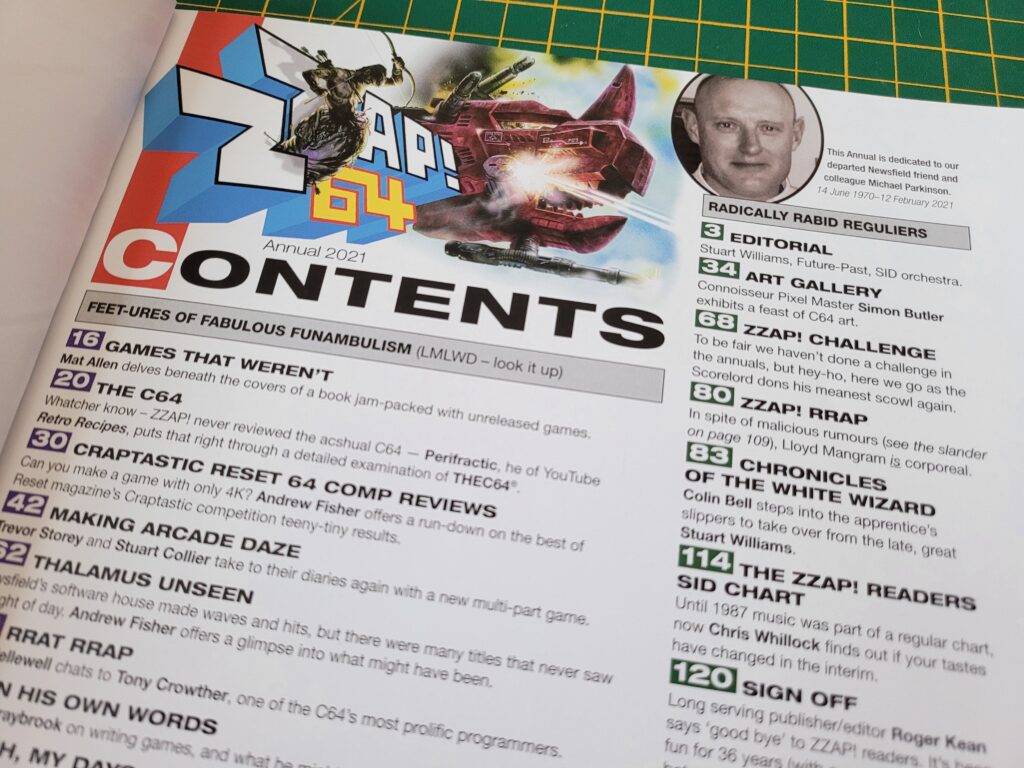
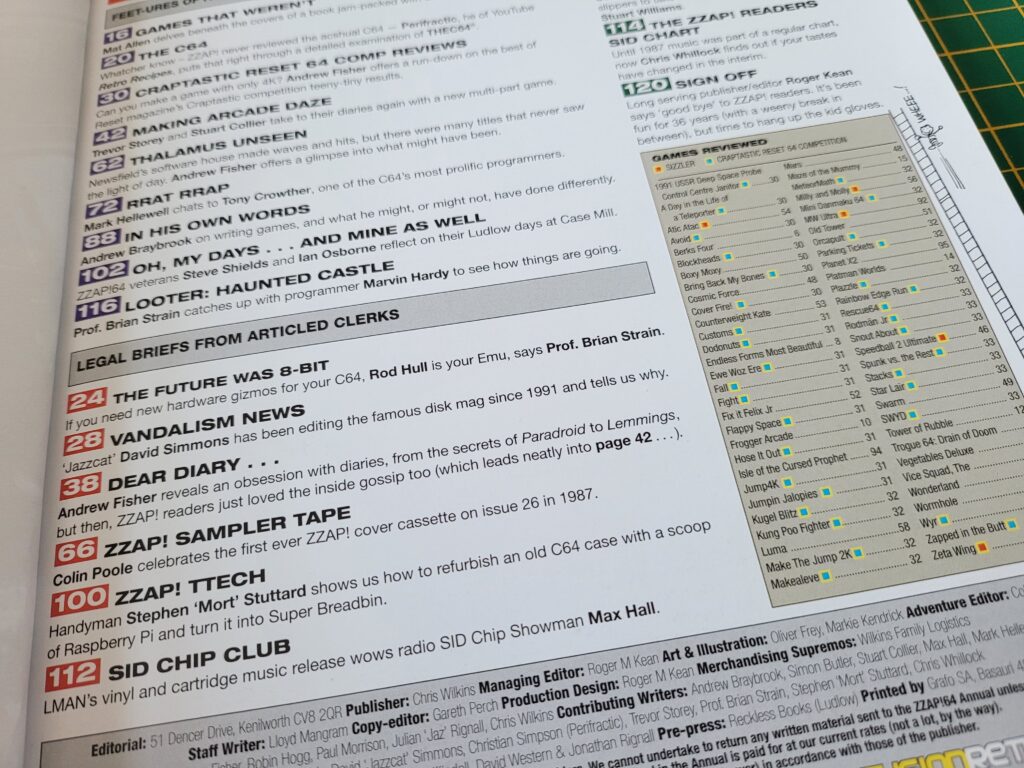
Below is a little peek at the contents page giving you an idea of exactly what’s inside the annual.


Zzap 64 2021 Annual

Zzap! 64 2020 Annual Contents Page


A few of the many contributors this year include Andrew Braybrook, Stuart Collier, Perifratic and Trevor Storey.


Zzap 64 2021 Annual

Zzap! 64 2020 Annual Contents Page


Most of the Zzap! 64 magazine regular features like Zzap! Rrap and the White Wizard can be found within the annual and are given plenty of space to shine. There are also dozens and dozens of game reviews covering pretty much every new game that has been released over the last 12 months for the C64.


Zzap 64 2021 Annual

Another example of the amazing Artwork of Oliver Frey.


The hardback A4 annual has 120 full colour pages all packed with interesting articles, reviews and artwork.

Here’s a tiny selection of random pages from the annual to give you an idea of what it contains.


This slideshow requires JavaScript.


Rounding off

There’s certainly enough content in this annual to keep any C64 fan quiet for a very long time. I reckon it makes a superb collectors item; chronicling the last twelve months of the C64 scene. I’ve bought every one of this new run of annuals since it started back in 2019 and I sincerely hope they continue being produced for a long time to come too.

The Zzap 64 2021 Annual is available directly from the Fusion Retro Books website for £15. You can save 15% by using the code ‘LYONSDENBLOG’ at the checkout making it even more of a bargain!

Getting an A1200 Online Part 4 – Installing an Amiga Email Client

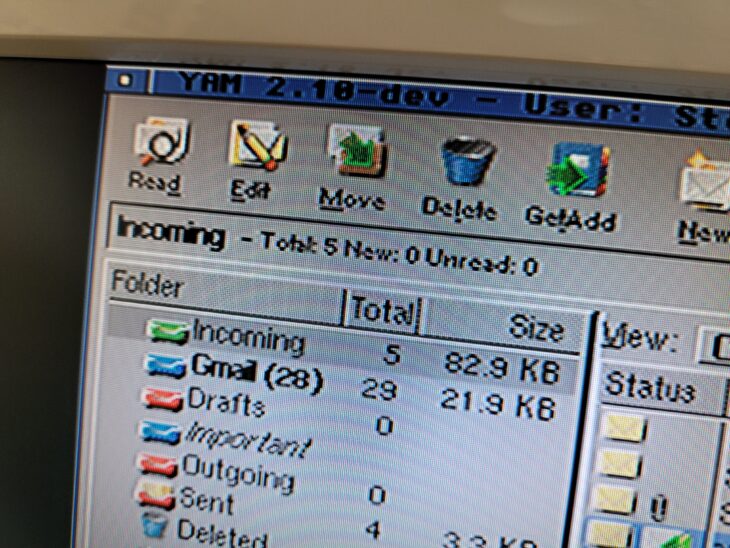
YAM Email on Amiga.,

Installing an Amiga Email Client (How to access Gmail on the Amiga in 2021)

In Parts 1, 2 and 3 we installed a network card, a TCP/IP stack, connected to the Internet and installed a web browser. In this part we’ll add another essential Internet tool to our Amiga 1200 – an email client.

This guide has taken me a lot longer to piece together than I expected because, well quite frankly accessing email on a classic Amiga is a minefield now. A few years ago I did a similar project getting my Amiga 500 with a Vampire accelerator to access IMAP emails with SimpleMail and it worked great. If you are interested you can read about it here. However trying to replicate that again in 2021 I discovered it just doesn’t work any more. SimpleMail hasn’t been updated for two and a half years now and trying to access anything via SSL results in it crashing out. AmiSSL was at version 4.1 when I set it all up last time, now it’s just hit v4.9. I’m guessing the two just don’t play nice together any more. IBrowse 2.5.3 needs the newer version of AmiSSL to function so I needed to find a solution that worked with that too.

So I thought, well OK if I can’t have IMAP at least I can still get Amiga email access via POP3 using good old YAM… So off I popped to Aminet to download the most recent version, 2.9p1, available here:

Aminet – comm/yam/YAM29p1-AmigaOS3.lha

I eagerly installed it… only to crash and burn as soon as I ran it because it was expecting AmiSSL 3.5. Any sort of secure POP3/SMTP access was immediately off the table and I was back to square one. I must admit I was starting to despair a little bit by this point. However I was determined to get email access on my miggy so I kept hunting for a solution and, eventually I found it.

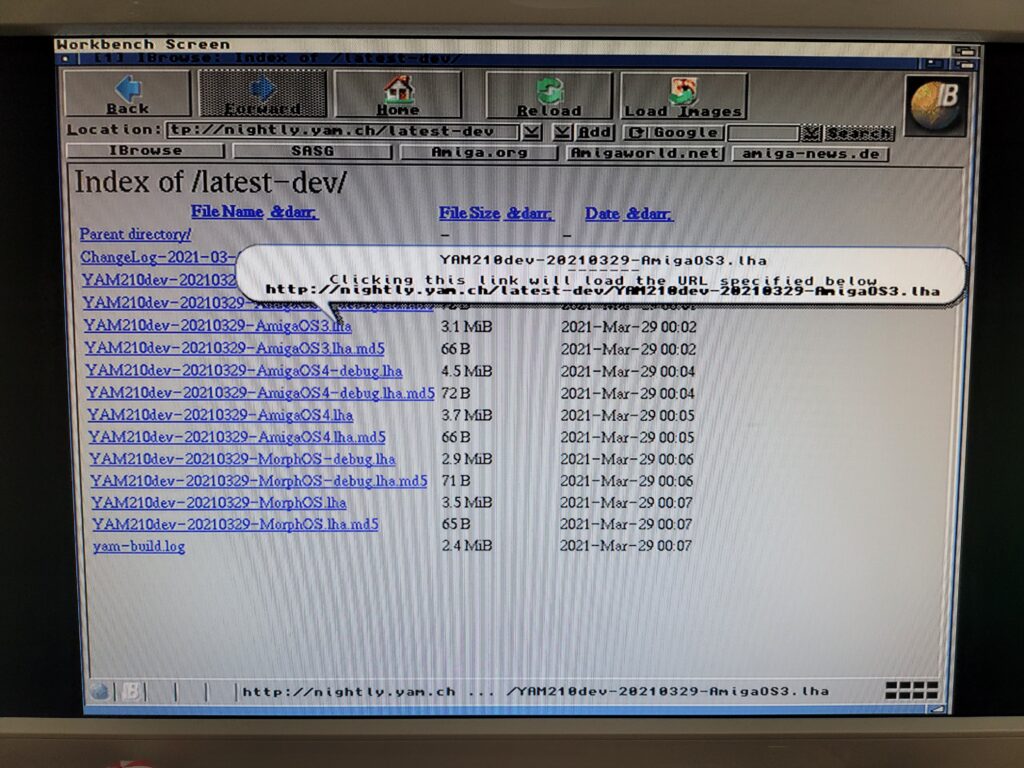
It turns out that YAM is actually still in active development and there was a new version released just last month! This new version is able to communicate with the new version of AmiSSL so I was back in business. Why they don’t publish it to Aminet I don’t know as that’s always been the first destination for Amigans looking for software. Anyway the latest version of YAM should always be available from the website below. At the time of me writing this article it’s at version 2.10 with a compiled date of 29th March 2021. I’m using AmiSSL 4.8 but over the course of doing this article I have since upgraded to 4.9 and everything still works perfectly. I just installed 4.9 over the top of 4.8.

Index of /latest-dev/ (yam.ch)
 

Amiga Email

Latest YAM ‘nightly’ build (actually more like monthly).


Installing YAM

OK before we get started there are a few pre-requisites that need to be considered before we attempt to get email on our Amiga.

Like most decent software on the Amiga, YAM requires MUI to be installed in order to function. It should also go without saying after my introduction that AmiSSL needs to be installed too. If you have followed the previous guides and got IBrowse up and running then you are good to go already. If not, head back to part 3 and install them first.

Also I’m not going to do a blow by blow account of how to install it. If you’ve been following along then you should be familiar with how to install programs on the Amiga by now. There are no surprises lurking within the installation. Besides, this article is long enough already!
 

Amiga Email

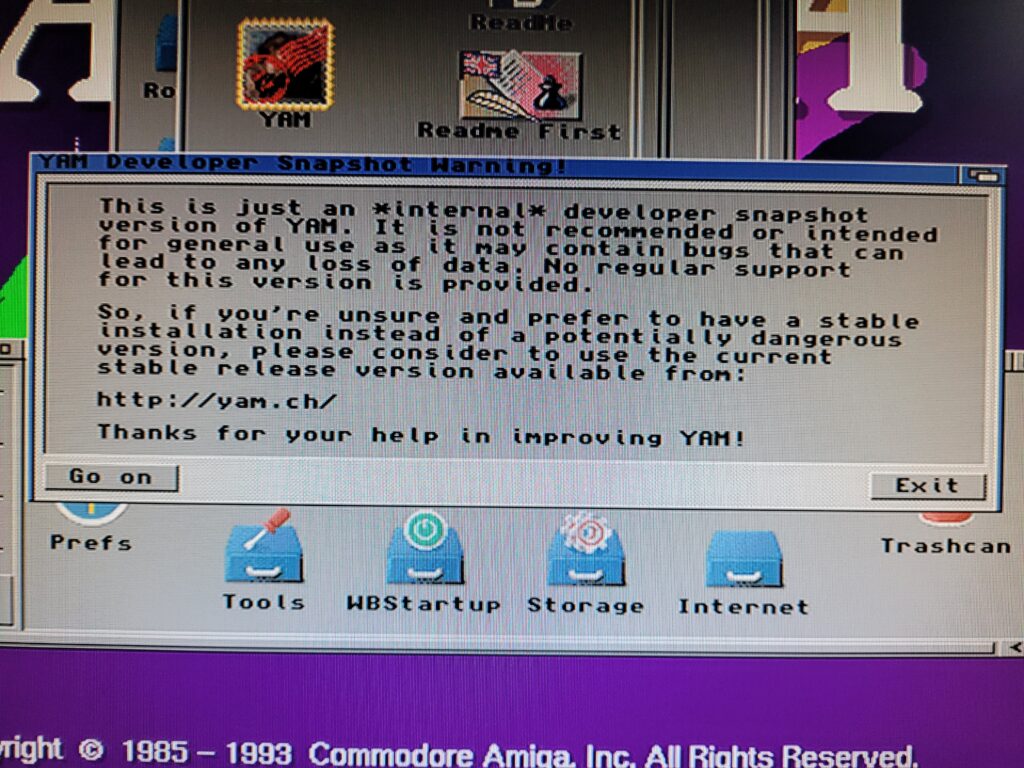
A warning that this is a developer version.


Because this is classed as a ‘developer build’ a little nag box pops up each time you run YAM. It warns about it not being for general use and that it may contain bugs but it’s perfectly safe (and stable) to use.

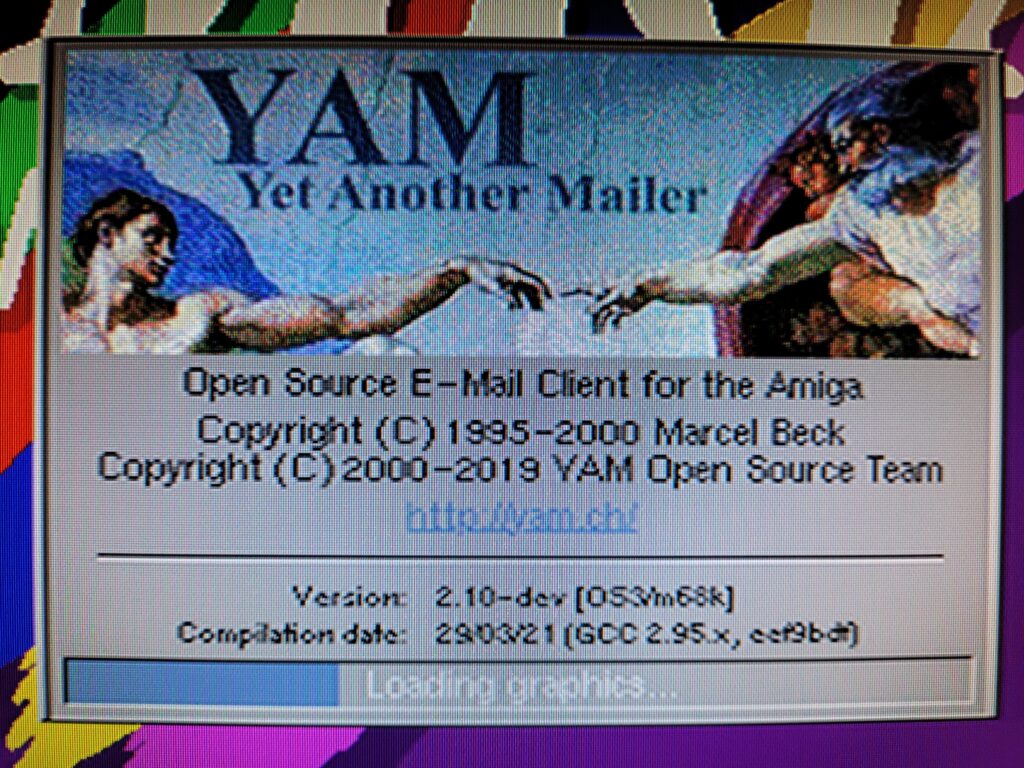
YAM does take a little while to load, even more so the very first time you run it. All being well you should see a nice splash screen like the one below with a handy progress bar.
 

Amiga Email

The YAM Splash screen.


After around 60 seconds YAM should have finished loading and you can begin the process of configuring the program to get your emails.

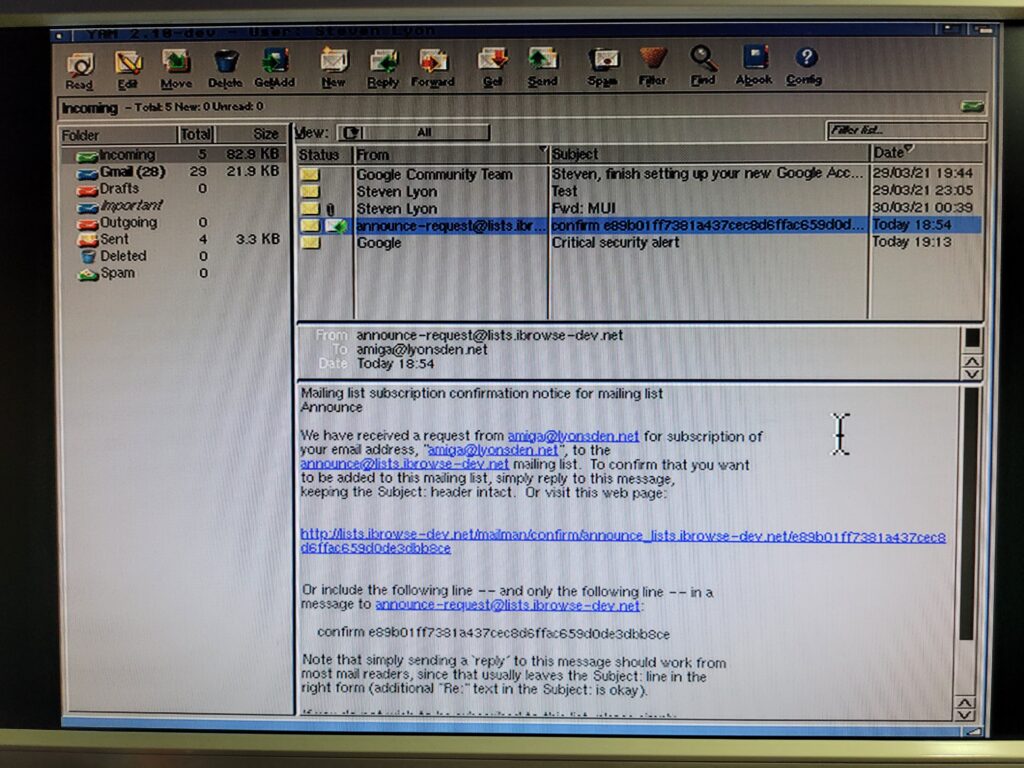
The program screen should look similar to the image below. Please bear in mind that I had already configured a couple of email accounts and tweaked some of the GUI settings before taking this photo.
 

Amiga Email

The main YAM interface.


I have tested this out with Gmail and the mail service provided by my hosting company and had great success with both. I’d imagine that it should work with most POP3 mail services provided you are able to adapt the instructions below to fit your circumstances.


Want to use a Gmail account for your Amiga email? STOP now!

To get this working with Gmail there are a number of things we need to configure within Gmail itself before trying to access it on your Amiga. If you fail to do this it just won’t work at all. You have been warned!


Amiga email – IMAP v POP

Gmail normally uses IMAP to deliver your email to your devices. This is perfect as the mail stays on their server and you can check it from as many different devices as you like. If you delete an email on one device it will vanish on them all. POP works differently in that when you connect the messages are downloaded from the server and onto your device. They are normally then erased from the server. If you try to access your mail from another device there wouldn’t be anything there. There are steps that can be taken to mitigate the limitations of POP but the bottom line is ‘IMAP is better’.

OK, so now you are aware of the compromise we’re making by using POP rather than IMAP there are some configuration changes we must make to Gmail. Once more some compromises need to be made to make this work which I will explain shortly.


Enable POP Access in Gmail

By default Gmail does not support POP access. This is a feature that must be manually turned on. To do so follow the instructions below:

1. Click on the cog in the top right hand corner of the screen.

2. Click on ‘See all settings’.
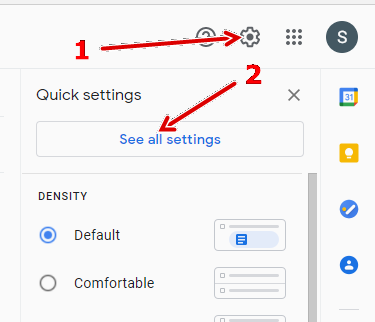
 

How to enable POP access in Gmail.

How to enable POP access in Gmail.


3. Click on ‘Forwarding and POP/IMAP’.

4. Click on ‘Enable POP for all mail’. If you are trying to access an existing account the chances are you have a ton of emails that you might not want/need to download to your Amiga. If this is the case click ‘Enable POP for mail that arrives from now on’.
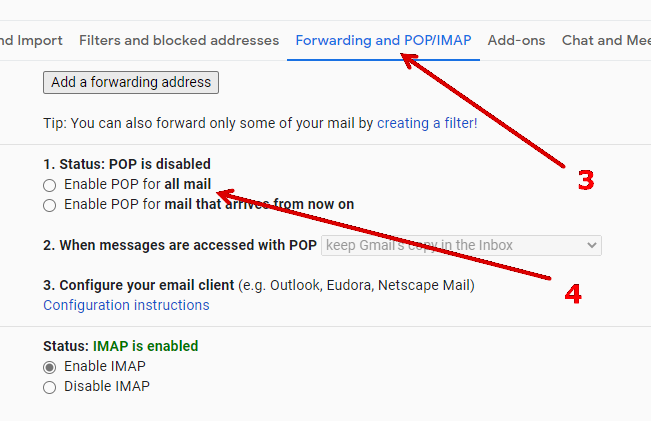
 

How to enable POP access in Gmail.

How to enable POP access in Gmail.

5. Select ‘archive Gmail’s copy’ next to ‘When messages are accessed with POP’. This will safely archive a copy of all the emails you download to your Amiga just in case you need to get them back at some point in the future. There are a few other options that you could choose here, this is just my preference.

6. Select ‘Disable IMAP’. Not strictly necessary as the two are mutually exclusive so even if you don’t disable it yourself Google will when you save the settings.

7. Click ‘Save changes’.
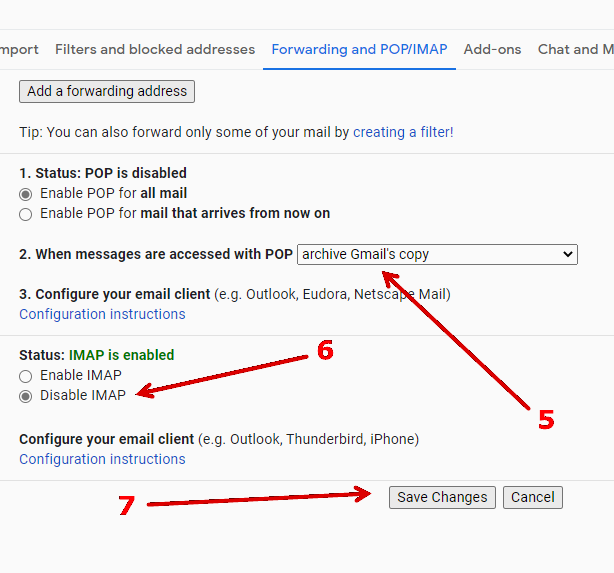
 

How to enable POP access in Gmail.

How to enable POP access in Gmail.


That takes care of enabling POP access and also what happens to your emails after you’ve downloaded them to your Amiga. However we’re still not done yet as there’s a few more security related settings that we need to tweak before Google will allow our decades old machine to talk to their servers!


Compromises

Remember when I mentioned about more compromises? Well this is where we have to make some more. You see in order to make their email service more secure, a few years ago Google introduced a new feature whereby ‘Less Secure Apps’ are blocked from connecting to their servers. Of course you’ve guessed it, our humble Amiga is most definitely classed as ‘less secure’.

There are a couple of ways around this problem, a quick and dirty way and a more involved but more secure way. Whichever method you choose is up to you. If you are using a dedicated Amiga Gmail account then the quick and dirty method should be fine. However if you are wanting to access your main Gmail account then I would recommend the second method. Also, if you happen to be using 2-factor authentication then you have no choice but to use the second method so skip right to that section now as you’ve already done the hardest part!

Basically if you’re here just to experiment or have a play around for nostalgias sake then create yourself a new Gmail account just for this purpose and choose the quick and dirty method. That way it doesn’t really matter one way or the other as the account will have nothing important stored on it. Likewise if you know what you are doing and can accept the calculated risk you can choose quick and dirty too – after all that’s how we rolled back in the 1990’s! Having said all that I recommend the second method.  The choice, as they say, is yours.

Quick & Dirty Method

OK the quick solution is to go back into Gmail settings by:

1. Clicking on the cog in the top right hand corner of the screen.

2. Then clicking on ‘See all settings’.


How to enable 'Less secure apps' in Gmail.

How to enable ‘Less secure apps’ in Gmail.


3. Click ‘Accounts and Import’.

4. Click ‘Other Google Account settings’.
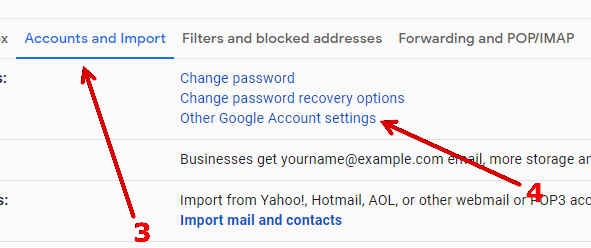
 

How to enable 'Less secure apps' in Gmail.

How to enable ‘Less secure apps’ in Gmail.


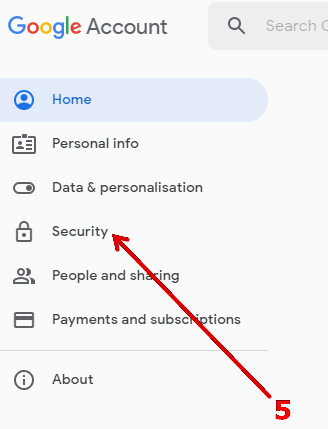
5. On the next screen click ‘Security’.
 

How to enable 'Less secure apps' in Gmail.

How to enable ‘Less secure apps’ in Gmail.


6. Now scroll down until you see the ‘Less secure app access’ section and click ‘Turn on access (not recommended)’.


How to enable 'Less secure apps' in Gmail.

How to enable ‘Less secure apps’ in Gmail.


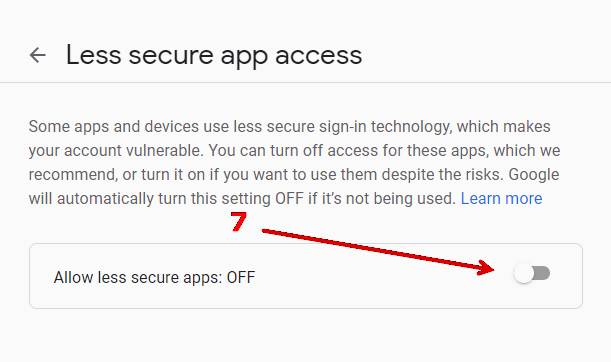
7. Another warning will appear – you must click the little slider to allow less secure apps.
 

How to enable 'Less secure apps' in Gmail.

How to enable ‘Less secure apps’ in Gmail.


And that’s it for the quick and dirty method, you will get a ‘Critical Security Alert’ warning email off Google but you can ignore it as the change was made by yourself. You’re now free to skip ahead to the YAM Configuration section and start accessing your mails.


Safer Method to get around the ‘Less Secure Apps’ Issue

This method is much safer in the long run but requires extra setup and will add an extra level of complexity to logging into your Gmail account in the future from any device. This method entails enabling 2-factor authentication and then creating an ‘App password’ just for your Amiga to use. It’s something I have enabled on all my online accounts from Amazon right through to Zoho and I would recommend you enable it too. It’s probably one of the best methods of protecting your online accounts against intrusion there is right now.


Enable 2-Factor Authentication on Gmail

Head back into Gmail settings by:

1. Clicking on the cog in the top right hand corner of the screen.

2. Then clicking on ‘See all settings’.


How to enable '2-step verification' in Gmail.

How to enable ‘2-step verification’ in Gmail.


3. Click ‘Accounts and Import’.

4. Click ‘Other Google Account settings’.


How to enable '2-step verification' in Gmail.

How to enable ‘2-step verification’ in Gmail.


5. On the next screen click ‘Security’.


How to enable '2-step verification' in Gmail.

How to enable ‘2-step verification’ in Gmail.


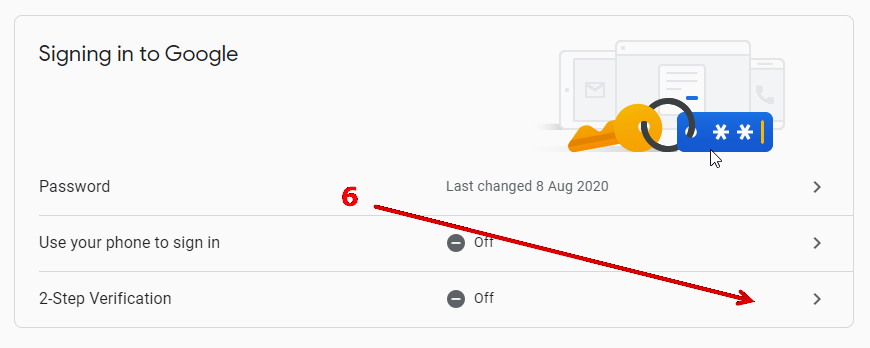
6. Now scroll down until you see the ‘Signing in to Google’ section and click ‘2-Step Verification’.
 

How to enable '2-step verification' in Gmail.

How to enable ‘2-step verification’ in Gmail.


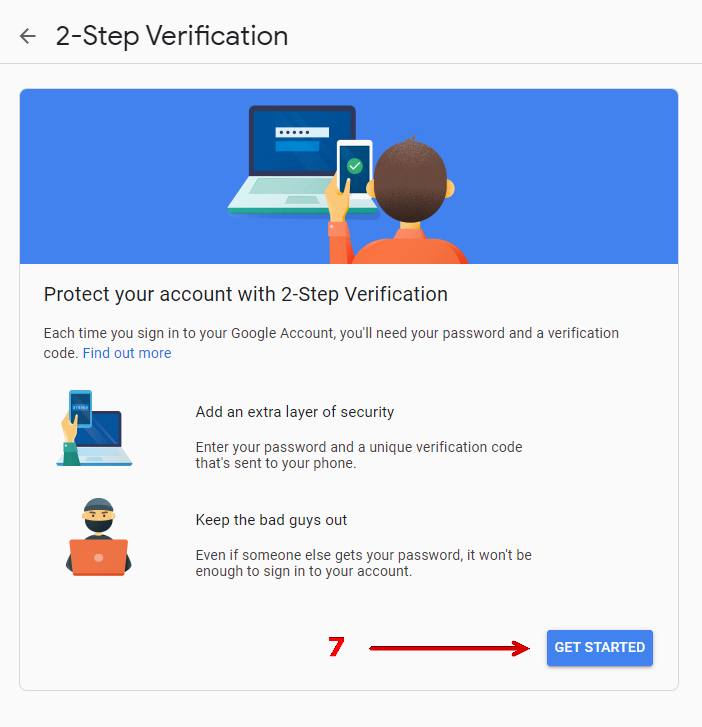
7. Click ‘Get Started’ on the next screen.
 

How to enable '2-step verification' in Gmail.

How to enable ‘2-step verification’ in Gmail.


8. On the next screen enter your mobile phone number.

9. Then click ‘Next’.
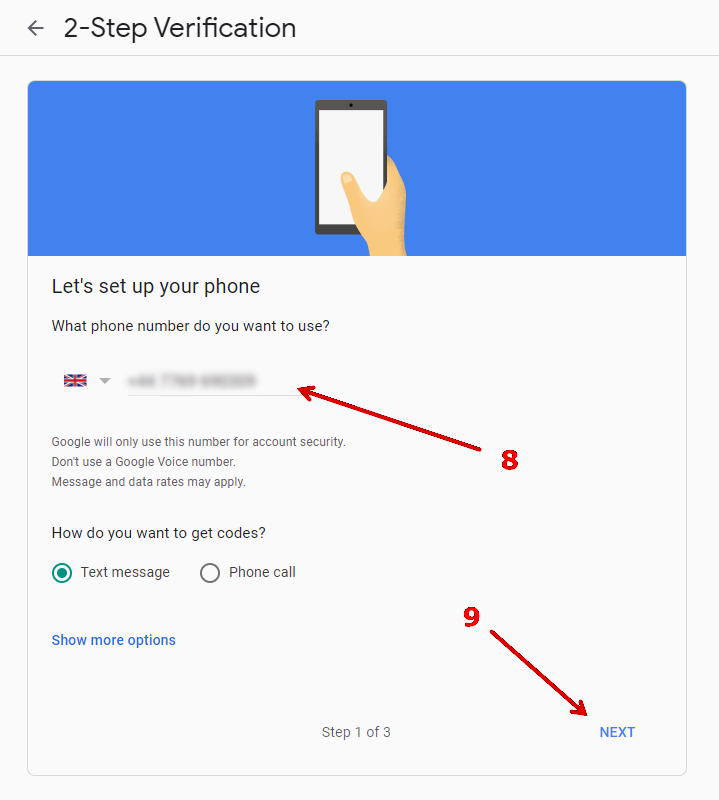
 

How to enable '2-step verification' in Gmail.

How to enable ‘2-step verification’ in Gmail.


10. You will now be sent a code via text message to your phone. Enter this code where specified on screen. This is what ensures the security of your account. In future you won’t be able to login without entering the correct code (which changes every time).

11. Click ‘Next’ to continue.
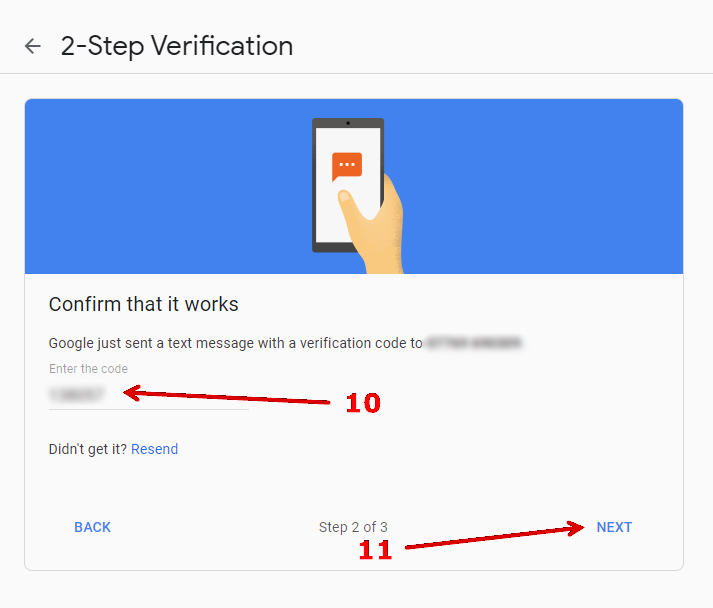
 

How to enable '2-step verification' in Gmail.

How to enable ‘2-step verification’ in Gmail.


12. Provided you entered the correct code in step 10 then you should receive confirmation that it worked. You should now click on ‘Turn On’ to enable 2-step verification.
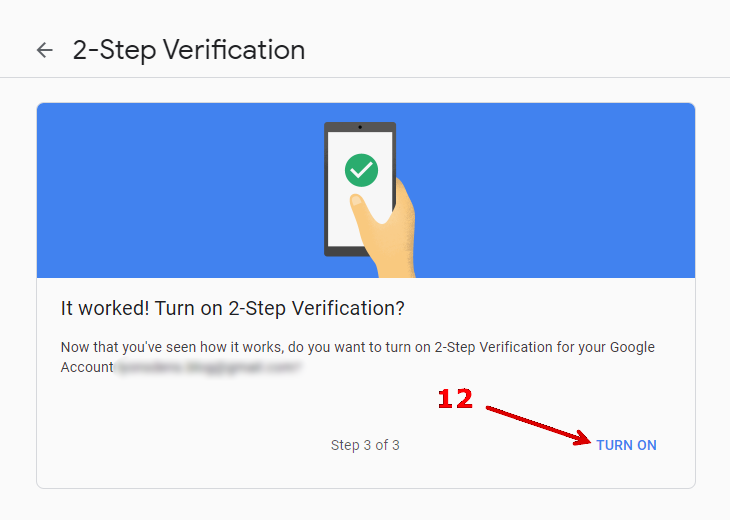
 

How to enable '2-step verification' in Gmail.

How to enable ‘2-step verification’ in Gmail.


13. You should be greeted with confirmation that 2-step verification is now ‘ON’ on the next screen.  At some point you may want to revisit this section as there are a whole bunch of additional ways to provide the 2-step verification if you scroll down. However for now we’re good to go so click the ‘back’ button (left arrow) to go back to the Security screen ready to create your App password.
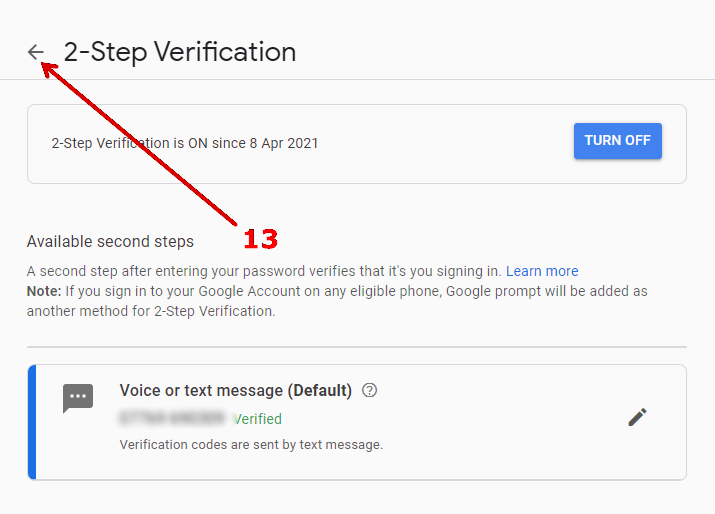
 

How to enable '2-step verification' in Gmail.

How to enable ‘2-step verification’ in Gmail.


Congrats – you’ve successfully got 2-factor authentication working – now you need to configure your ‘app password’.


Creating an Amiga email ‘App Password’

Follow these instructions to create a unique password especially for your Amiga to access your Gmail account. By the way, if you’ve just enabled 2-step verification following the guide above then you should already be on the correct screen so can skip to step 6 below, otherwise start at step 1.


1. Clicking on the cog in the top right hand corner of the screen.

2. Then clicking on ‘See all settings’.


How to create an 'app password' in Gmail.

How to create an ‘app password’ in Gmail.


3. Click ‘Accounts and Import’.

4. Click ‘Other Google Account settings’.


How to create an 'app password' in Gmail.

How to create an ‘app password’ in Gmail.


5. On the next screen click ‘Security’.


How to create an 'app password' in Gmail.

How to create an ‘app password’ in Gmail.


6. Now scroll down until you see the ‘Signing in to Google’ section and click ‘App passwords’.
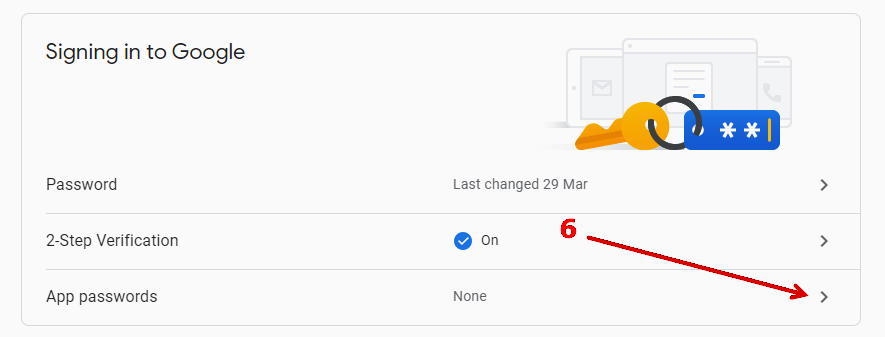
 

How to create an 'app password' in Gmail.

How to create an ‘app password’ in Gmail.


7. It will ask for your password so enter it and then click ‘Next’ to continue.
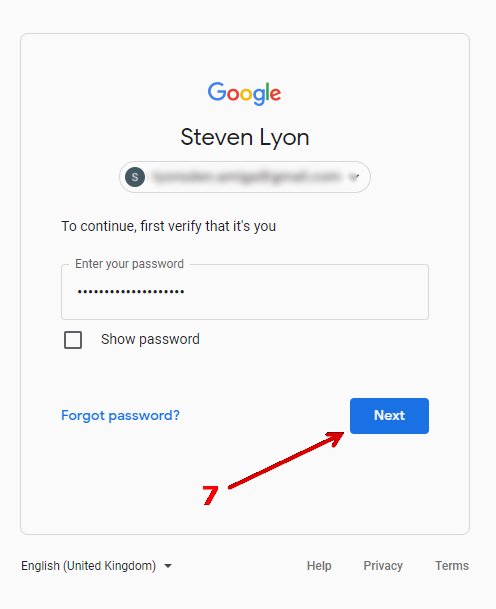
 

How to create an 'app password' in Gmail.

How to create an ‘app password’ in Gmail.


8. You should now see the ‘App passwords’ dialogue. Select ‘Mail’ from the drop-down menu where it says ‘Select app’. This means that the password only grants access to email on your account – nothing else.

9. Then select ‘Other (Custom Name)’ from the ‘Select device’ drop-down menu.
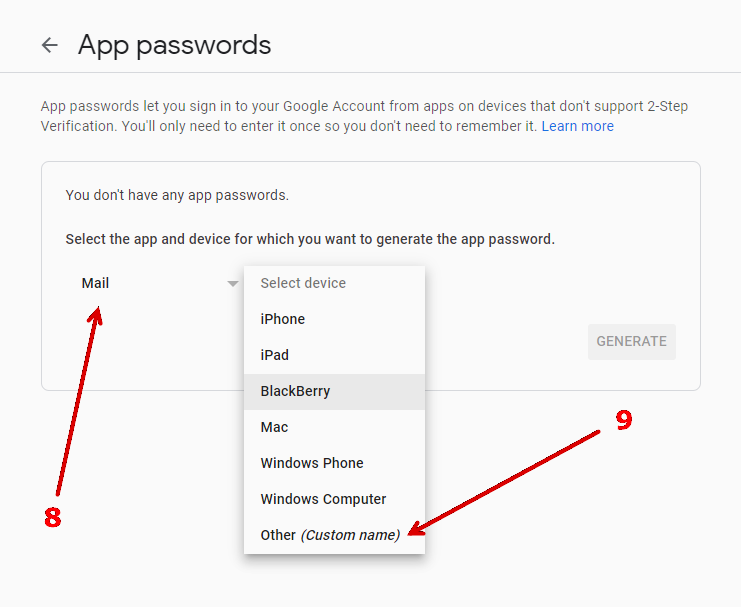
 

How to create an 'app password' in Gmail.

How to create an ‘app password’ in Gmail.


10. Give the device a name. I chose ‘Amiga Mail’ but you can use pretty much anything you like here.

11. Click ‘Generate’ when ready to have Google create your app password for you.
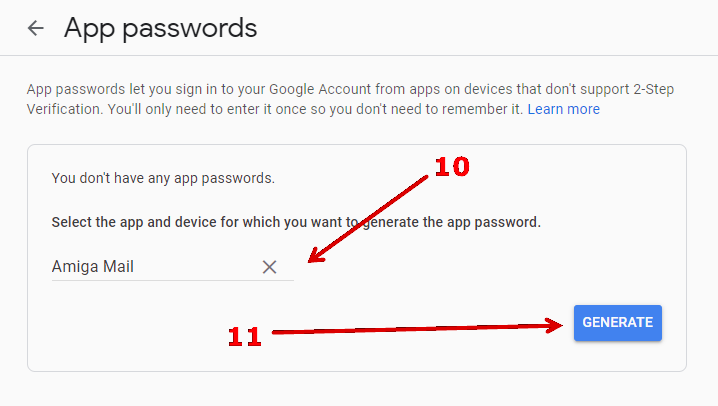
 

Amiga Email

How to create an ‘app password’ in Gmail.


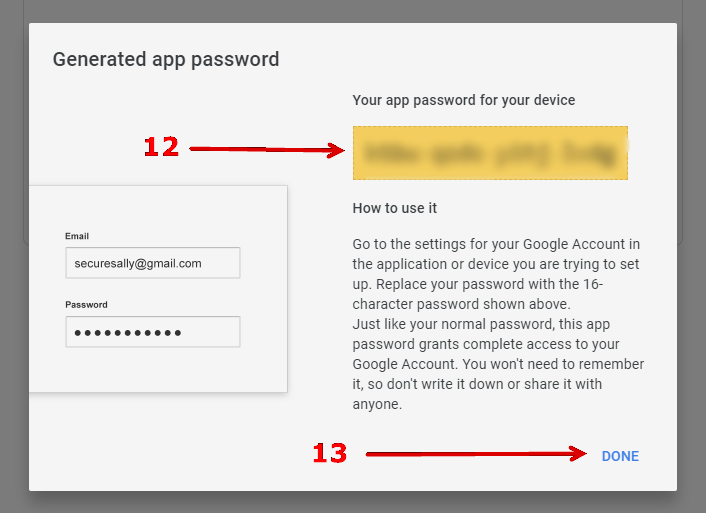
12. A window should now pop up with your new Amiga email App password. Make a note of it as you will need it when you configure YAM and you will never be able to view it again once you move onto the next step!

13. Click ‘Done’ when ready.
 

Amiga Email

Our Amiga email ‘app password’.


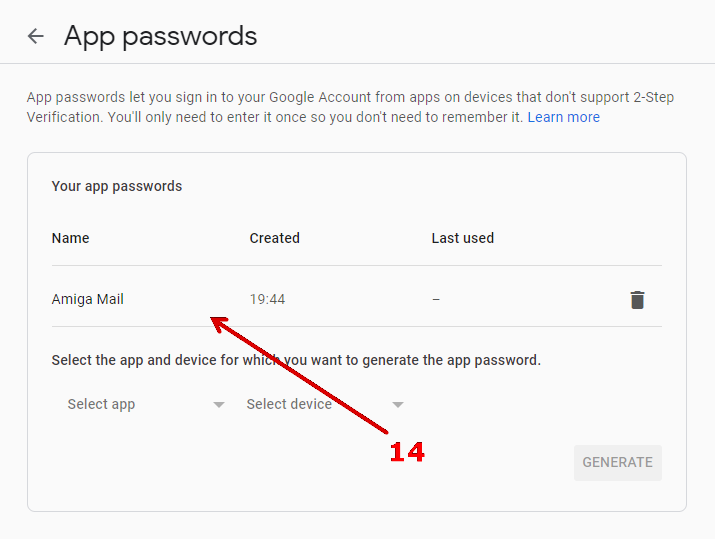
14. You should now be back on the ‘App passwords’ screen where your new Amiga email password should be listed. If at any point in the future you need to revoke access to your Amiga then you can delete this password from here.
 

How to create an 'app password' in Gmail.

How to create an ‘app password’ in Gmail.


Now at long last you we’re ready to move back over to the Amiga to configure YAM.


Configuring YAM to connect to your Amiga email Provider

POP3 (Receive) Settings

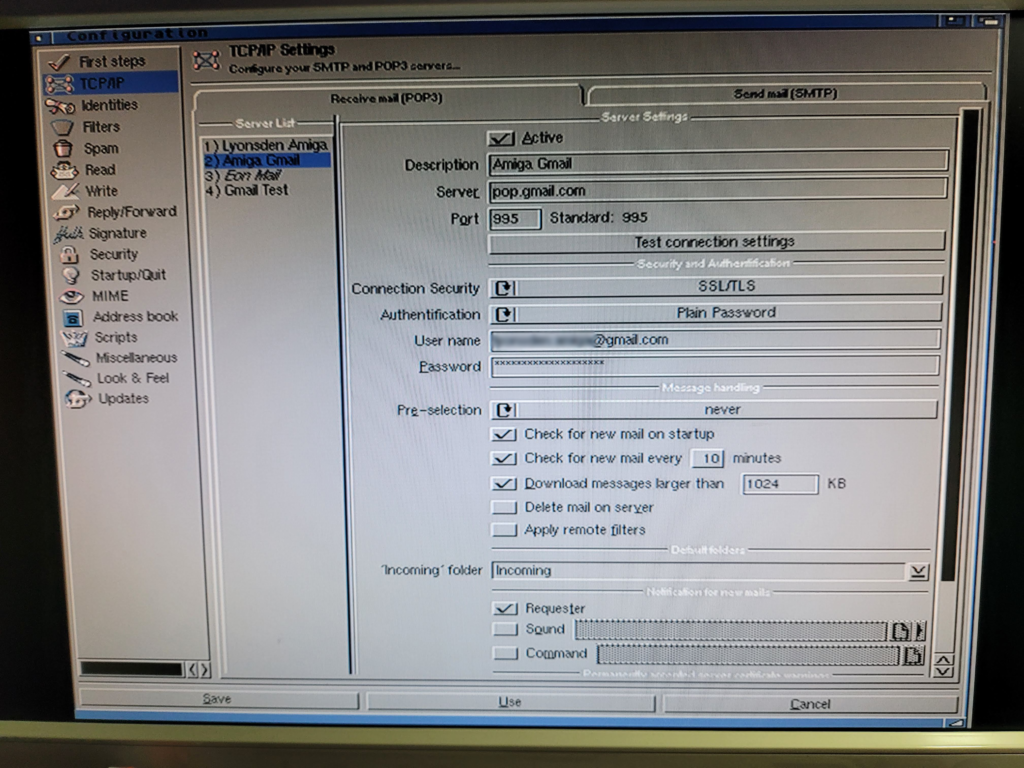
To access the POP and SMTP settings screen click the ‘Config’ icon on the toolbar. It’s the last icon on the right with a question mark on it. The configuration screen should pop up after a few seconds. It’s a little sluggish so give it a moment before you start trying to choose a category to work on.
 

Amiga email

The YAM POP3 settings screen.


We need the TCP/IP section so click on that. For the remainder of this section I am going to assume that you are using Gmail and I will provide the settings required to get that working. Of course if you are using another provider then feel free to enter the settings required for your service.

Now enter the following information into the POP3 Server Settings section.


  • Active – Tick the box.
  • Description – ‘Amiga Gmail’ (though it can be anything you want).
  • Server – ‘pop.gmail.com’.
  • port – ‘995’.
  • Connection Security – SSL/TLS.
  • Authentication – Plain Password.
  • Username – Your full Gmail address (eg james.kirk@gmail.com).
  • Password – Your password.


The rest of the settings are down to personal preference and affect when and how often YAM will check for mail and whether you want it to delete emails on the server or not.

If you would like all your emails to be put into a specific folder when downloaded you can specify that in the ‘incoming folder’ section using the drop-down menu. By default all new messages will go into the ‘Inbox’ folder.

Once you are happy with your message handling settings, double check you have entered everything correctly and then click on ‘Test connection settings’.

This is the moment of truth when you will see if everything you’ve done so far has worked…

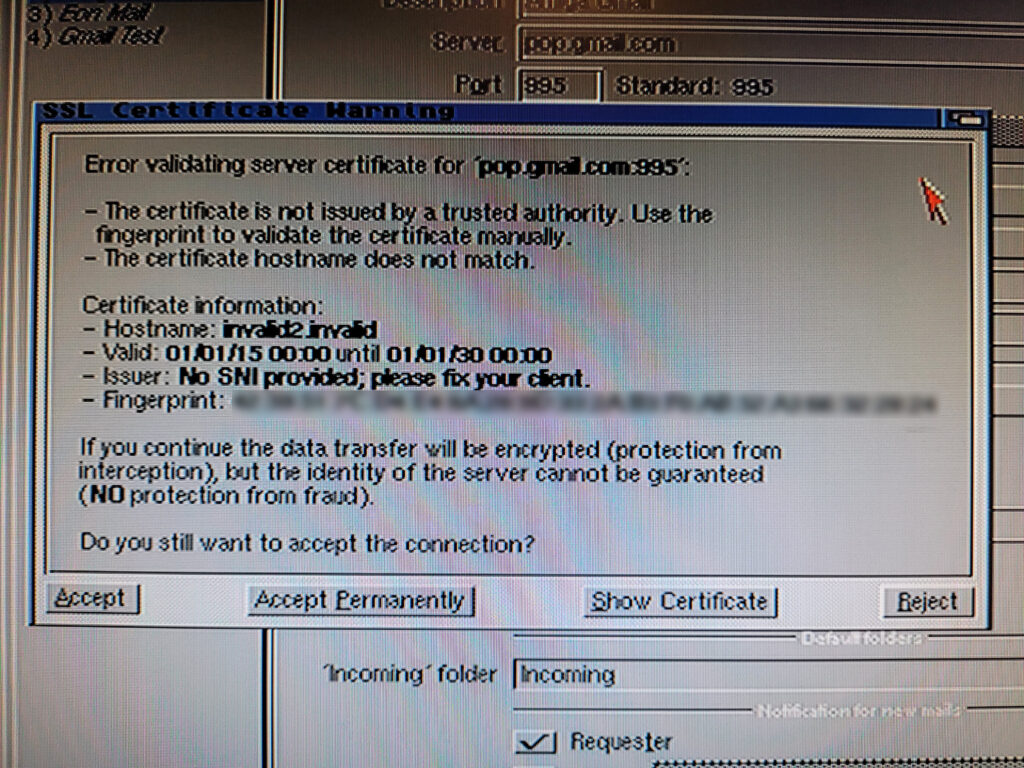
Be prepared to receive an SSL certificate warning as YAM doesn’t support SNI. This is not a major problem though as we can manually approve the certificate by clicking ‘Accept Permanently’.
 

Amiga email

Manually accepting the Gmail SSL certificate in YAM.


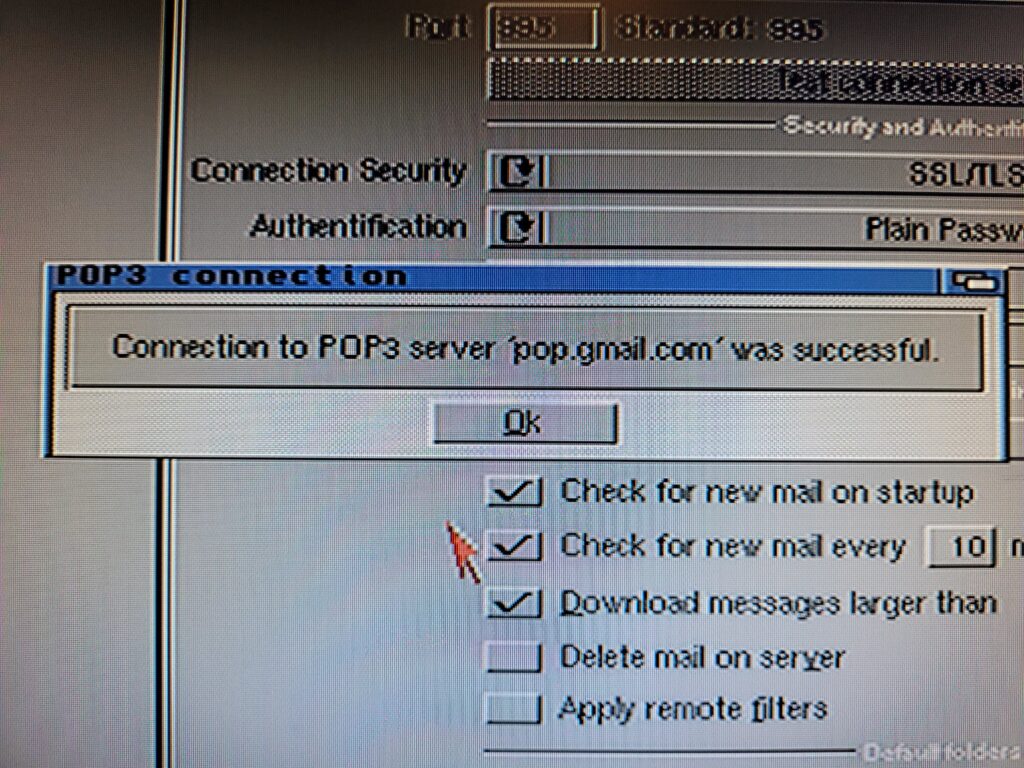
All being well you should get a very satisfying little message appear like the one below stating ‘Connection to POP3 server ‘pop.gmail.com’ was successful.
 

Amiga email

Successfully connected to Gmails POP3 server.


SMTP (Send) Settings

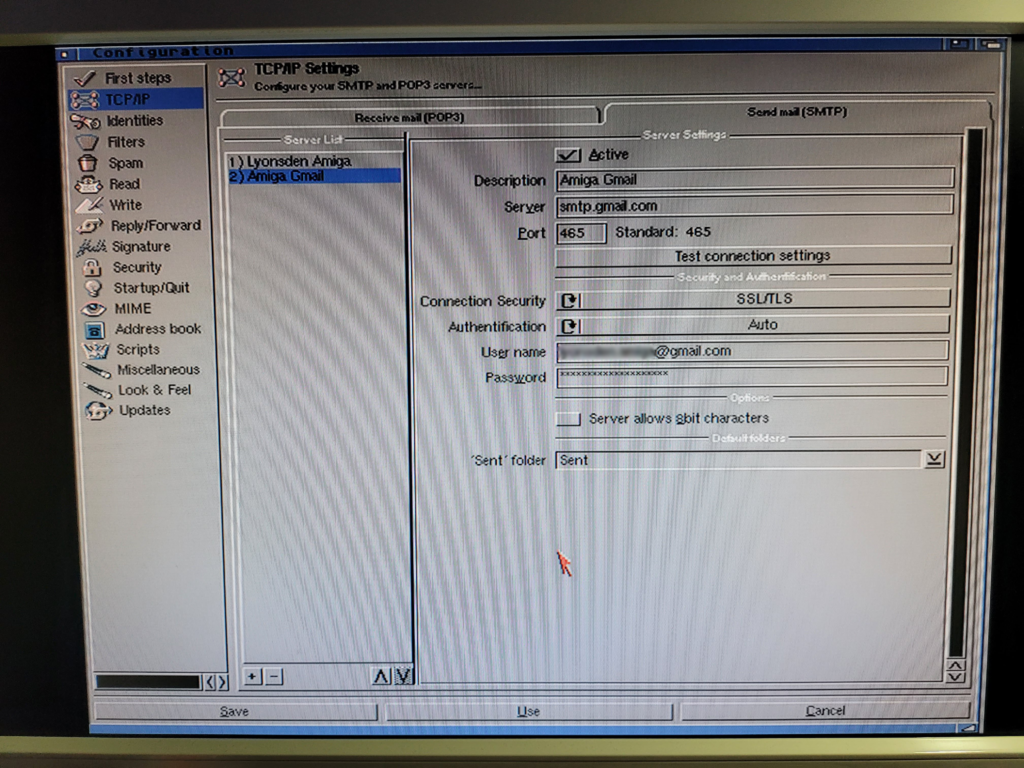
With POP3 configured to receive emails it’s now time to set up SMTP so we can send emails too. To reach the SMTP settings simply click on the ‘Send mail (SMTP)’ tab.
 

Amiga email

YAM’s SMTP configuration screen.


Enter the following information into the SMTP Server Settings section.

  • Active – Tick the box.
  • Description – ‘Amiga Gmail’ (though it can be anything you want).
  • Server – ‘smtp.gmail.com’.
  • port – ‘465’.
  • Connection Security – SSL/TLS.
  • Authentication – Auto.
  • Username – Your full Gmail address (eg james.kirk@gmail.com).
  • Password – Your password.

If you would like all your sent Gmail messages to be put into a specific folder you can specify that in the ‘Sent folder’ section using the drop-down menu.

As before double check you have entered everything correctly and then click on ‘test connection settings’.

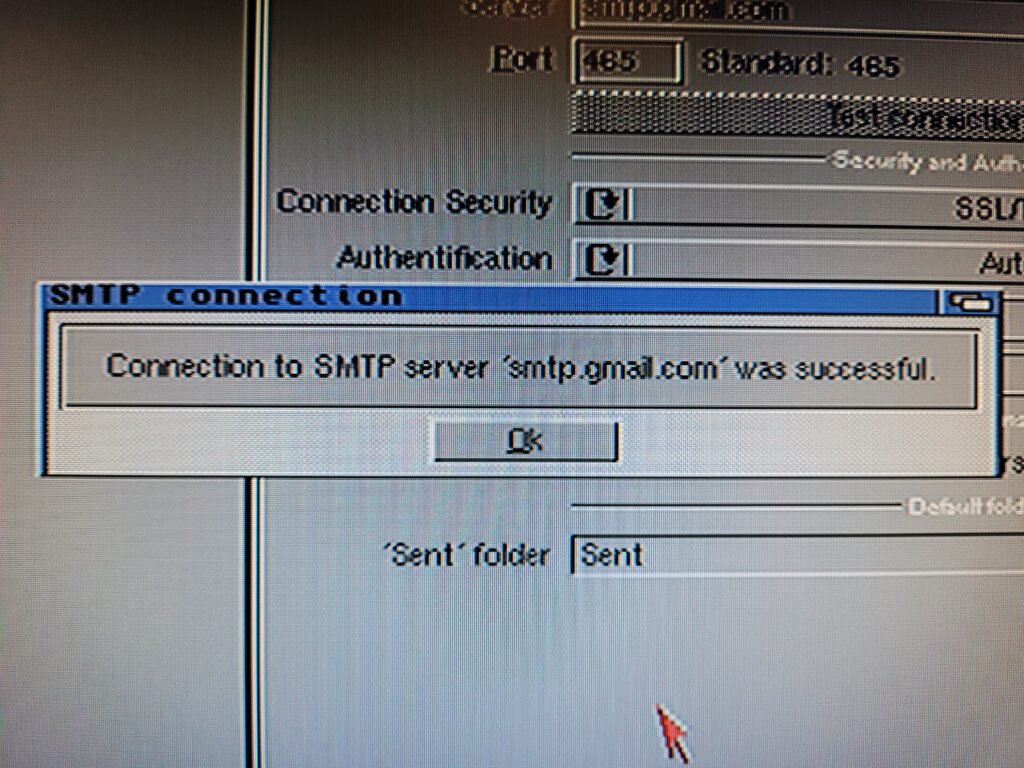
With a bit of luck you should get a message confirming that ‘Connection to SMTP server ‘smtp.gmail.com’ was successful.

Congratulations – you’ve successfully configured YAM to work with Gmail/your email provider, enjoy!
 

Amiga email

Successfully connected to Gmails SMTP server.


Tying up a few loose ends on our Amiga email project


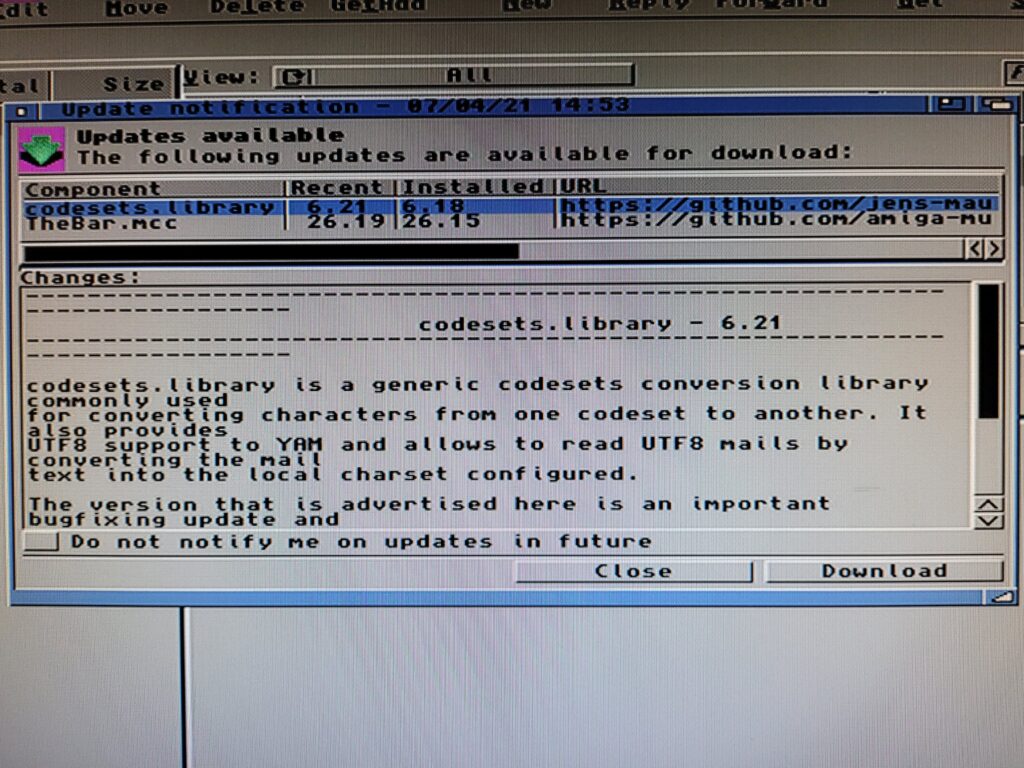
YAM features a built in software updater that checks for updated dependencies periodically. It successfully informed me about two packages that needed updating the first time I ran the program but unfortunately it seemed unable to download either of them.
 

Amiga email

YAM’s automatic updater window.


Needless to say the OCD in me had to sort this out. Couldn’t be running a program knowing there are updates available – no matter how trivial the may be! Happily I was able to locate both of the updated packages on Aminet.

TheBar.mcc is available here: Aminet – dev/mui/MCC_TheBar. This version is actually slightly newer than the version reported in the updater.
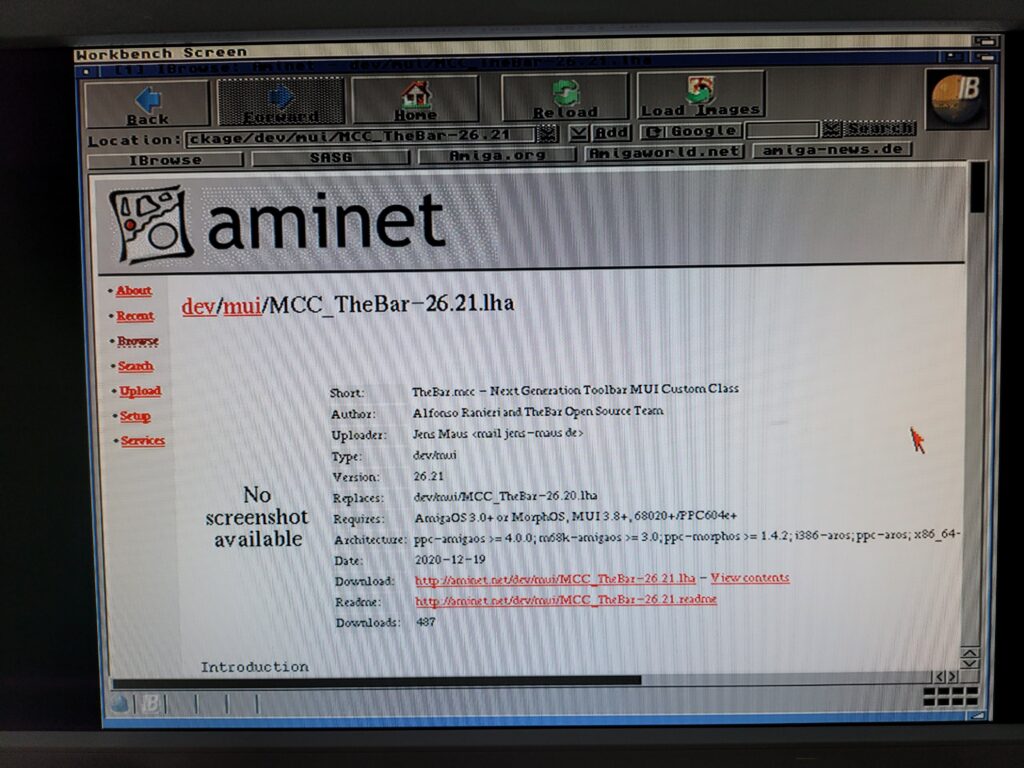


Amiga Email

Where to find TheBar on Aminet.


Whilst codesets.library is available here: Aminet – util/libs/codesets-6.21.lha
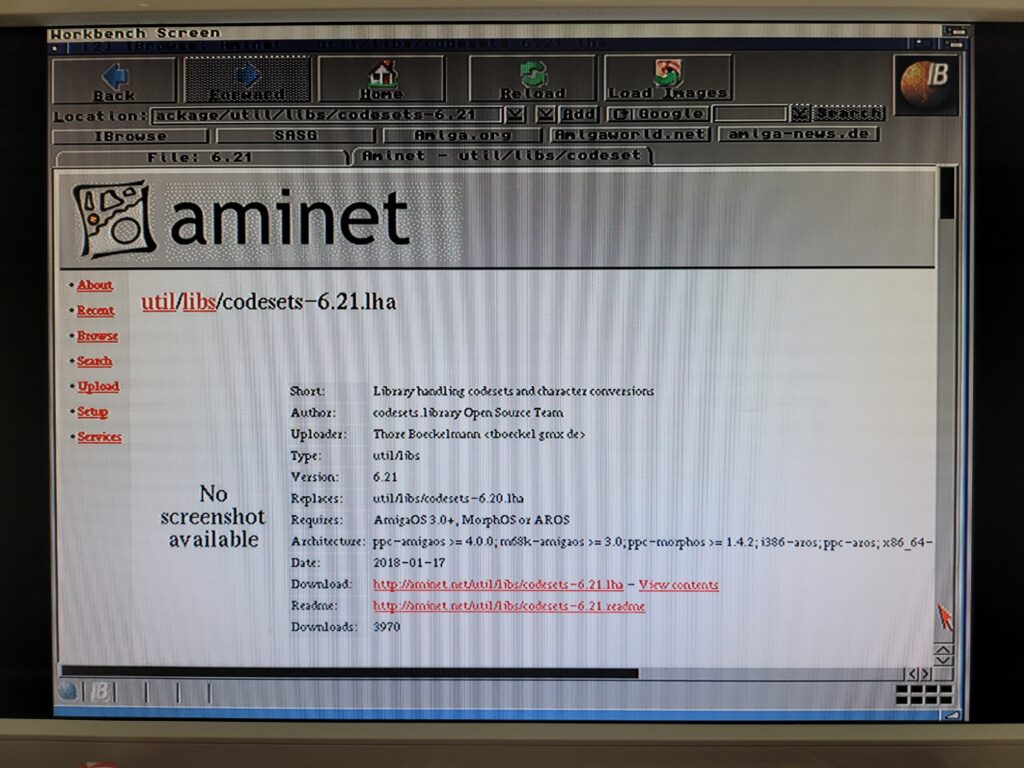
 

Amiga Email

Where to find codesets.library on Aminet.


They both had installers and were very straightforward to install. The Amiga needs a reboot before the new libraries can be accessed by YAM. So after dutifully rebooting my Amiga I ran the updater again and was greeted by a reassuring ‘no software updates available’ message. Happy days.
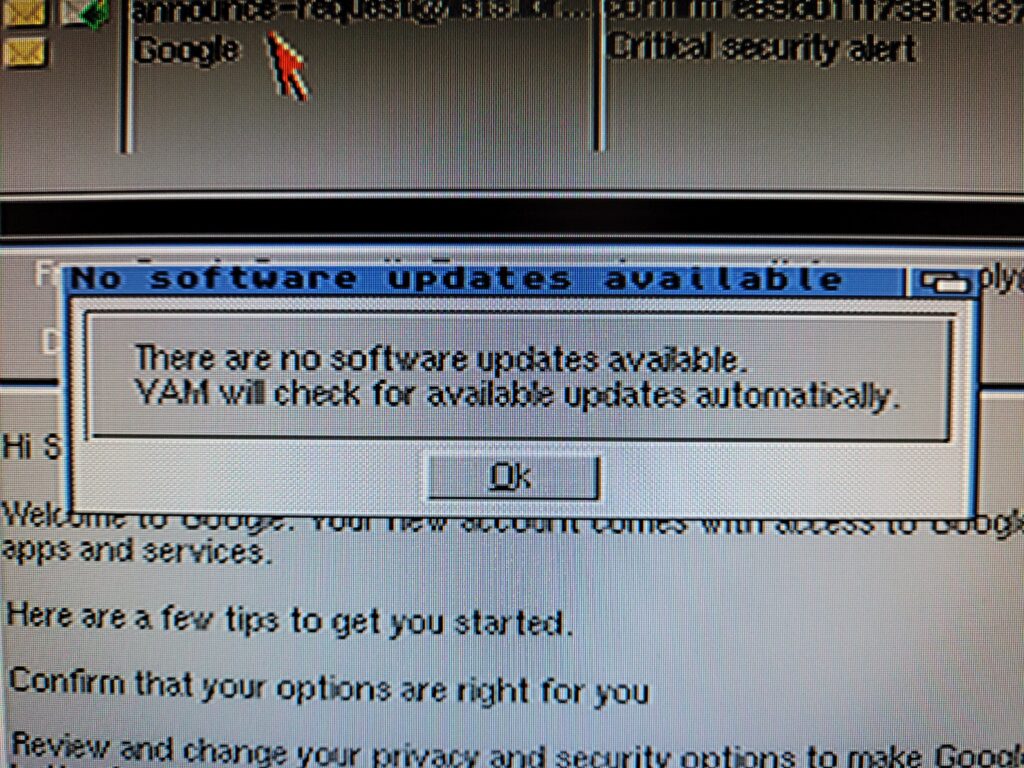
 

Amiga Email

Fully updated!


Obviously these files will be updated at some point in the future and the above links will stop working. However if you just search for the respective packages on Aminet without the version numbers there’s a very good chance you will find their newer incarnations.

Tweaks

I made the following tweaks to YAM in the ‘Look and Feel’ section of the configuration screen.

  • Changed the icons (there are a few sets to choose from) to the ones you see in the screenshots.
  • Turned off the fixed font size for viewing emails as I thought they looked terrible presented this way.
  • Reduced the size of some of the fonts used for various parts of the UI as the default size was too large to comfortably fit everything on screen.
  • Even after reducing the font size the toolbar icons didn’t fit and were truncated on the right hand side of the screen so I moved the icons across the top closer together to make sure they all fitted on the screen.

Mission accomplished! – There’s a tremendous amount of customisation on offer here that certainly puts a lot of modern mail software to shame. Windows 10 Mail app I’m talking about you!

Apart from being a little sluggish when opening up the config screen I found using YAM on the Amiga a delight. Pretty much everything you would expect from a modern mail package is available from spam filtering to mail filters. Very impressive for a free program running on 30 year old hardware!


Supporting YAM

Speaking of free, YAM has a homepage on Github here: https://github.com/jens-maus/yam and I would encourage you to visit it and maybe send them a PayPal donation if you appreciate their continued support of the Amiga. IMAP support is on their future ‘to do list’ and if you’d like to see that happen then let them know and support them in any way you can.


Rounding Off

And that concludes part 4 – Installing an Amiga email client. I hope you found it useful and easy enough to follow. It was quite a voyage of discovery for me but definitely a satisfying one by the end of it.

I realised by the time I had finished writing this that it had become more of a ‘how to get Gmail on the Amiga’ guide. This was never my intention when I started out – it was supposed to be a generic guide.  However there were so many things required to get Gmail working that I felt I should include them otherwise anyone following would hit a brick wall and give up. Mind you seeing as Gmail is by far the most popular email provider I suppose that may not be such a bad thing after all?

As new versions of YAM and AmiSSL come out I may update this article from time to time just to confirm everything still works… or not, as the case may be. Likewise if SimpleMail gets updated I’ll check that out and report back too.

I don’t think I’ll produce a ‘Part 5’ as I’ve covered the main features that one would expect to have for a ‘full’ online experience now. At some point I might do a separate article about connecting an Amiga to a local area network to access shared folders and such like. This is something I’d find very useful and I’d guess others would too. Anyway I hope you enjoy using your Amiga online in the 21st Century!

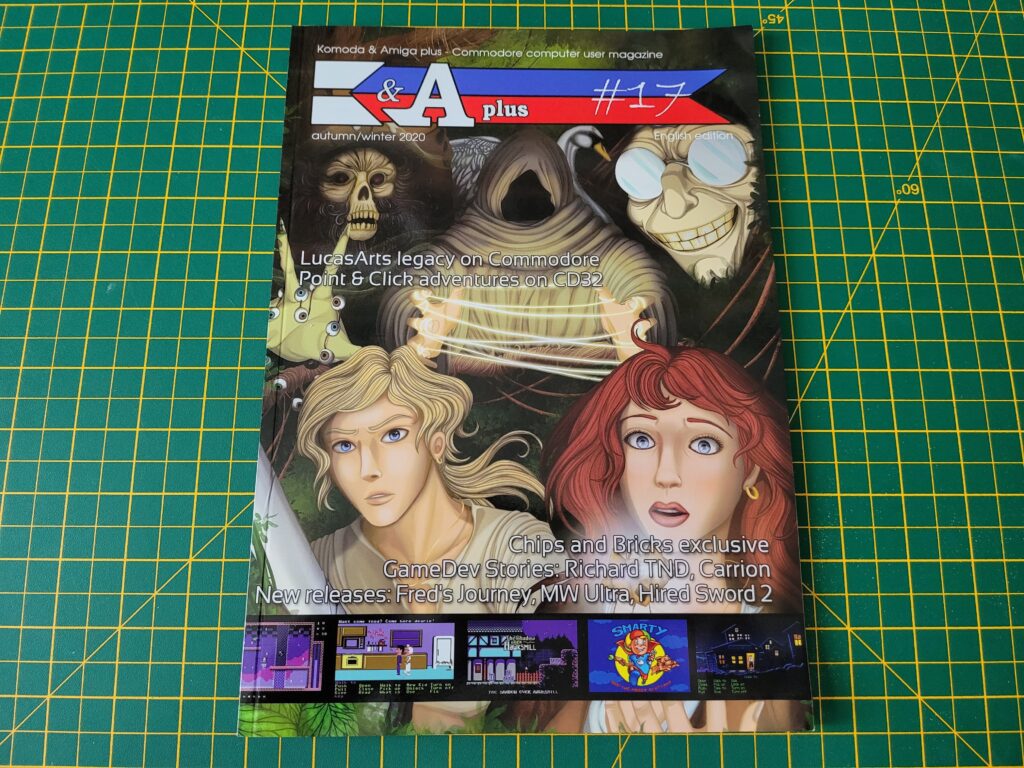
K&A Plus #17 Magazine Preview

Received my copy of K&A Plus #17 a few days ago. As always I paid a little extra for the cover disk which I think is well worth it. The disk comprises the 4th instalment of a series of games compilations called ‘Good Old 8-Bit Games’.


K&A Plus #17

K&A Plus #17 Front Cover.


The 81 page magazine has a lovely piece of artwork featuring Guybrush and Elaine from Monkey Island adorning the front cover. The relevance of this becomes immediately apparent when reading the very interesting ‘LucasArts Legacy’ article.


The CoverDisk


Good Old 8-Bit Games

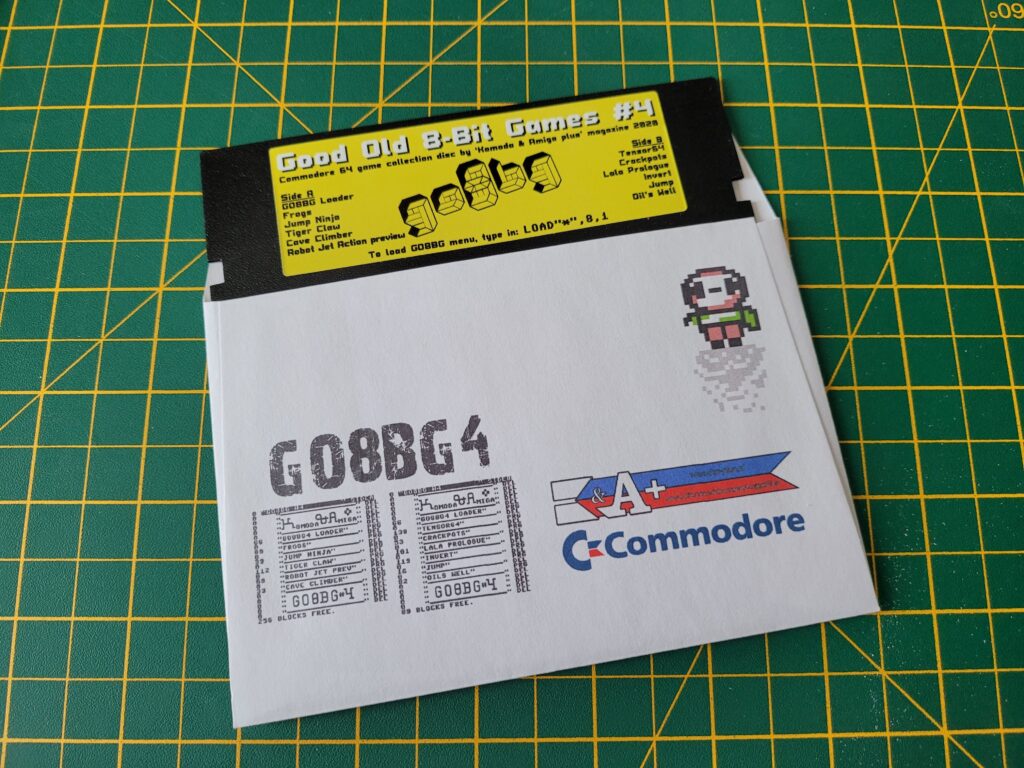
Good Old 8-Bit Games #4.


The double-sided floppy disk (complete with printed colour jacket) is packed with C64 games to help while away those rainy Sunday afternoons.


Good Old 8-Bit Games

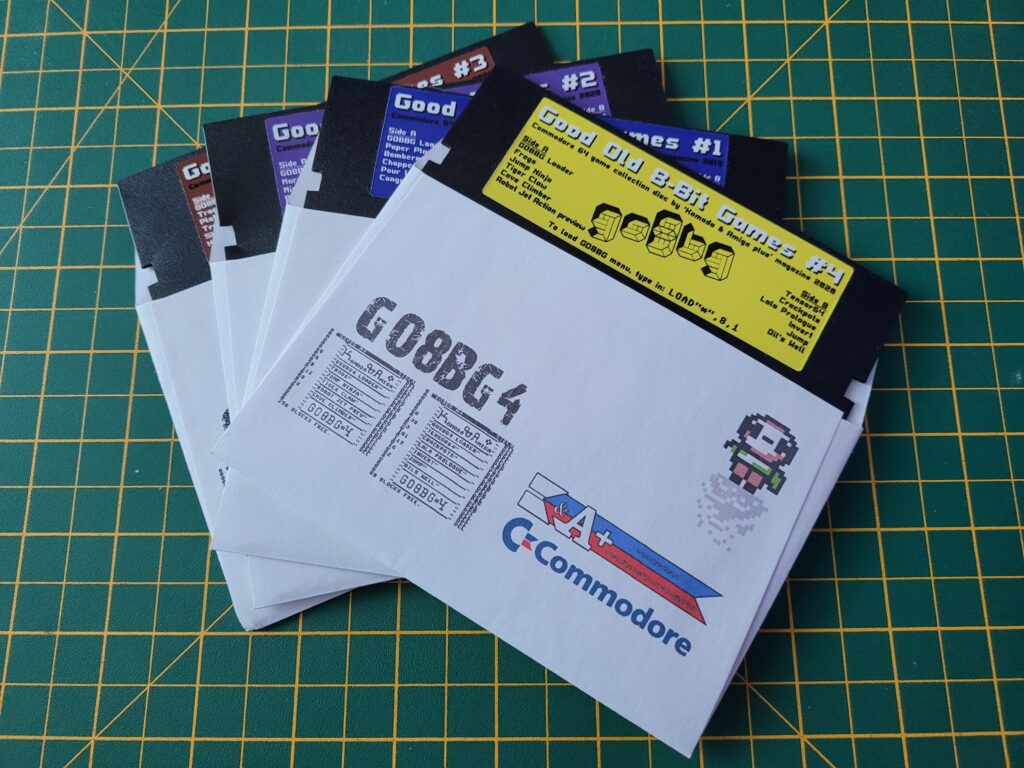
The Complete GO8BG Collection so far…


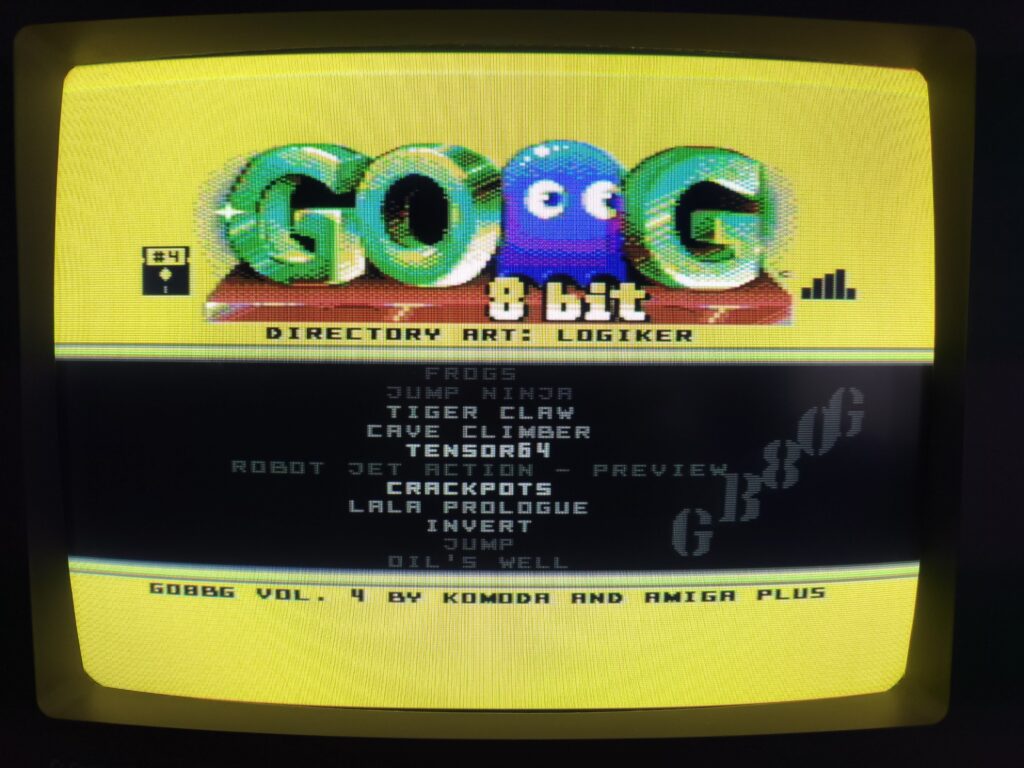
Once again the disk represents astounding value for money, packing in 11 great games across both sides. There’s a lovingly crafted custom loader for the disk with some terrific music playing in the background too.


Good Old 8-Bit Games

Custom Game Loader.


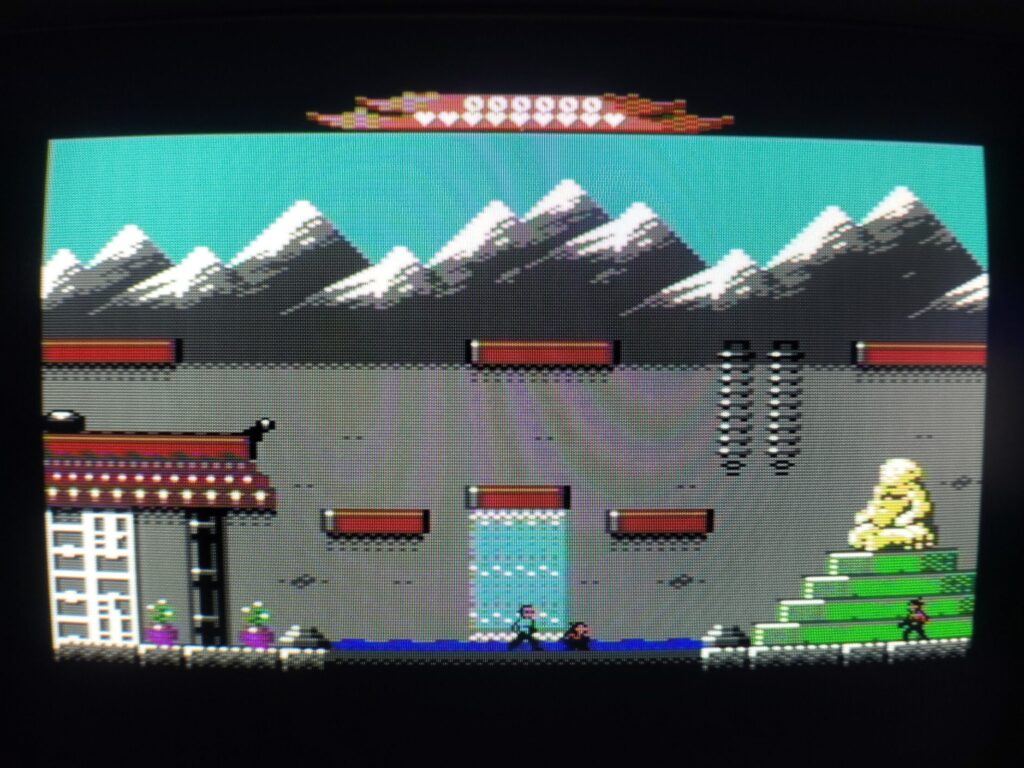
The highlight of the collection for me this time has to be Tiger Claw – a fun little Bruce Lee inspired beat ’em up.


Good Old 8-Bit Games

Tiger Claw


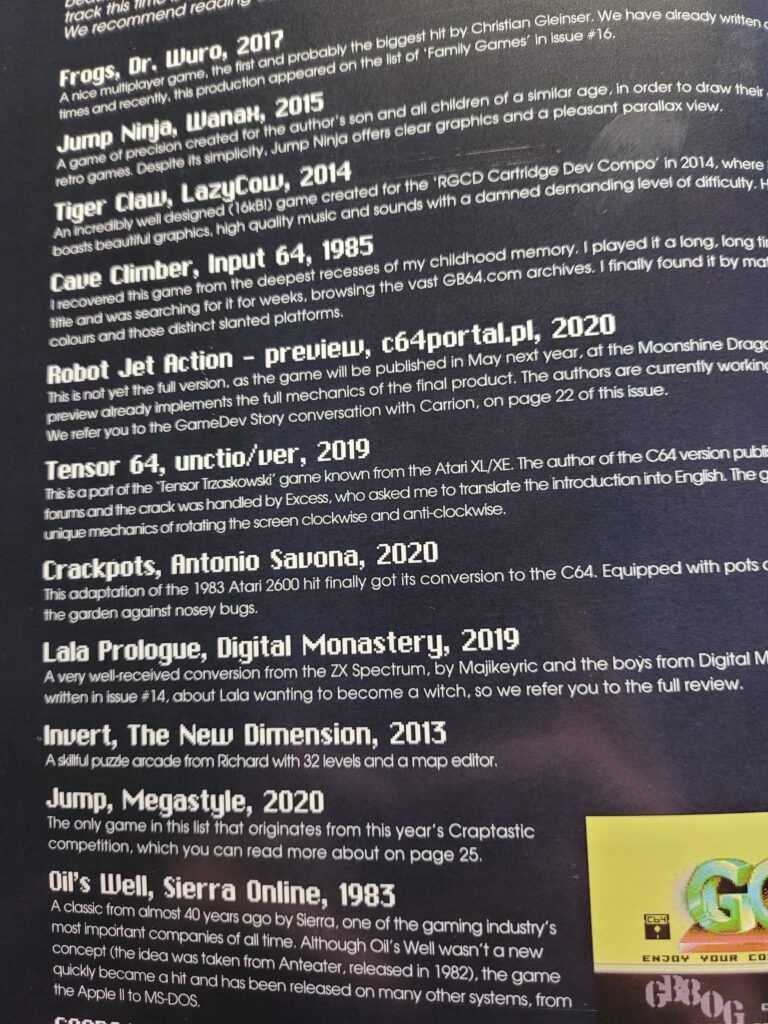
Here’s a full rundown of the games included on disk #4…


K&A Plus #17

Good Old 8-Bit Games #4 – Disk Contents.

Magazine Preview


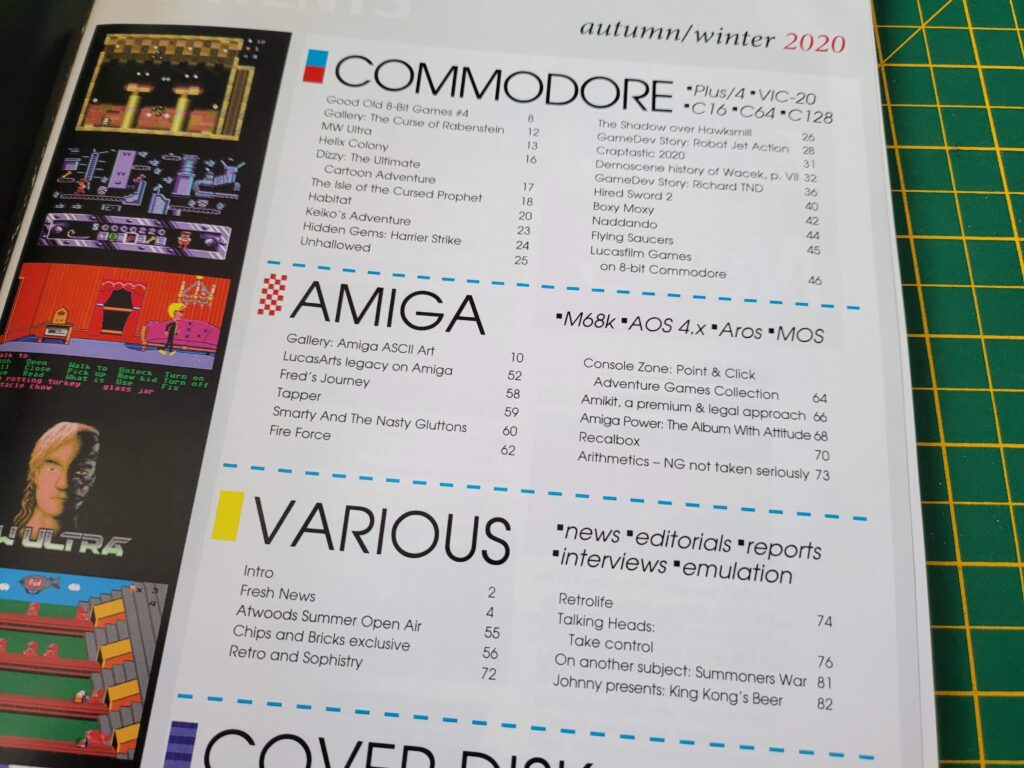
Here’s a quick look at the contents page of K&A Plus #17.


K&A Plus #17

K&A Plus #17 Contents.


And here’s a little preview of some of the great stuff in this issue:

This slideshow requires JavaScript.

This was a great read with loads of reviews and interesting articles to get stuck into. There’s enough here to keep any Commodore fan entertained for an entire afternoon. If you’ve never come across this magazine before you might want to take a look at some of my previews of previous issues here.

If you want to find out more about K&A Plus #17 or order yourself a copy, head on over to the Komoda & Amiga Plus website. The magazine is produced in Poland but they produce an English language version too. Shipping to the UK is pretty quick (COVID disruptions allowing of course).

Getting an A1200 Online Part 3 – Installing an Amiga Web Browser

Amiga Web Browser

Installing an Amiga Web Browser

In Parts 1 and 2 we installed a network card, a TCP/IP stack and connected to a network. By the end of this part we will have a fully functional modern web browser and be able to surf the internet in style on our Amiga 1200.

The browser we’ll be installing is IBrowse as it’s probably the best browser available for classic Amigas these days. It’s still in active development which means we should have a fighting chance at viewing present day websites.

Before we dive in there’s a few other things that need installing first. Namely AmiSSL and MUI. IBrowse won’t run unless MUI has been installed and AmiSSL is essential for accessing https websites.

MUI 3.8 is available to download from Aminet here:

Aminet – util/libs/mui38usr.lha

Unfortunately I can’t link to AmiSSL on Aminet as every time it is updated the link breaks (Aminet don’t keep the older versions online unfortunately). Also I can never be sure that a newer version will break what was previously working in my guide.

Hopefully the following link taken from AmiSSL’s github development page will prove to be a ‘permanent’ link to the archive.

https://github.com/jens-maus/amissl/releases/download/4.8/AmiSSL-4.8.lha

Installing AmiSSL

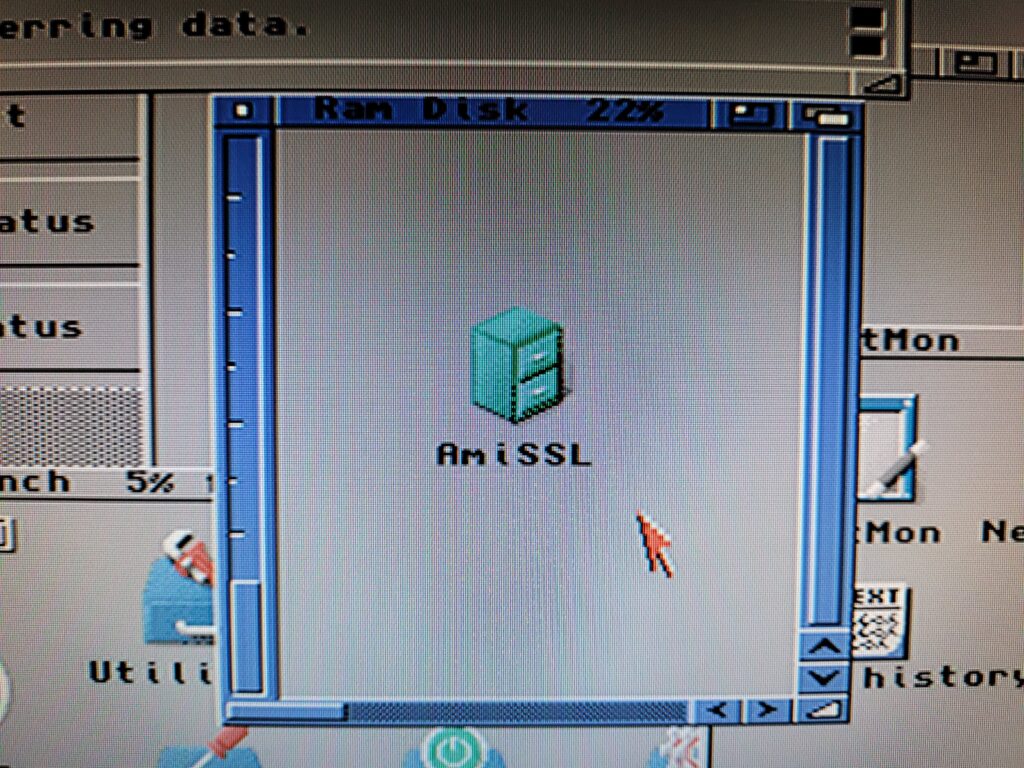
Once we have the AmiSSL archive on the Amiga it should unpack into a single folder as shown in the photo below.


AmiSSL

AmiSSL folder in RAM Disk.


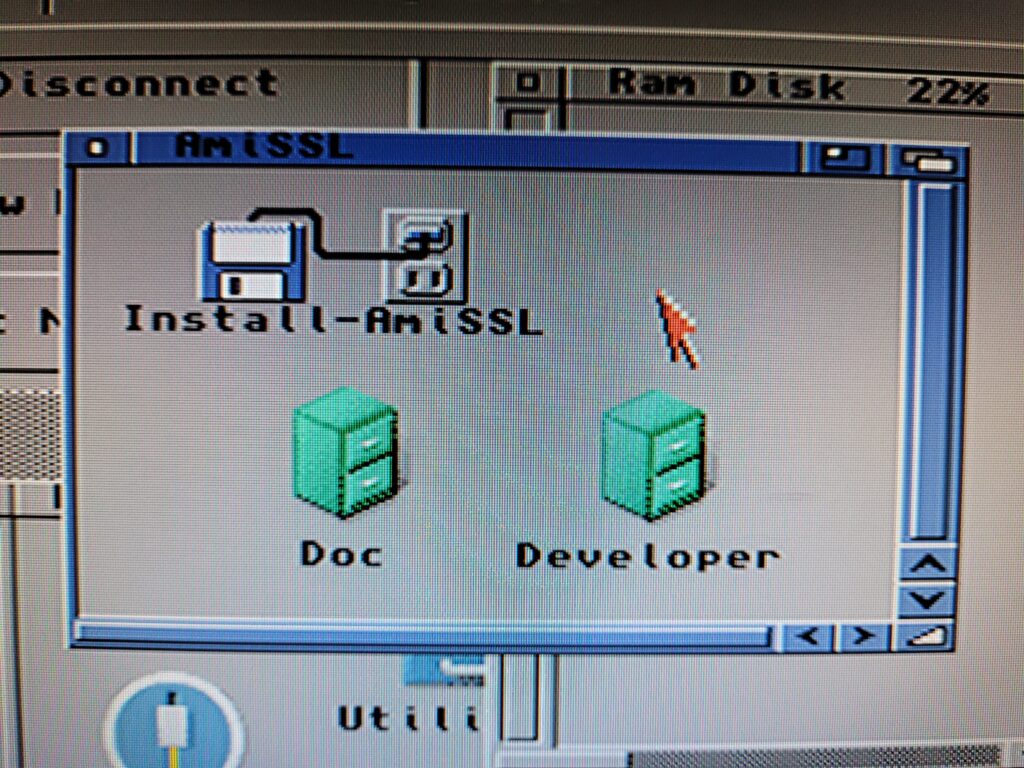
Opening the AmiSSL folder reveals the Installer along with a couple of other folders that can be ignored.


AmiSSL

AmiSSL Installer.


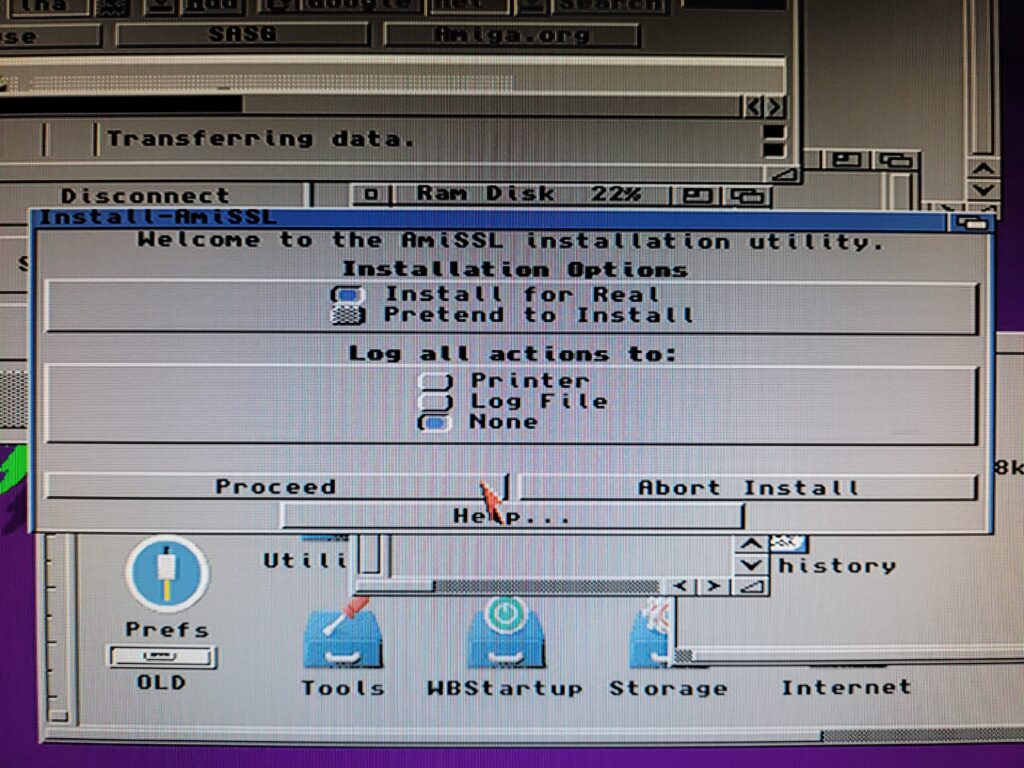
Double-click the installer to run it and progress to the screen shown below. Select ‘Install for Real’ before clicking on ‘Proceed’.


AmiSSL

AmiSSL – Install for real.


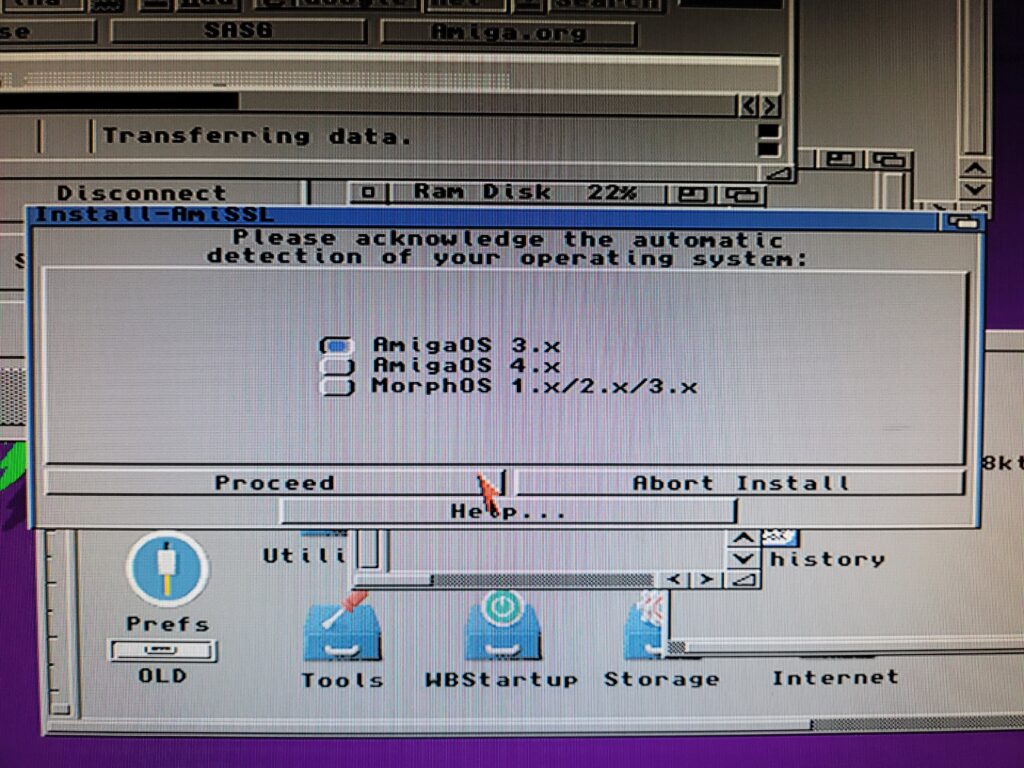
The installer should automatically detect the correct version of AmigaOS so just check it in the following window then hit ‘proceed’.


AmiSSL

Choosing your version of AmigaOS.


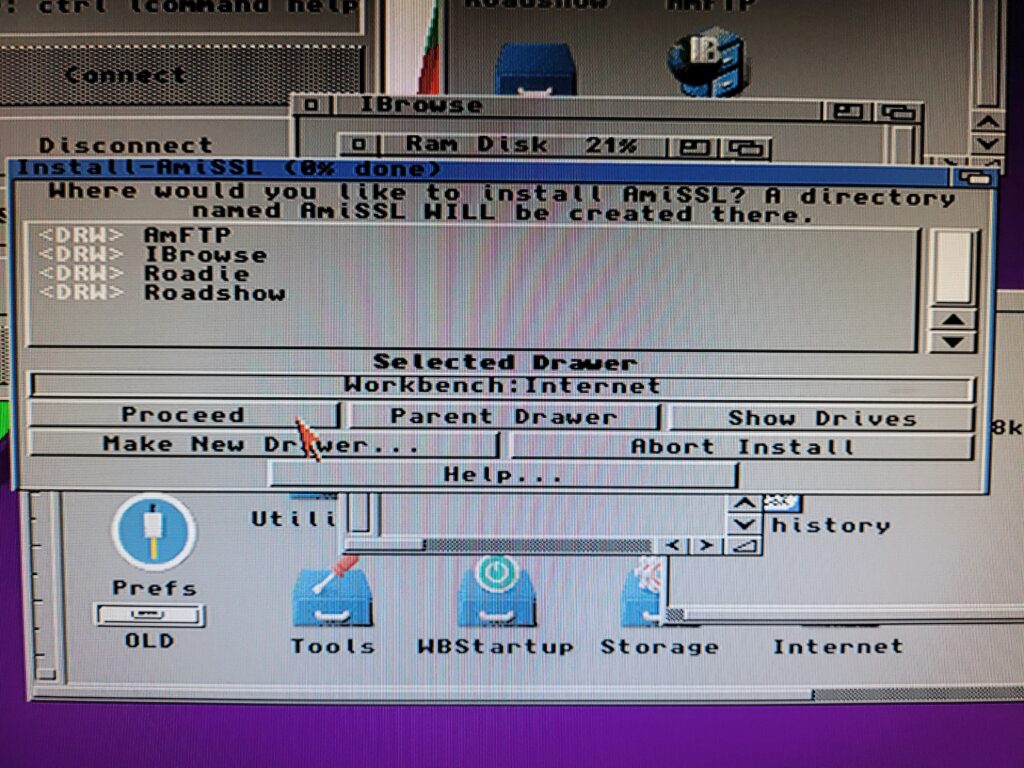
Next up it wants to know where to install everything. As before I chose to install it in the Internet folder I created earlier but it can go anywhere you want.


AmiSSL

Choosing where to install AmiSSL.


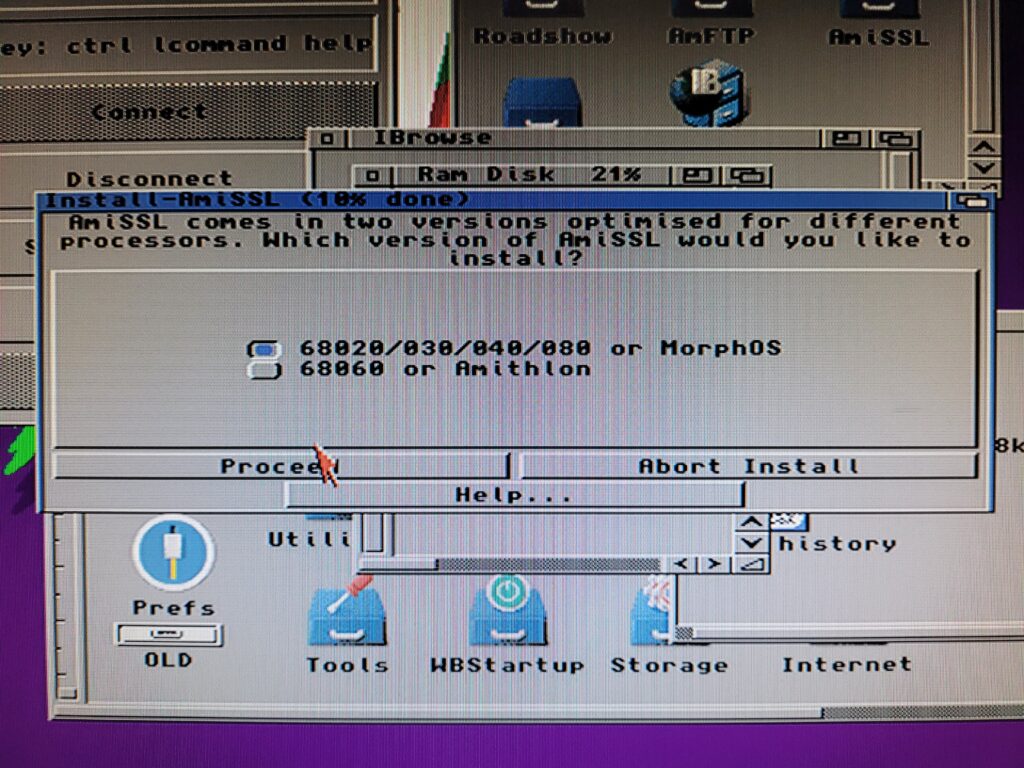
Unless you have a ‘060 accelerator board installed in your A1200 then the first option is the one we want on the next screen.


AmiSSL

Choosing the correct version of AmiSSL optimised for your CPU.


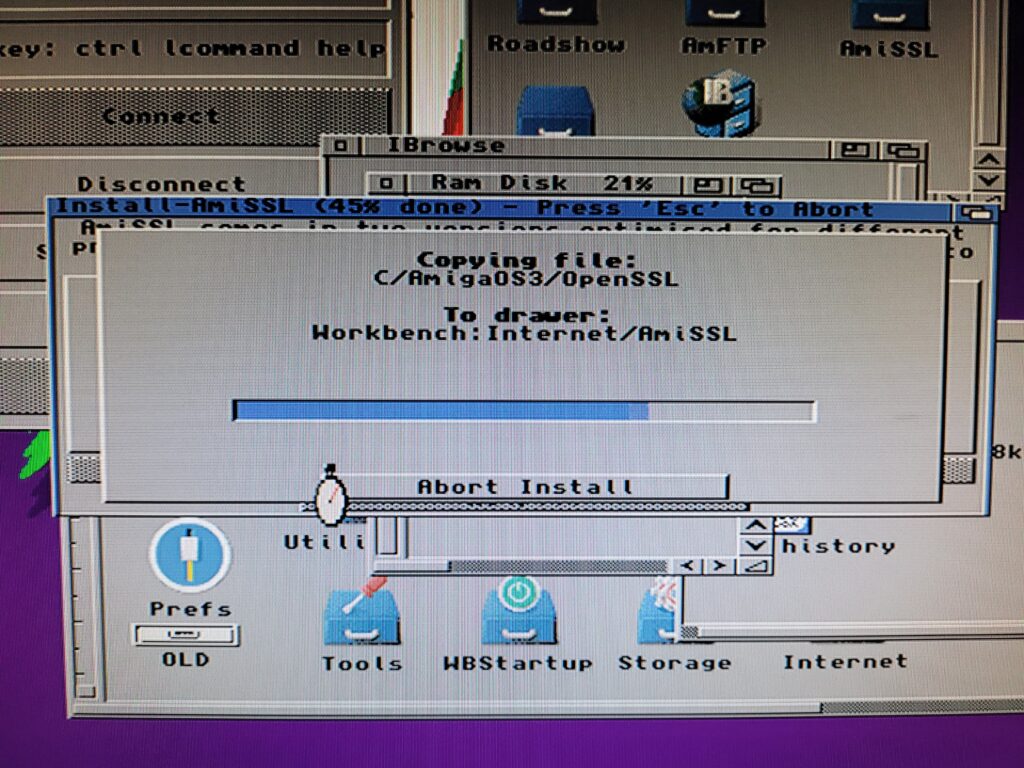
The installer will now get on with the task of installing OpenSSL and a whole bunch of certificates.


AmiSSL

Files being installed.


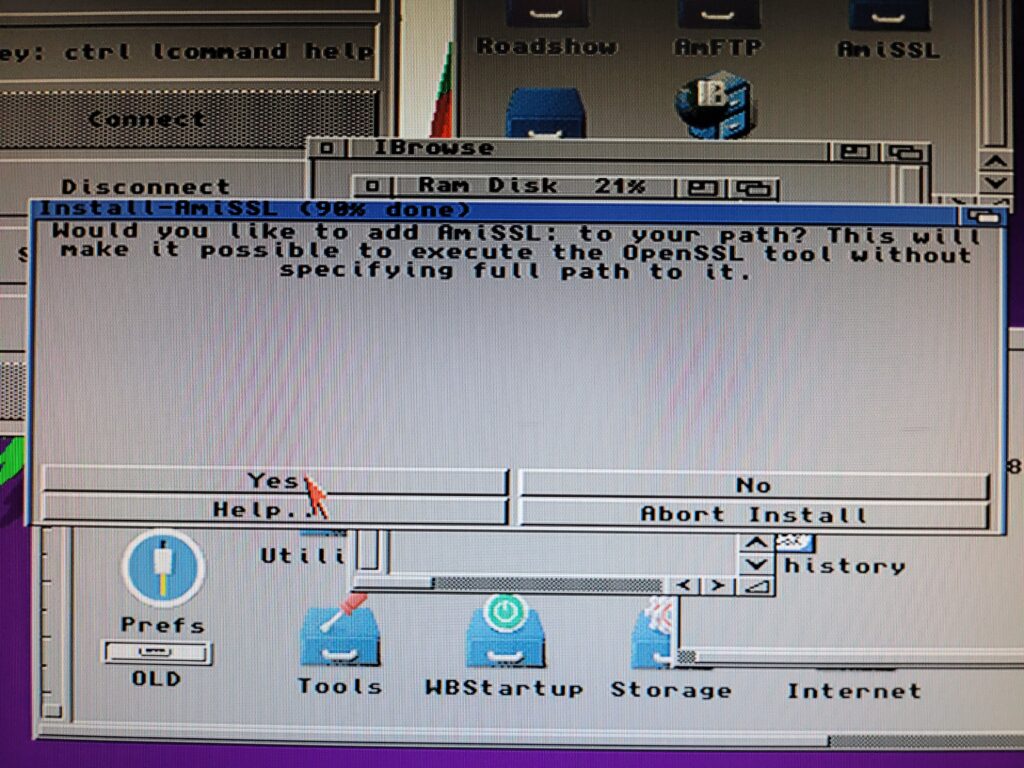
Once all the files have been copied over it will ask if you want to add it to your path. Answer yes to this to continue.


AmiSSL

Adding AmiSSL: to Workbench’s path.


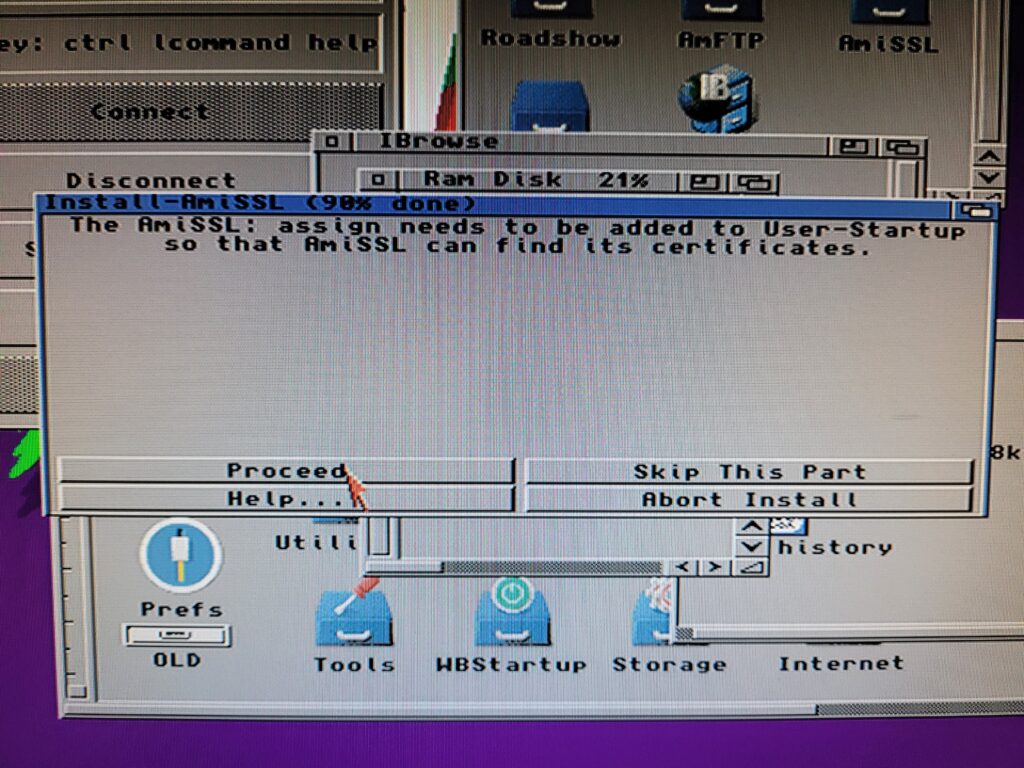
It also wants to add an assign to the user-startup. We need this to happen or it won’t work so click ‘proceed’ to let it do its thing.


AmiSSL

Adding an AmiSSL: assign to User-Startup.


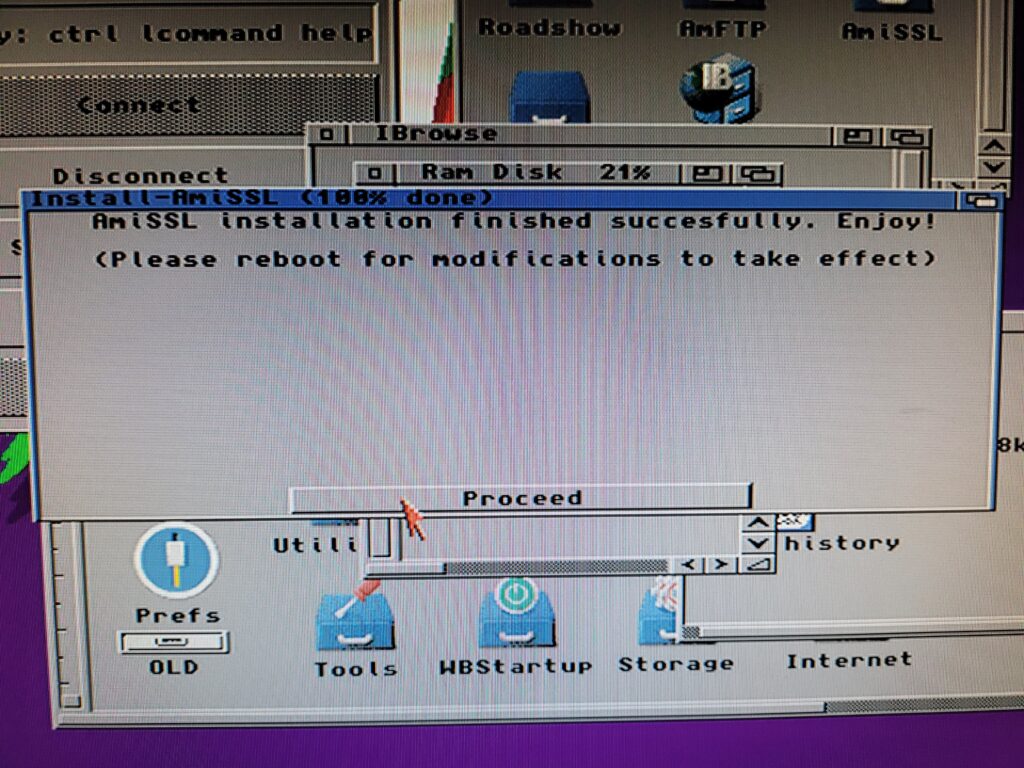
A message will pop up saying the computer needs to be (manually) rebooted before it will work. Hit proceed to continue.


AmiSSL

Mission accomplished – AmiSSL is now installed.


And that’s all there is to this one, AmiSSL is now installed and ready to provide secure internet access to any programs that require it.


AmiSSL

A reminder of where AmiSSL was installed.


Installing MUI 3.8

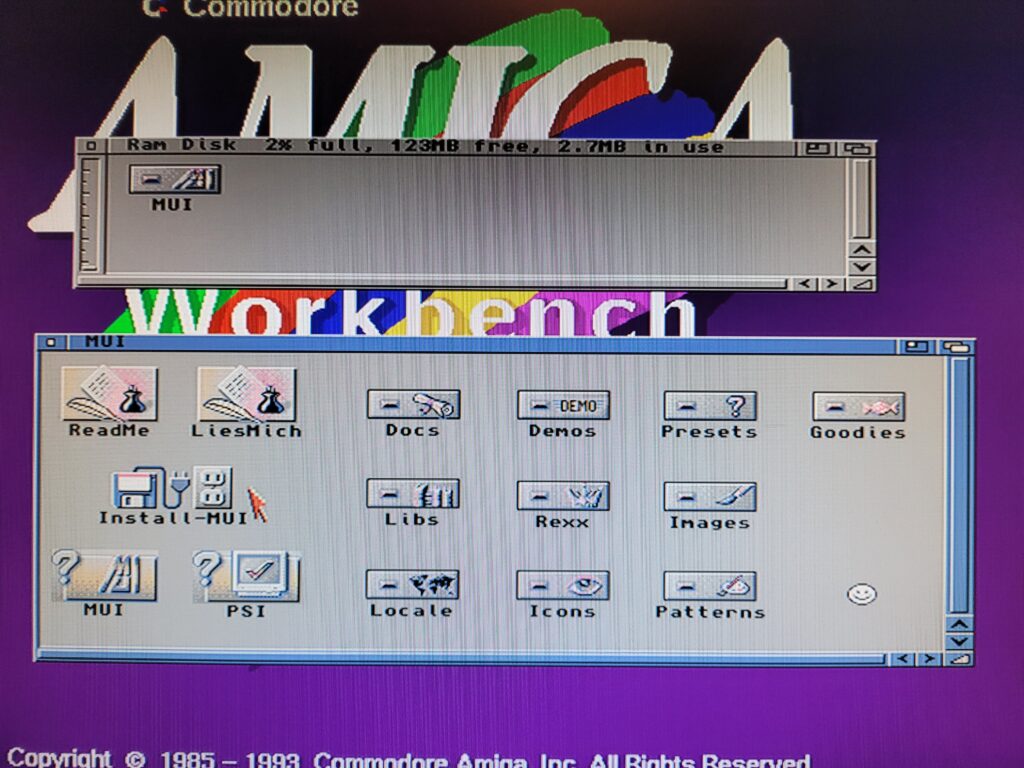
MUI 3.8 is a pretty big archive so will take a little while to unpack but once it does you should have a folder like the one below. Run ‘Install-MUI’ to get the ball rolling.


MUI3.8

This is how the unpacked MUI archive will look.


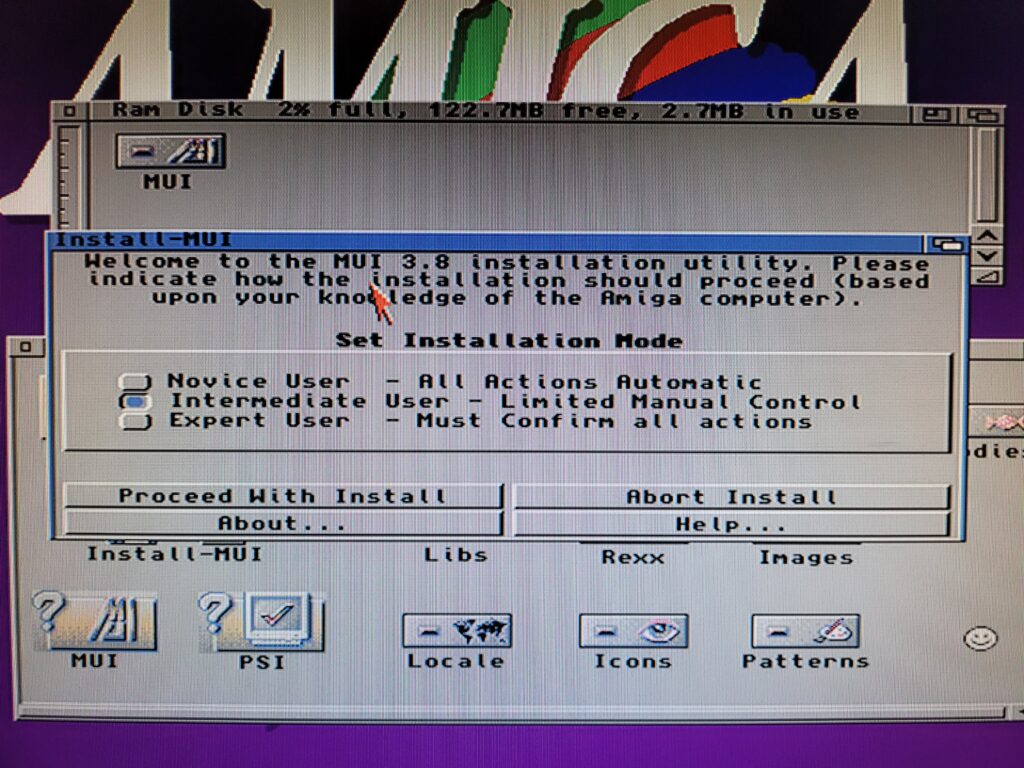
Select ‘Intermediate User’ otherwise you won’t be able to tweak the installation.


MUI3.8

Select ‘Intermediate User’.


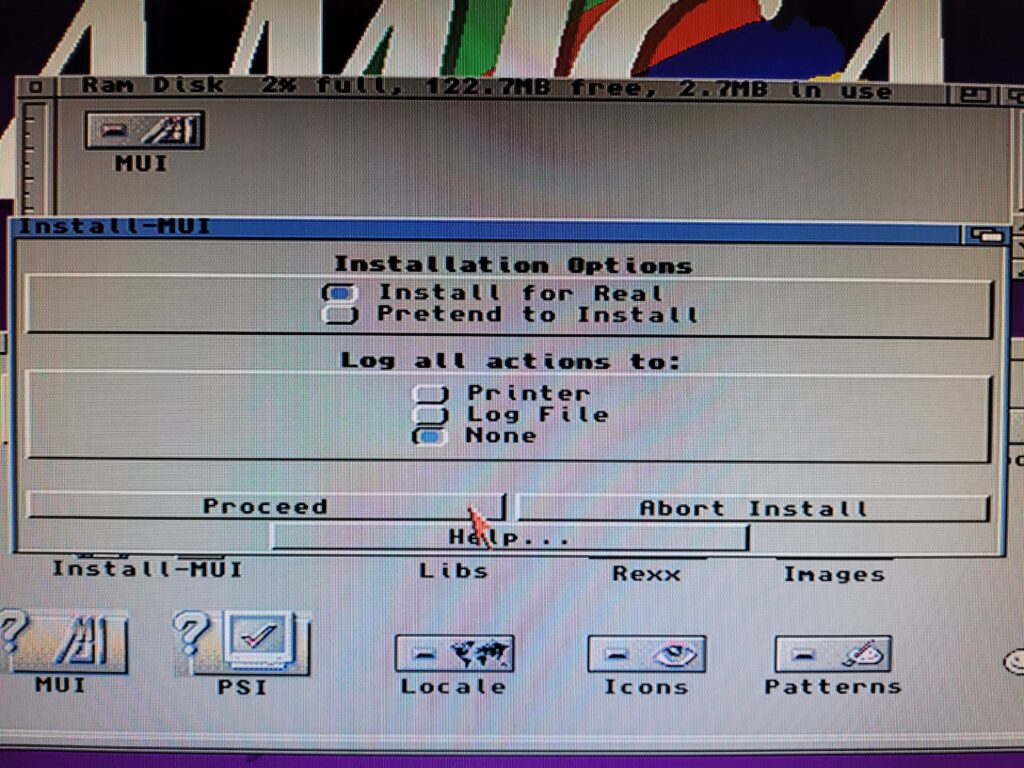
Obviously we want to actually install MUI so keep ‘Install for real’ selected.


MUI3.8

Installing for Real…


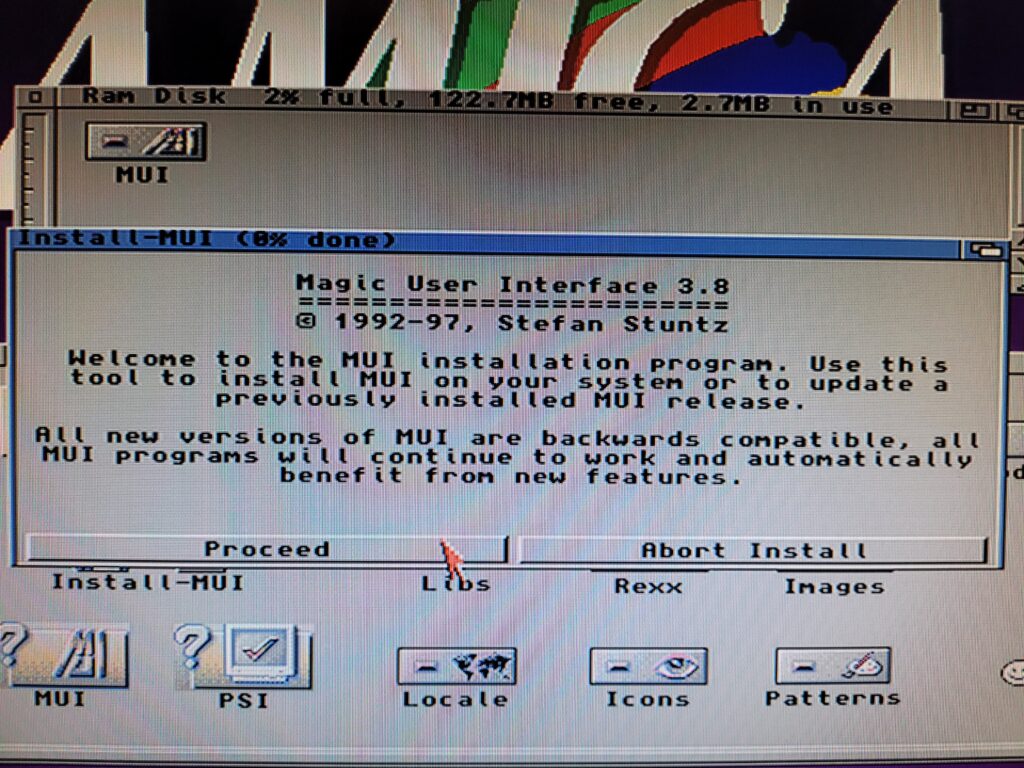
The next screen simply explains what the Installer is going to do so just click proceed here.


MUI3.8

A little intro from Stefan Stuntz.


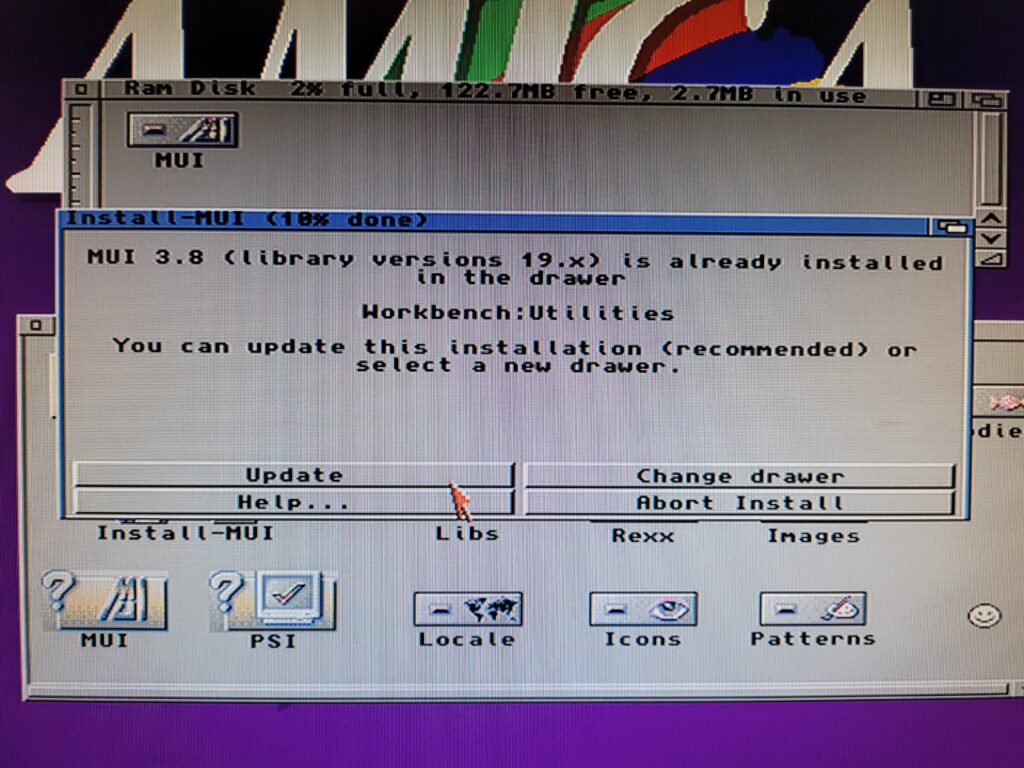
Choose where to install the software when the next screen appears. As I have already installed MUI before, when I ran the installer again (so I could get these screenshots) it gave me the option of changing where to put it. I mention this just to explain why the screenshot will differ from a regular first time install.


MUI3.8

Choosing where to install MUI3.8. (This screen will different slightly from a fresh install as I have already installed this before).


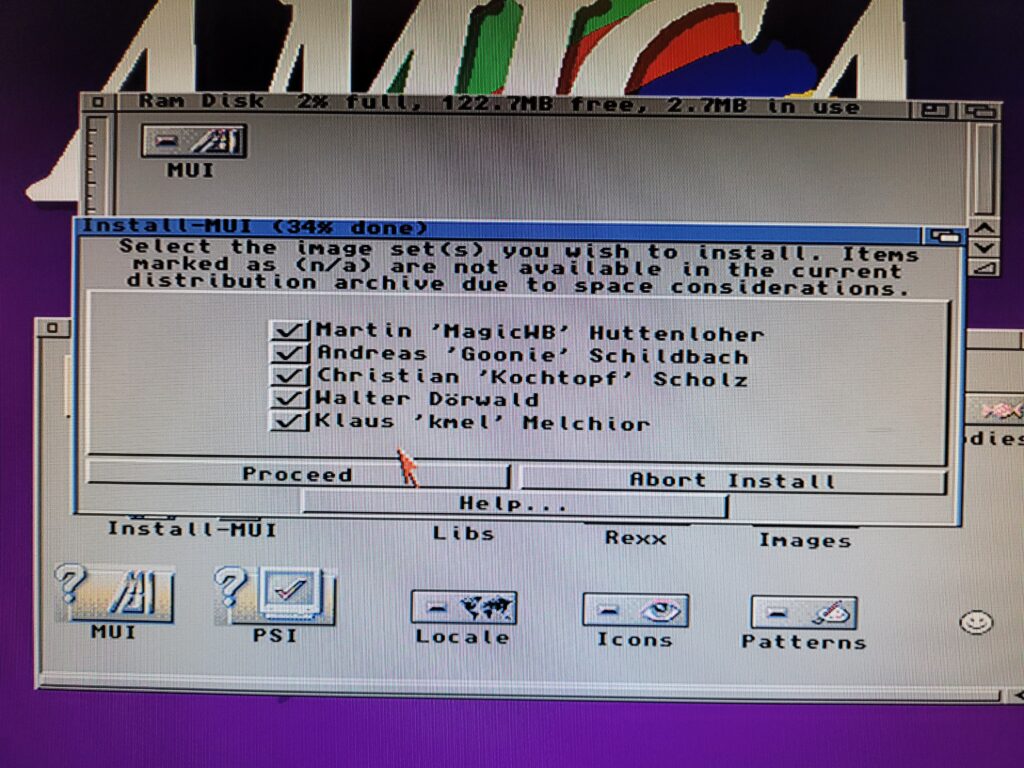
The following window gives you the option of choosing which image sets you want. Think of these as themes that will let you change the appearance of various aspects of the MUI interface. Leaving everything ticked will allow plenty of choice if we want to mix things up in the future.


MUI3.8

Choosing image sets.


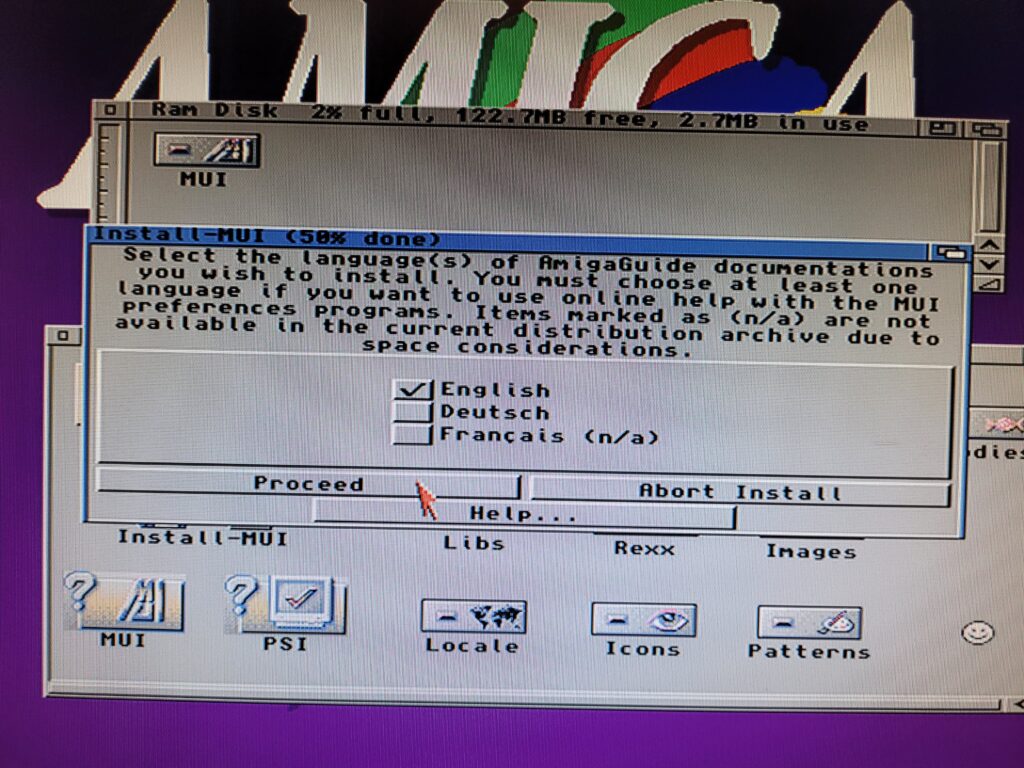
Choose your language from the following screen and then click proceed.


MUI3.8

Select the language for the AmigaGuide docs.


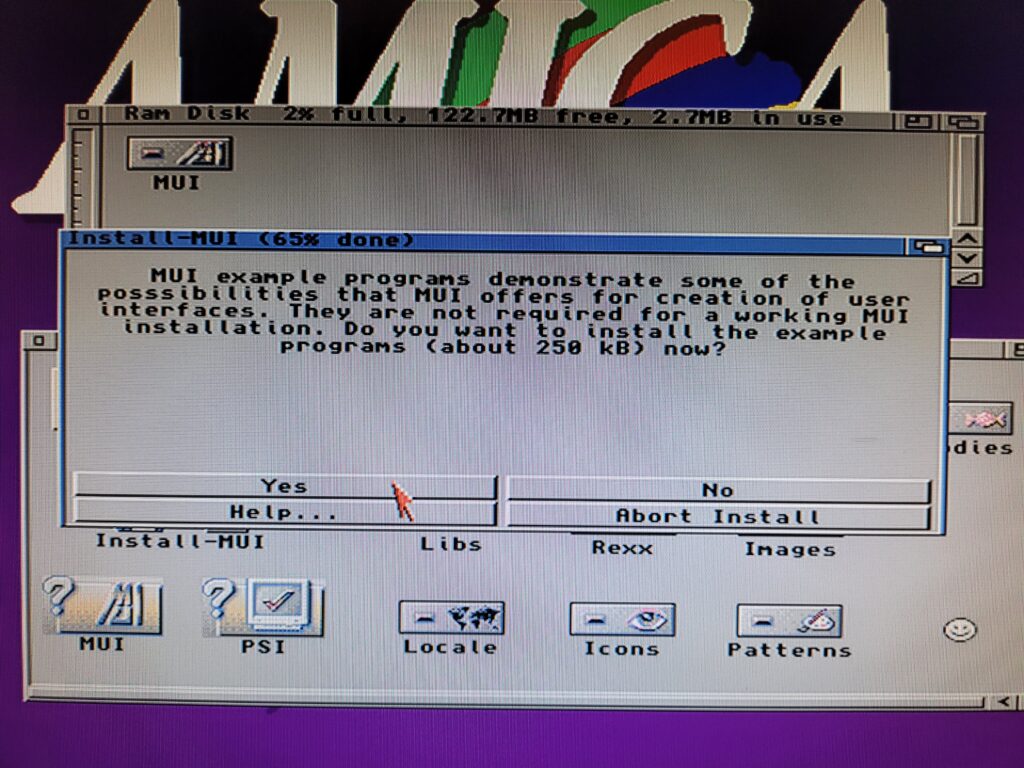
A bunch of demo programs can be installed from the next screen if you wish.  These are more geared towards developers to show what MUI is capable of. However they don’t take up much space so if you’re curious just click ‘yes’ to continue. Alternatively click ‘no’ – the installation will continue regardless of which option is chosen.


MUI3.8

MUI example programs.


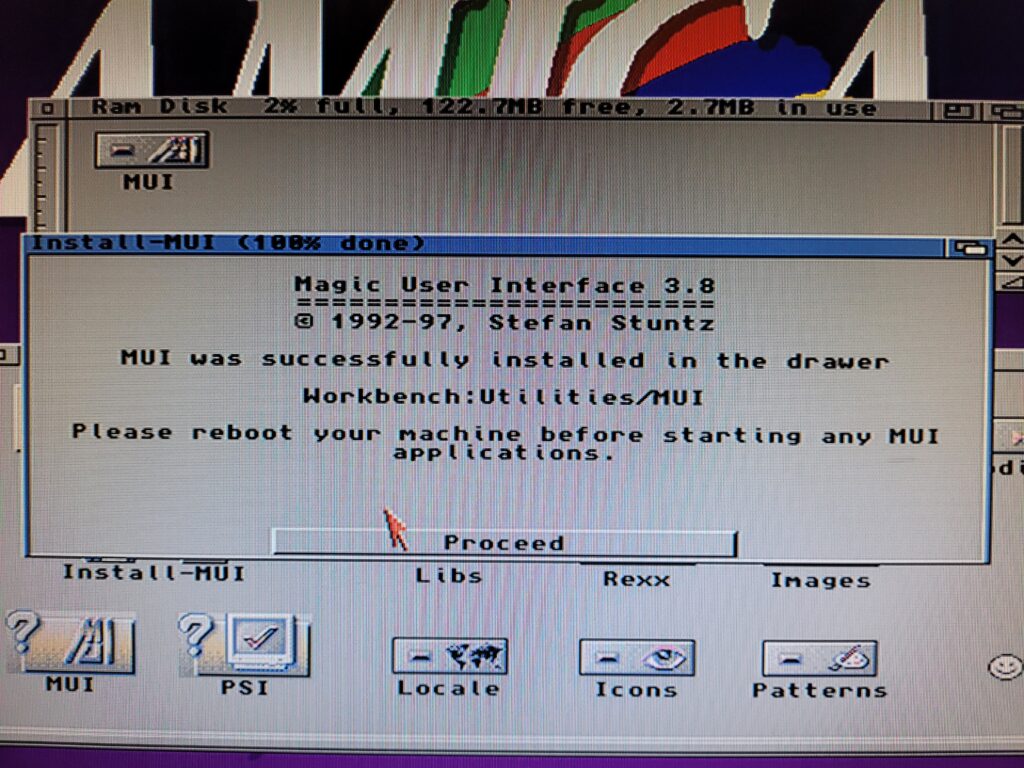
The installation will now finish and display the screen below and recommend a reboot.


MUI3.8

Congratulations – you’ve successfully installed MUI3.8.


MUI is now successfully installed and we can finally move on to installing our browser!

Reboot your Amiga before moving onto the next stage so that both AmiSSL and MUI are up and running.


Installing the IBrowse Web Browser

IBrowse can be downloaded from here:

IBrowse – web browser for Amiga computers / AmigaOS (ibrowse-dev.net)

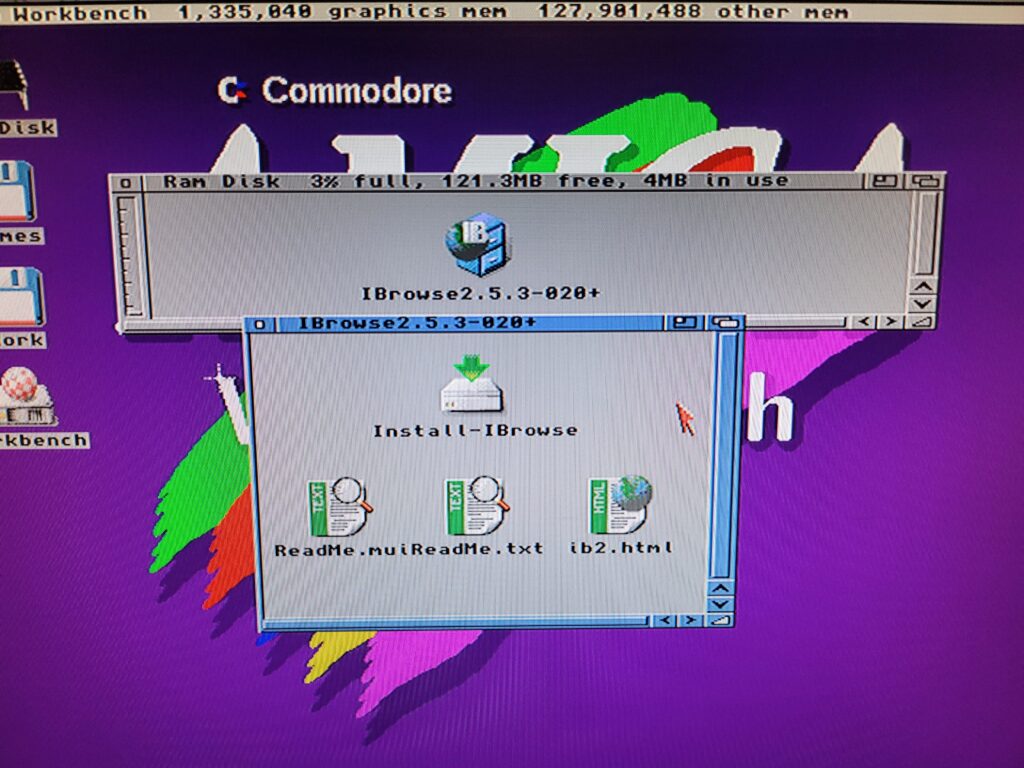
Unpack the archive to a folder on your Amiga and you should get a folder like the one shown below. Run ‘Install-IBrowse’ to get started.


Amiga Web Browser

The IBrowse archive unpacks to this…


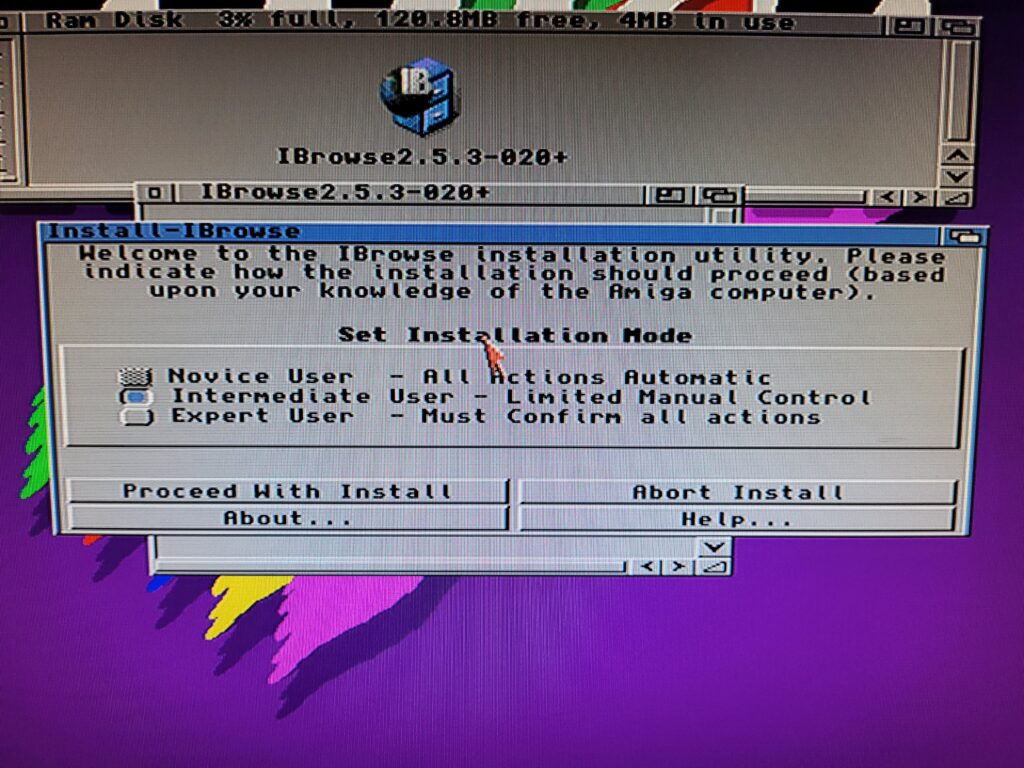
I selected ‘Intermediate User’ so I had some control over what goes where.


Amiga Web Browser

Select ‘Intermediate User’…


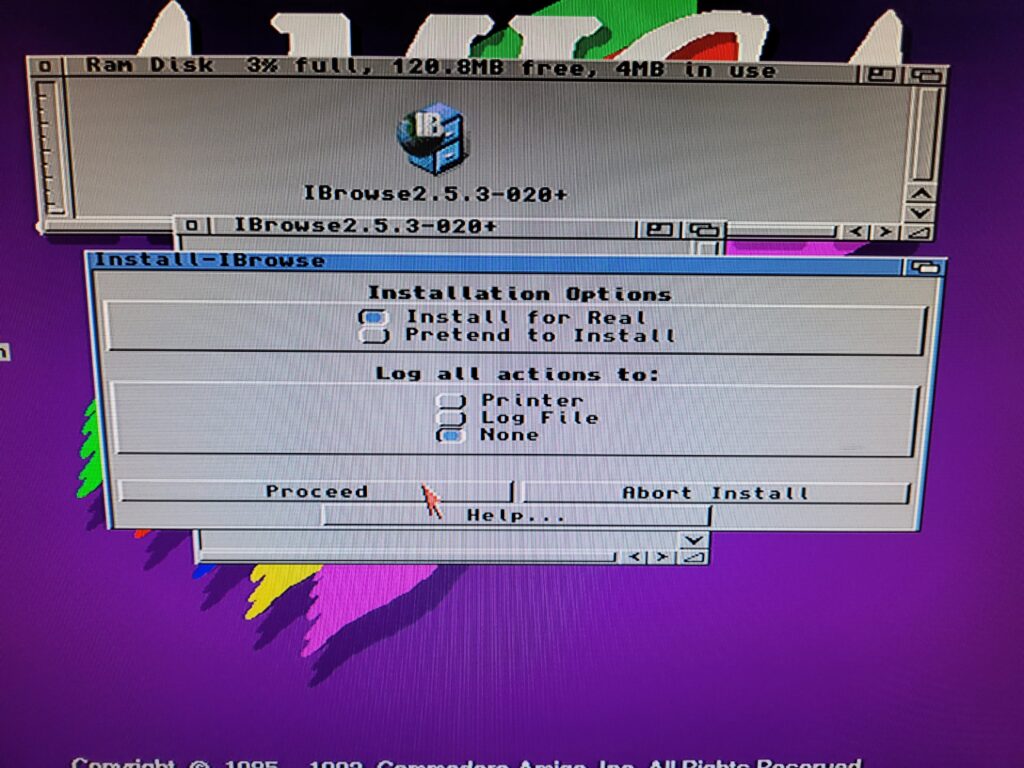
Next there’s the usual option to do a pretend install if you just want to see what it’s going to do or assess any potential problems in advance. Make sure to keep ‘Install for Real’ selected and click ‘Proceed with Install’..


Amiga Web Browser

…and Install for Real.


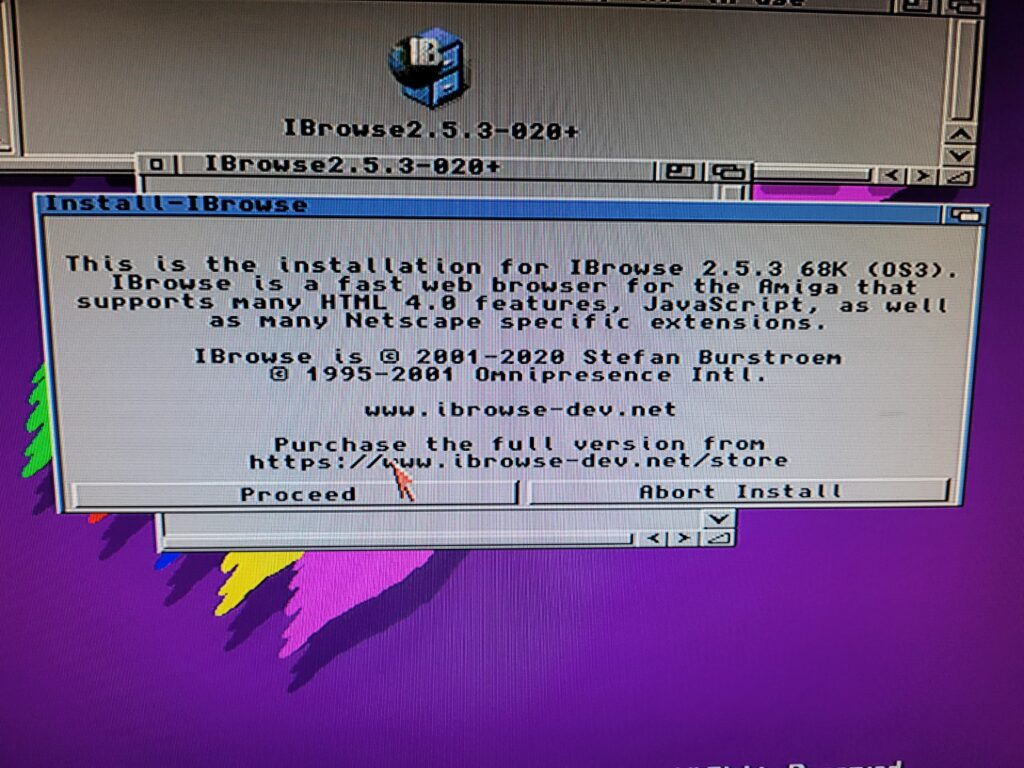
The next window is just a little introduction to the program which can be safely ignored.


Amiga Web Browser

A little introduction to the program.


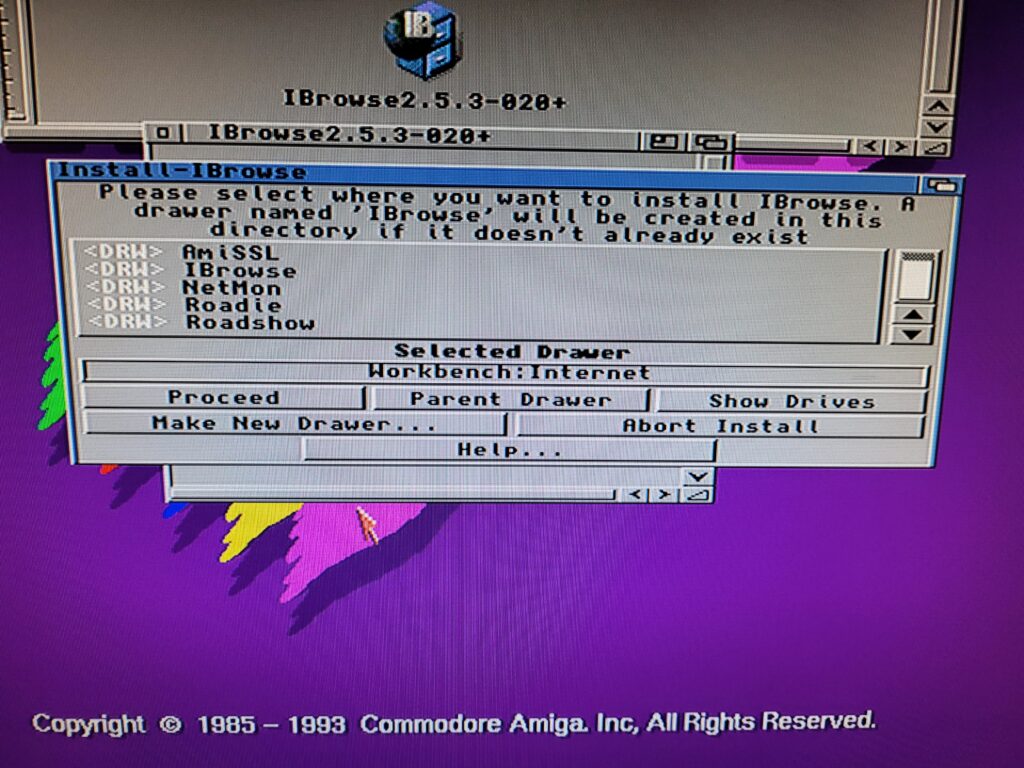
The first choice we need to make is where to install the program. As always mine is going into my Internet folder with all my other Internet related programs.


Amiga Web Browser

Selecting where to install IBrowse.


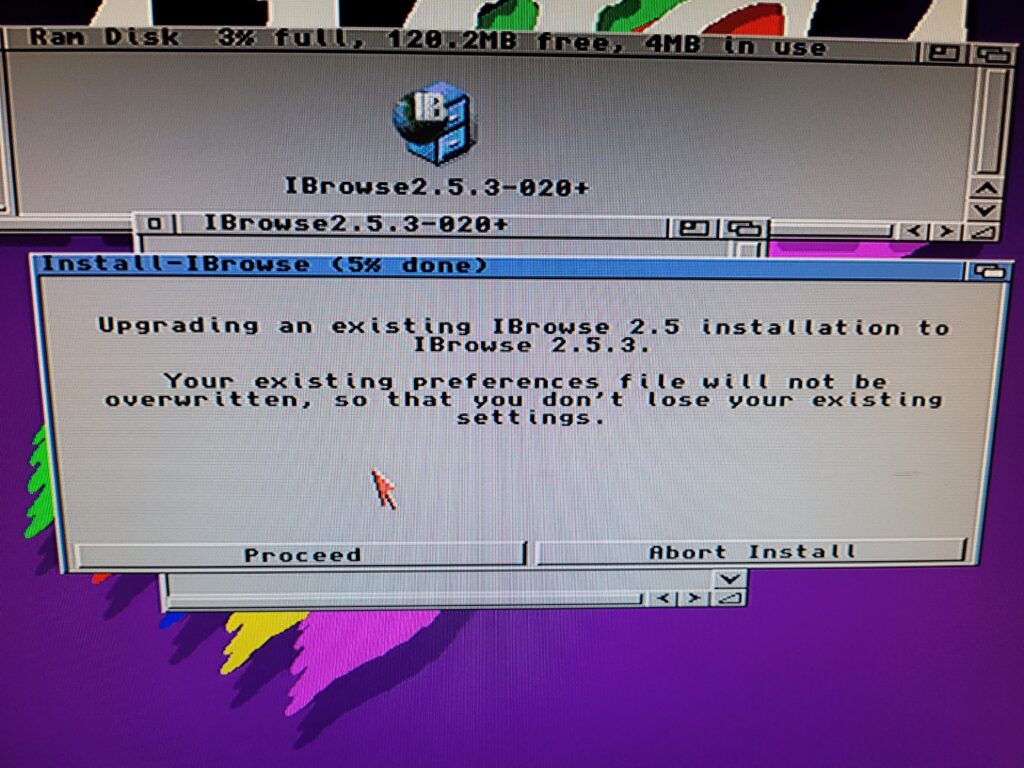
I had already installed IBrowse before so I received confirmation that none of my preferences would be disturbed. Nice.


Amiga Web Browser

As I had already install IBrowse before this screen popped up. If you’re installing it for the first time you shouldn’t see this.


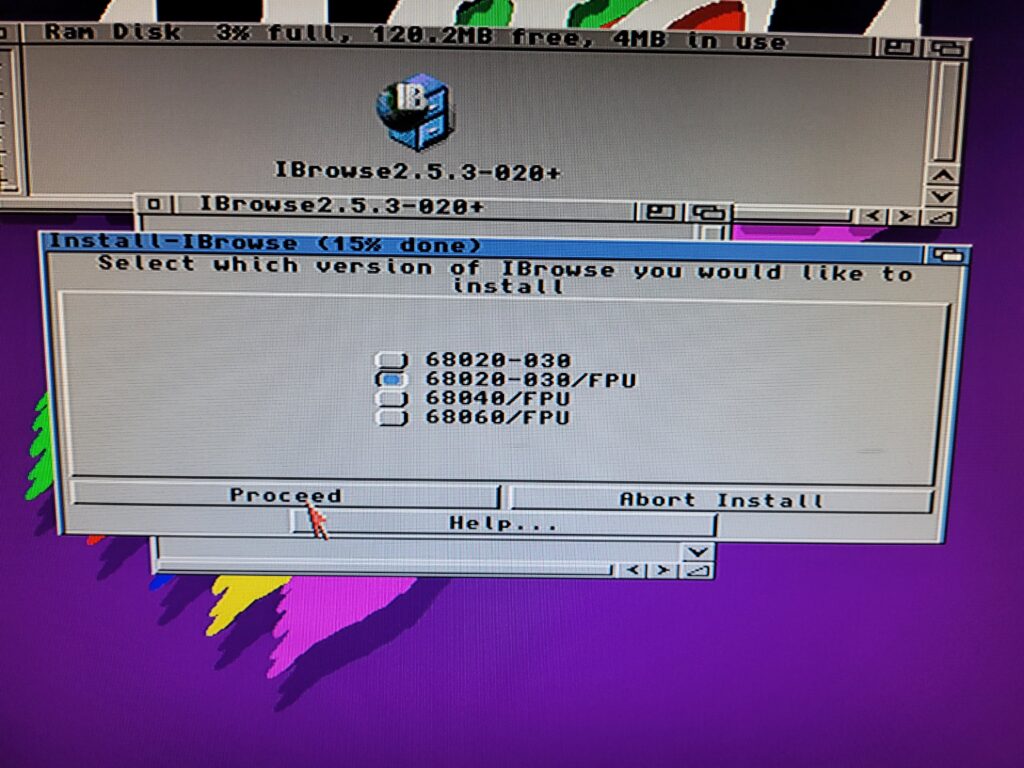
The next dialogue box lets us choose a version optimised for our CPU. I have a 68030 CPU and an FPU in my A1200 so I chose the ‘68020-030/FPU’ option.


Amiga Web Browser

Picking the version that’s optimised for your CPU.


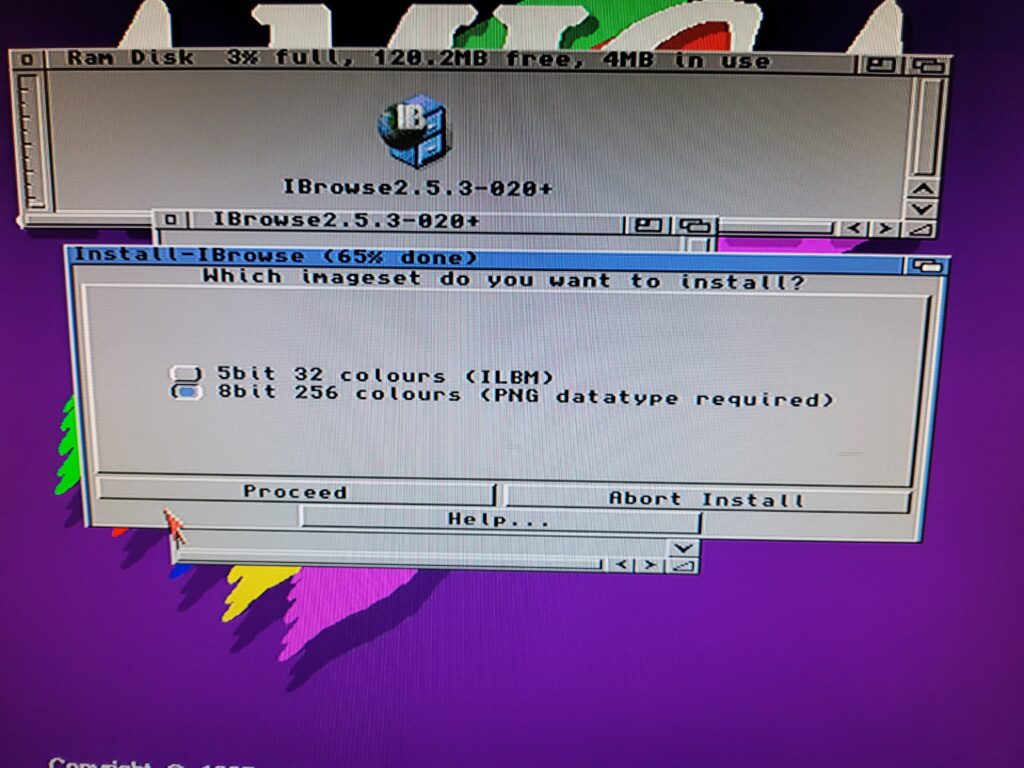
Next we can choose the Imageset to use for the buttons etc. This is down to personal choice and how many colours you choose to run your Workbench in.


Amiga Web Browser

Choosing the imageset.


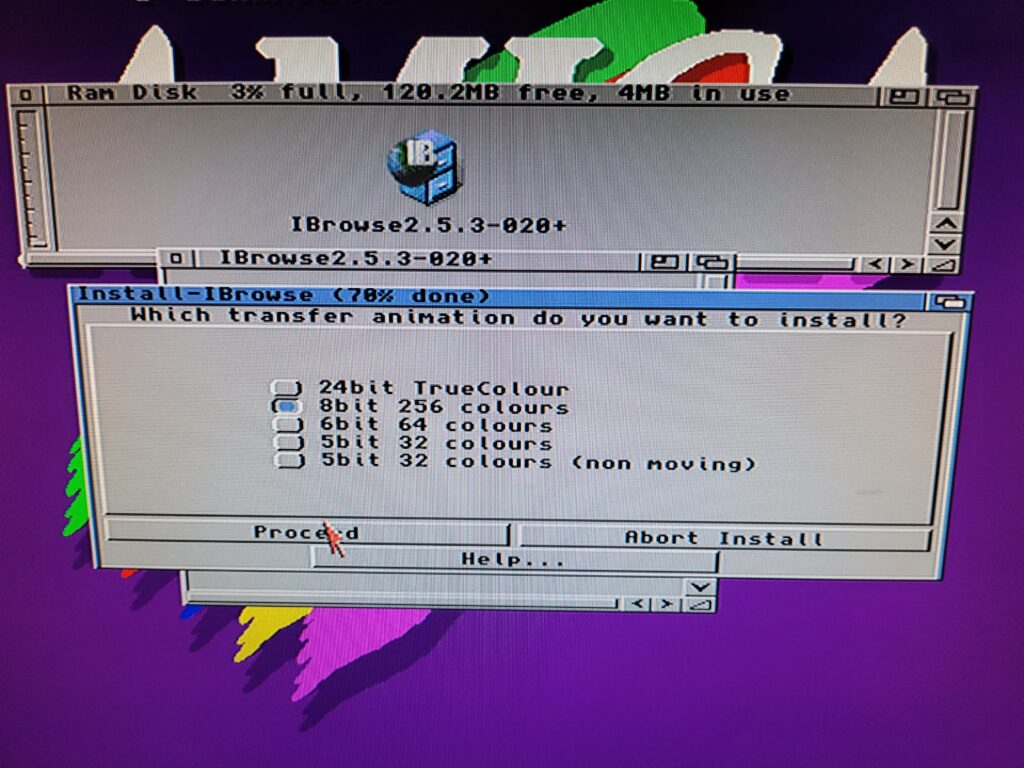
The next choice is similar and affects the little animated globe in the corner of the screen. I chose 256 colours for both options as that’s the max my AGA chipset will allow on Workbench. This is a real throwback to the 90’s when all browsers had a cool animation in the corner whilst we waited for pages to load.


Amiga Web Browser

Choosing the transfer animation – remember those?


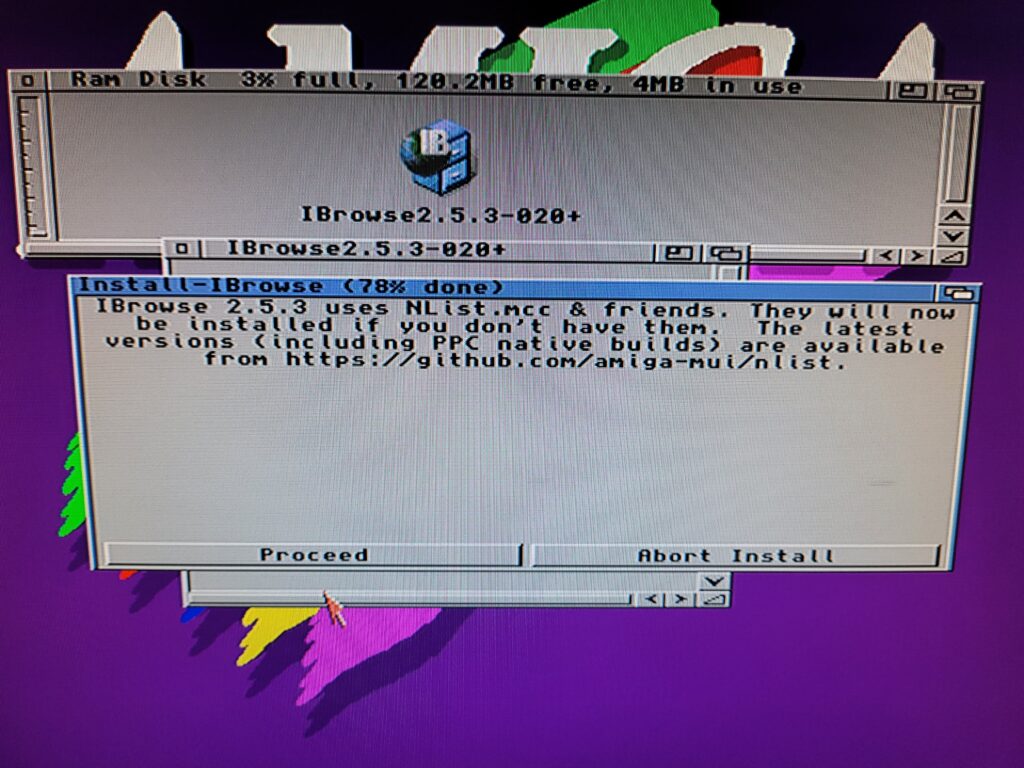
The next window informs us that some additional files will be installed if they aren’t already present so just hit proceed to move things along.


Amiga Web Browser

A little notice that some extra MUI stuff will be installed.


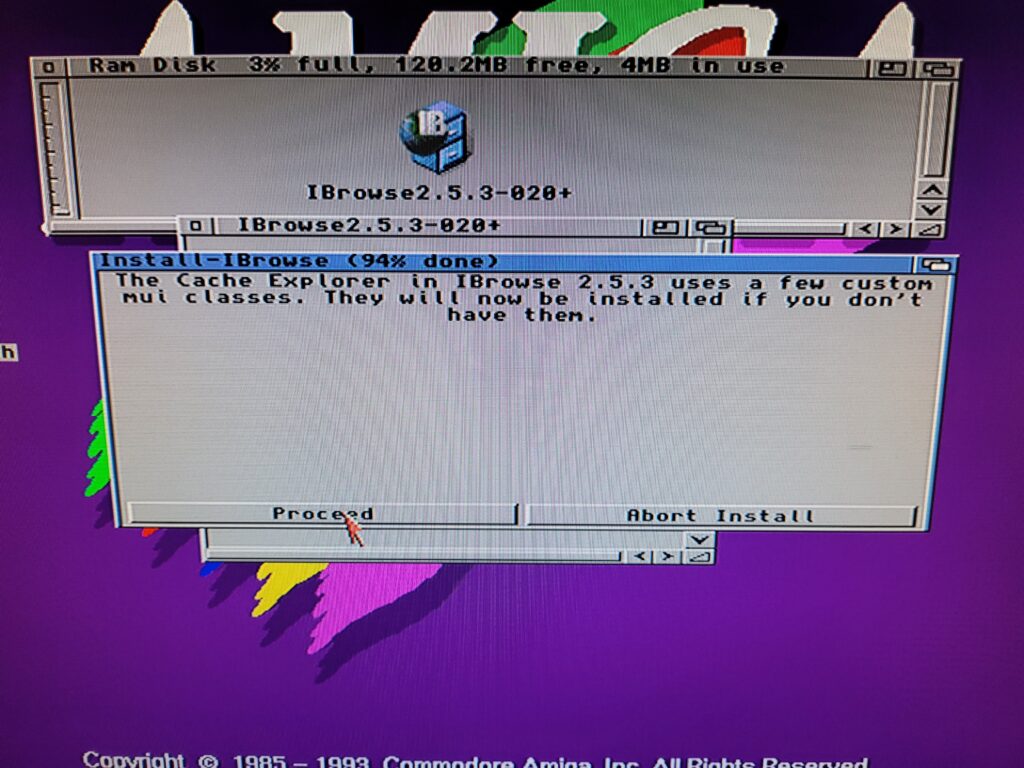
Another info window advises about the installation of new MUI classes if you don’t already have them. Just hit ‘proceed’.


Amiga Web Browser

Some more MUI stuff will be installed.


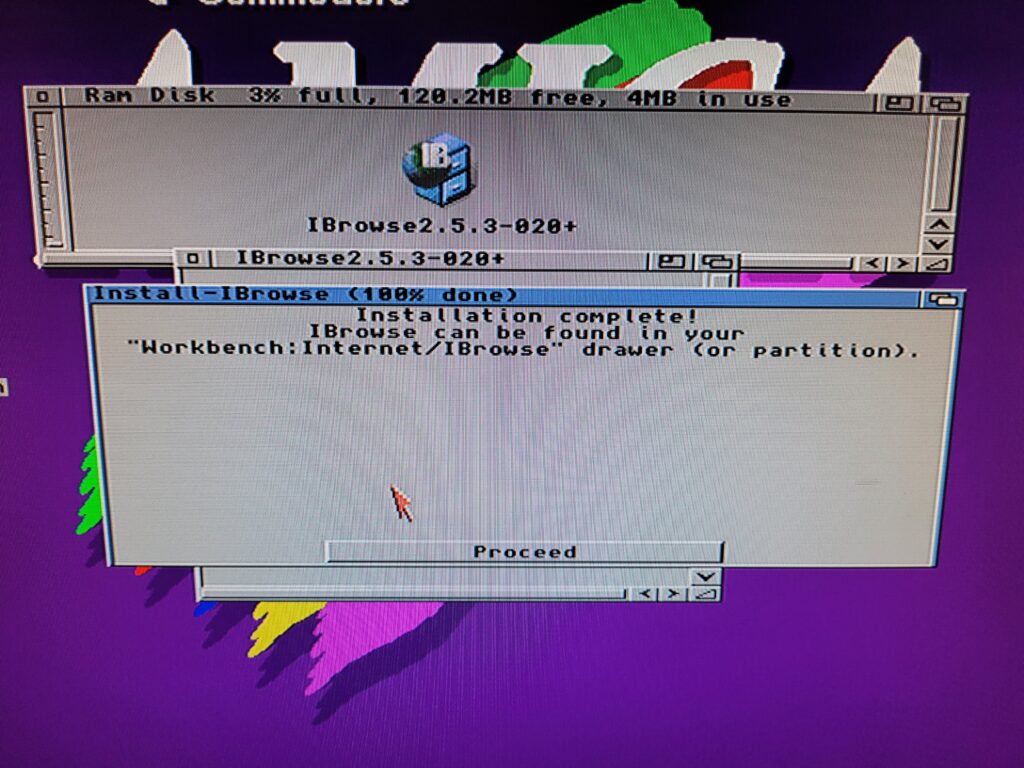
If everything went smoothly that will be the end of the install. You should see a confirmation window along with a reminder of where IBrowse was installed.


Amiga Web Browser

IBrowse is now installed!


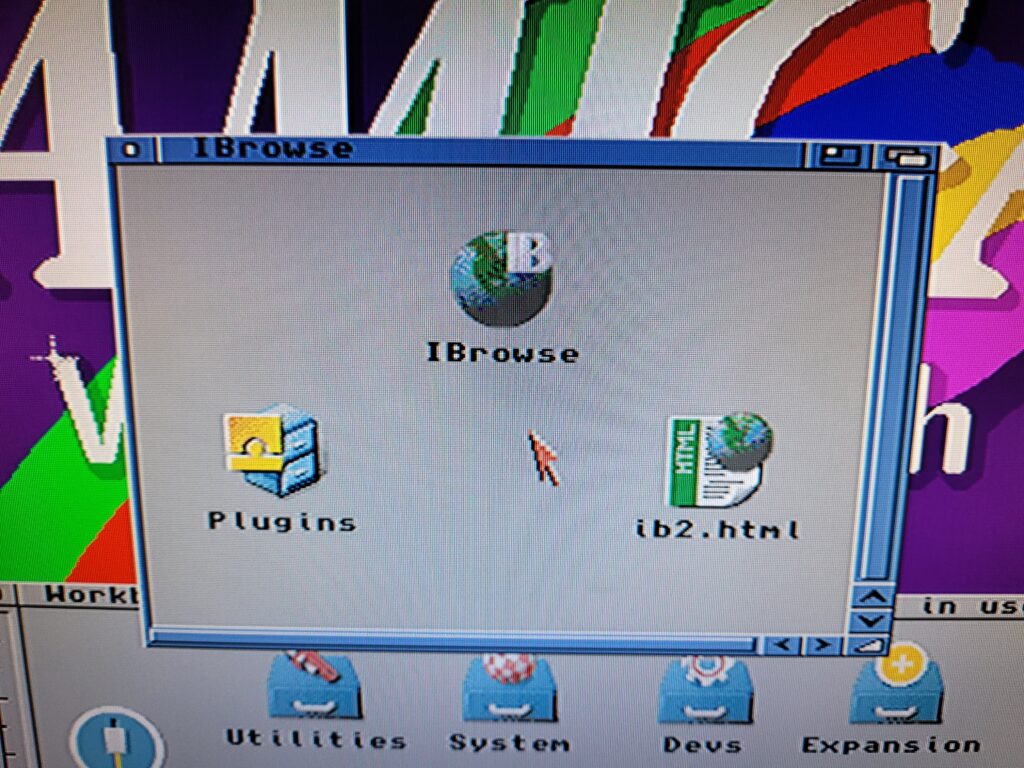
Opening the folder should reveal the main IBrowse program, a plugins folder and some documentation.


Amiga Web Browser

The IBrowse program icon.


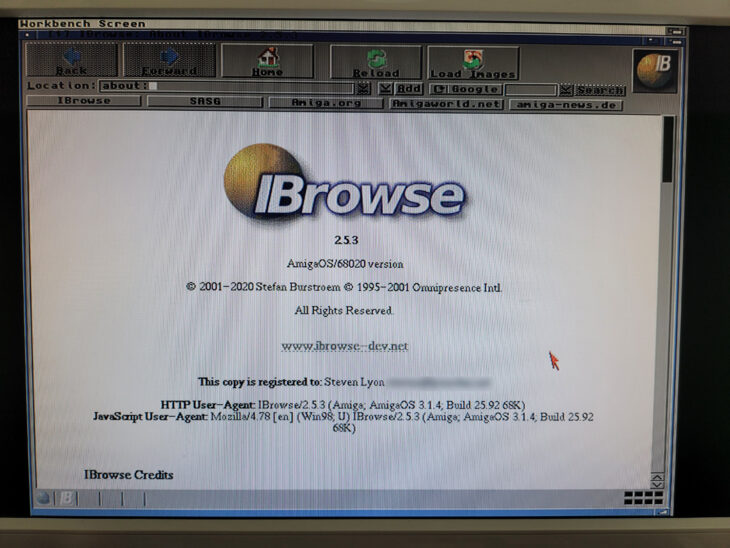
When you run the IBrowse program it should bring up a screen very similar to the one shown below.


Amiga Web Browser

The IBrowse splash screen.


Taking a look at a few websites.

At last we can finally do some surfing like it’s 1995 again! Although IBrowse can access secure sites that doesn’t mean it will work with every site. The web has evolved a lot in the past 25 years and the Amiga has not. Graphics and Javascript intensive websites are off-limits, as are sites heavily reliant on CSS which IBrowse doesn’t currently support. CSS is promised for IBrowse 3. Having said that, there’s still plenty of sites we can visit that display well and finding out which ones work is an adventure in itself!


Amiga Web Browser

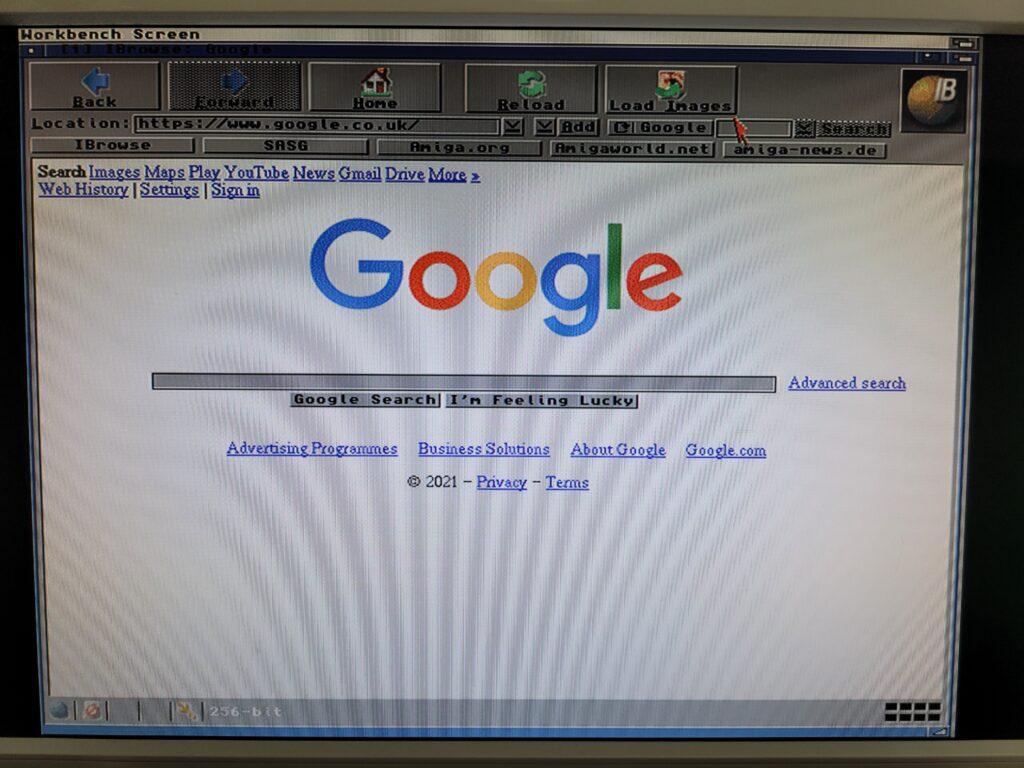
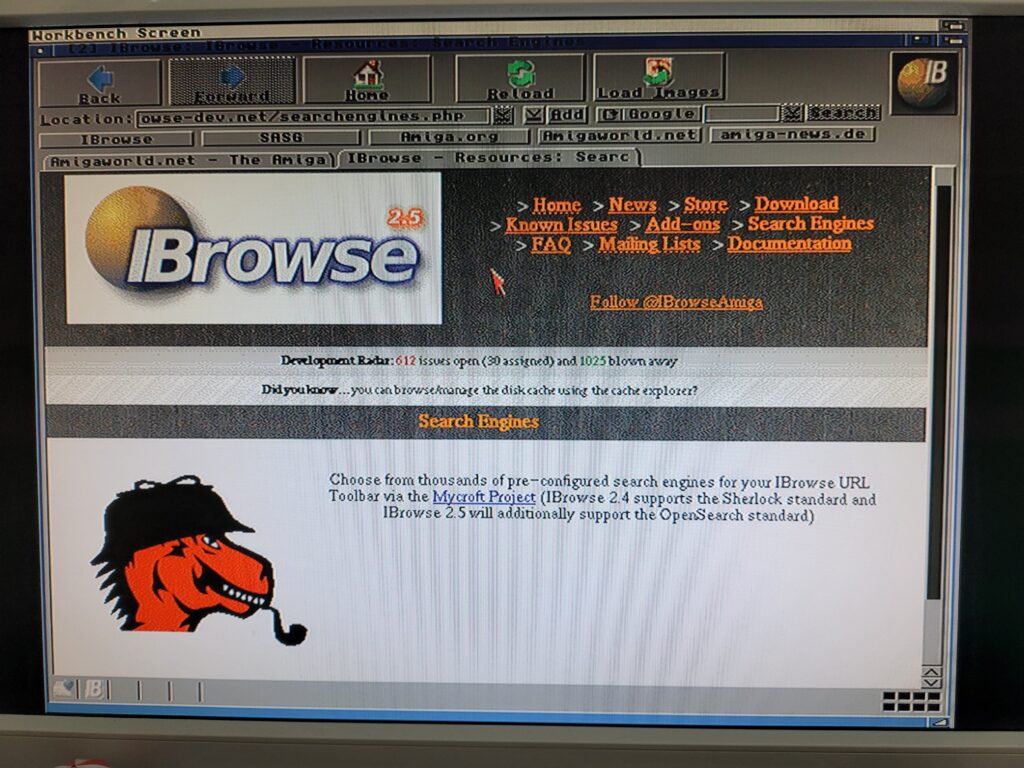
Google as viewed in IBrowse. Fun fact – Google’s search page didn’t even exist back when IBrowse launched!


Thankfully Google works like a dream and the page comes up in a matter of seconds. There’s also a built-in Google search in the Toolbar which elicits search results in seconds too.


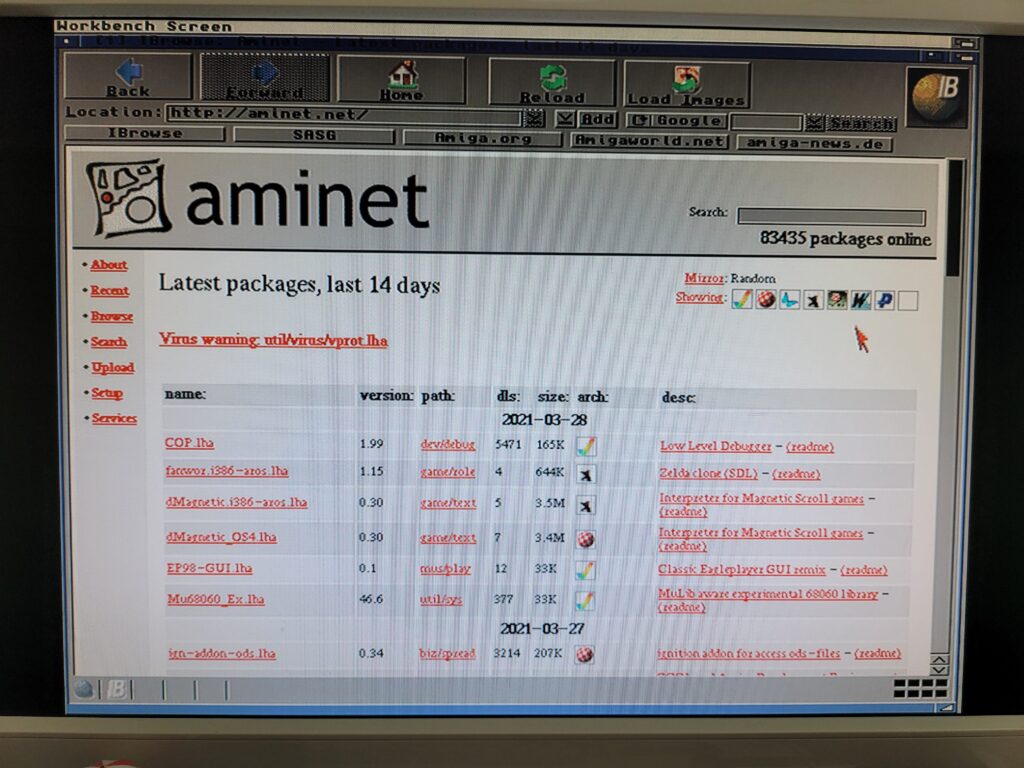
Aminet works really well in IBrowse too, displaying pages and search results in 2-3 seconds. Downloading multiple programs is a breeze too thanks to the built-in download manager. With this capability on the Amiga itself it will no longer be necessary to download stuff on a PC and then transfer it across.


Amiga Web Browser

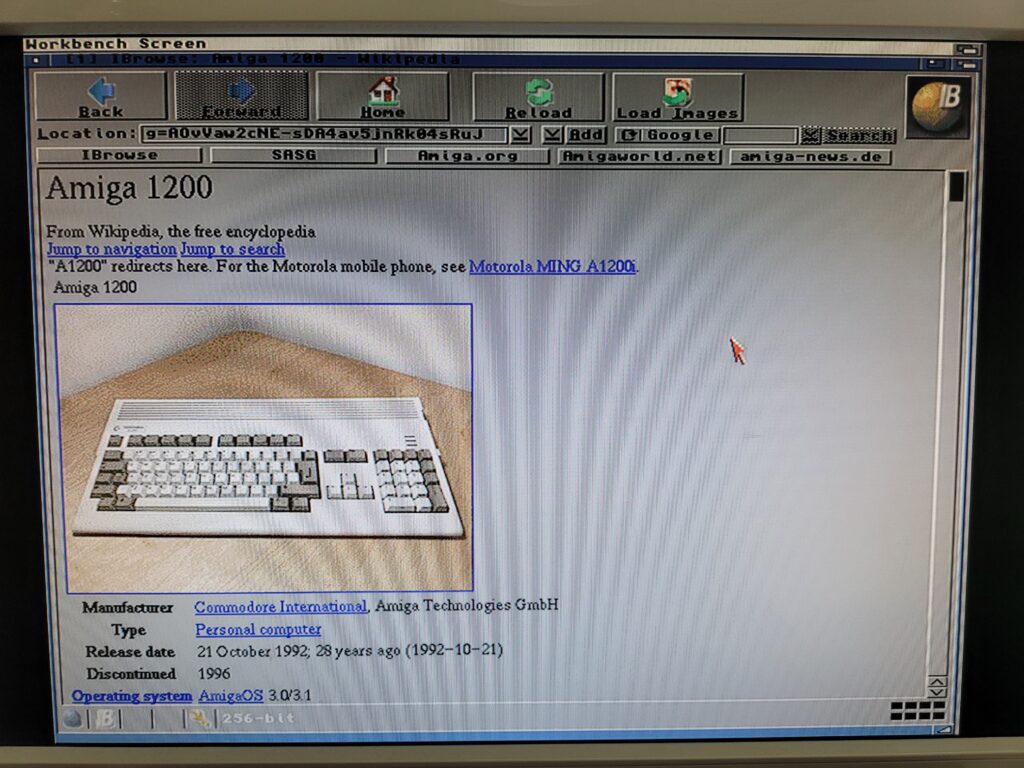
Wikipedia viewed in IBrowse.


Wikipedia also works pretty well as it tend to have lots of text and relatively few images.


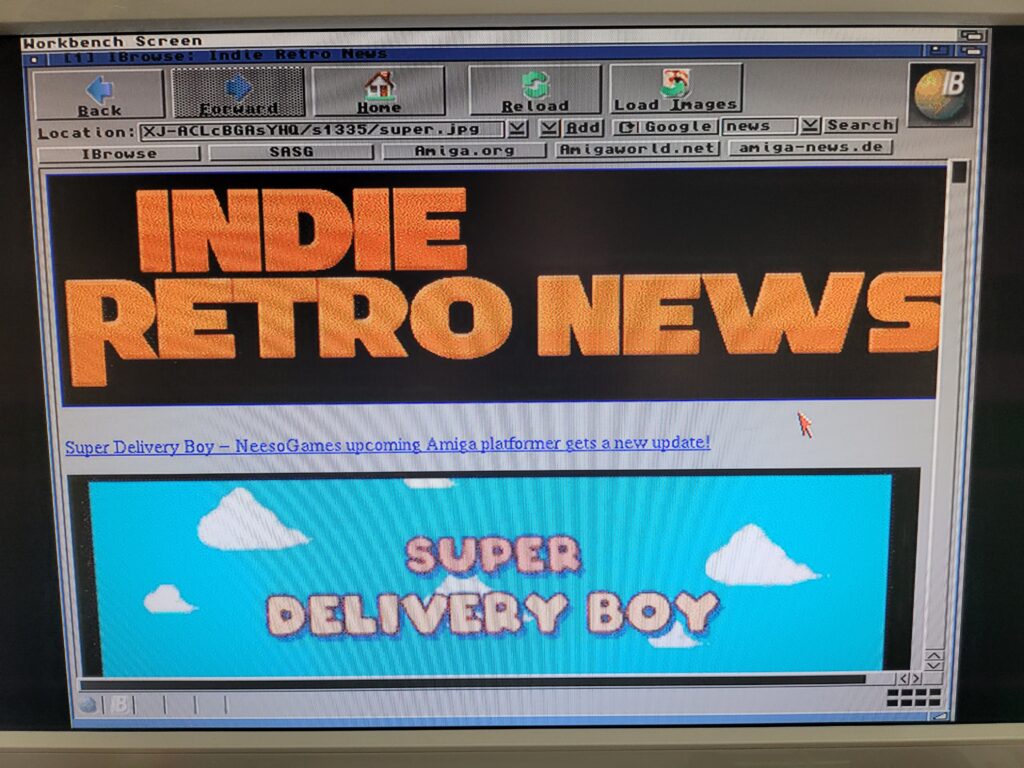
Amiga Web Browser

Indie Retro News in IBrowse.


One of my favourite Retro gaming sites works pretty well too, albeit a little slow loading the images.


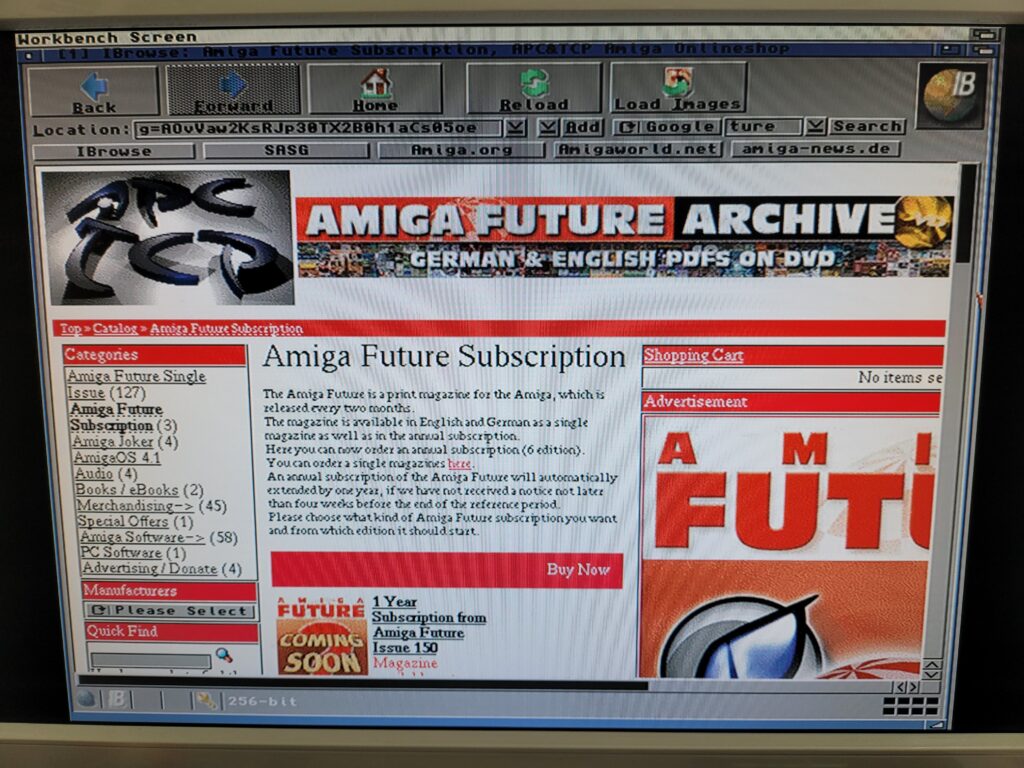
Amiga Web Browser

Amiga Future in IBrowse.


The Amiga Future site displays pretty well too.


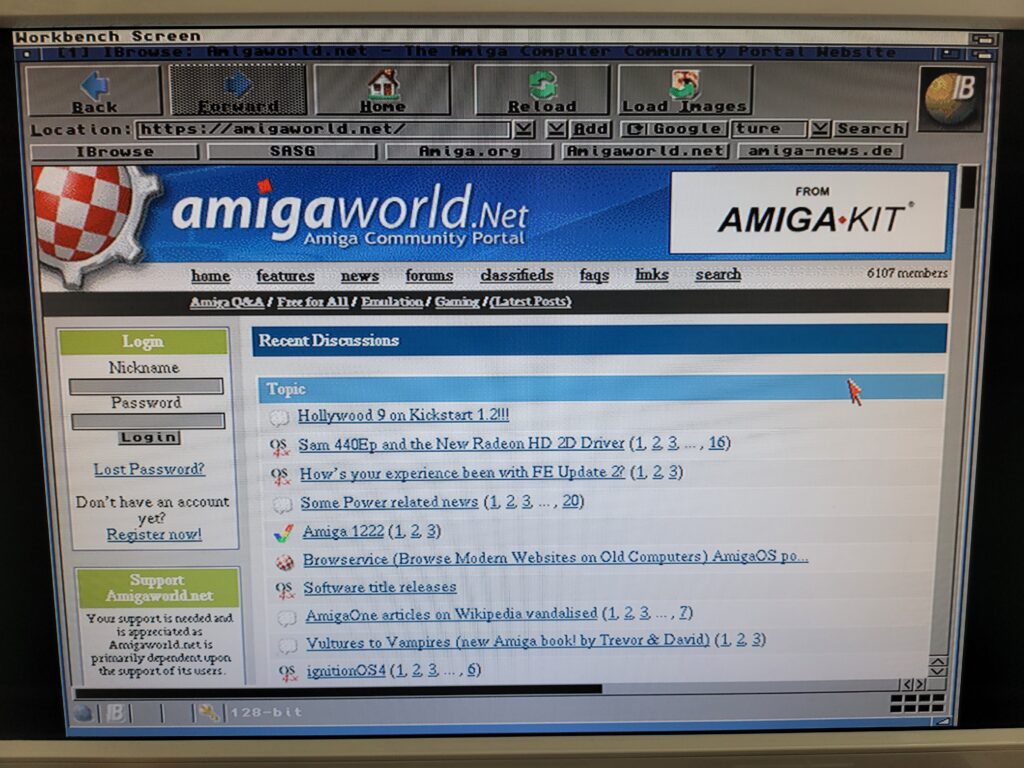
Amiga Web Browser

AmigaWorld in IBrowse.


As does AmigaWorld as you would hope so for an Amiga oriented site.


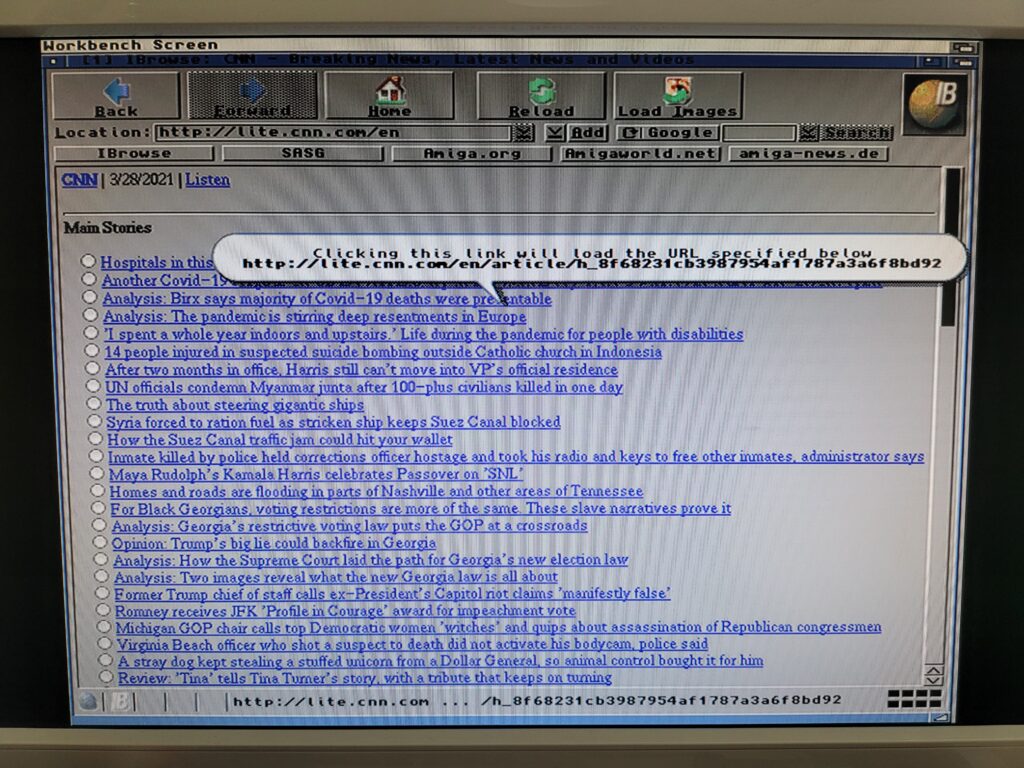
Amiga Web Browser

CNN Lite in IBrowse.


Most of the main news sites are drowning under the weight of photos and adverts so aren’t really practical for viewing on the Amiga – not if you value your time anyway! However there are still places we can go to, such as CNN lite for example.


Rounding Off

IBrowse is one of the few Classic 68k Amiga web browsers still actively being developed now. It can display https sites and has gained some modern features such as a password manager, integrated search bar and even tabbed browsing. I would really encourage you to pay for the full version if you enjoy using it. We need guys like this supporting the current Amiga scene otherwise we’d be stuck with AWeb now…


Amiga Web Browser

Tabbed browsing in IBrowse.


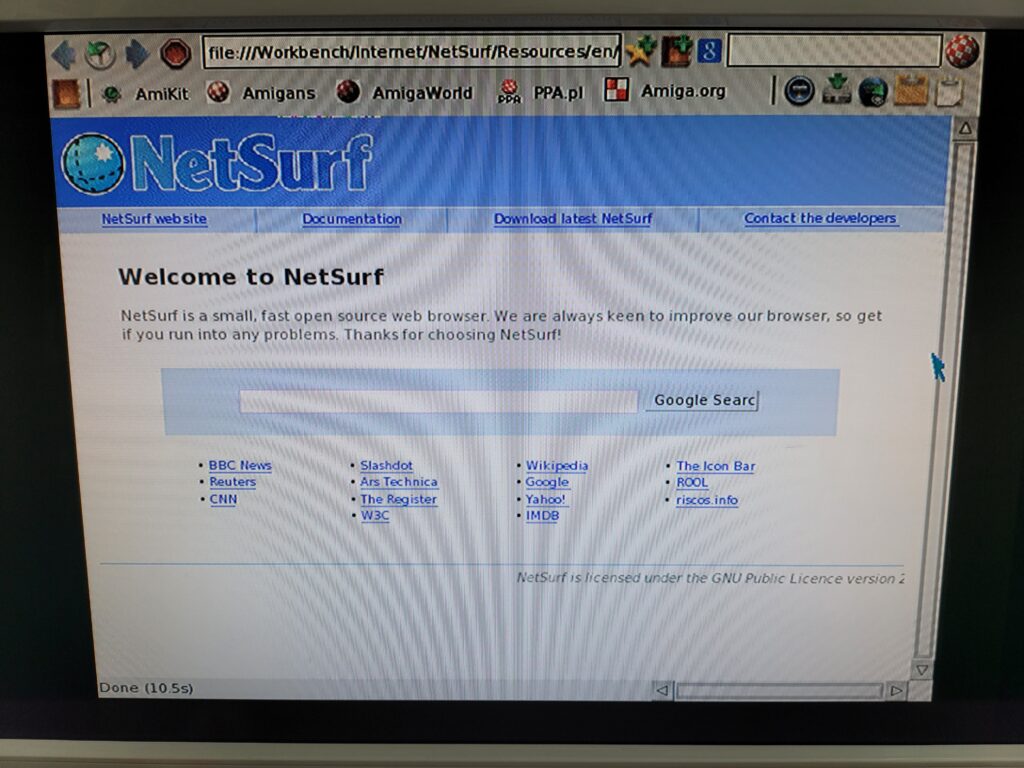
Just as an aside I also tried the NetSurf Amiga web browser as this claims to be able to work with CSS sites. However after eventually getting it working it wasn’t worth the effort. It looks pretty and may well work great on PPC or Vampire equipped Amiga’s but on my ‘030 A1200 it was diabolical. We’re talking several minutes to load a page (badly) and a horrible laggy mouse pointer that made navigation a nightmare. This browser is clearly aimed at NG Amiga’s so I dismissed it as an option. If I ever get an 060 or PPC card I will revisit it in the future but for now I’ll be waiting for IBrowse 3 to get CSS support.


Amiga NetSurf

NetSurf – not the browser you are looking for.


Anyway have fun surfing the internet with your new Amiga web browser and if you do find some cool Amiga friendly websites then please let me know in the comments below. I hope to compile a list of them in the future to help out my fellow Amigans.

And that concludes part 3 – Installing an Amiga Web Browser. In Part 4 I will look at adding both POP3 and IMAP email access. This is something I did a few years ago on my Vampired A500 running Apollo OS. However I want to revisit it and make sure it still works today and whether it’s actually viable on a slower non-Vampired Amiga.

Getting an A1200 Online Part 2 – Adding an Amiga TCP/IP Stack

Amiga TCP/IP Stack

Installing an Amiga TCP/IP Stack

By the end of Part 1 we’d installed a network card and ancillary software but still couldn’t do anything useful. This is because Amiga OS doesn’t have any sort of networking features built into it. For that we need to add an Amiga TCP/IP Stack. There are a few different options available to Amiga users in this area such as Genesis, Miami(DX), Easynet and maybe a couple of others. I chose to go with Roadshow. It’s probably the fastest TCP/IP stack around and still in active development. Version 1.14 was released in September 2020.


Amiga TCP/IP Stack

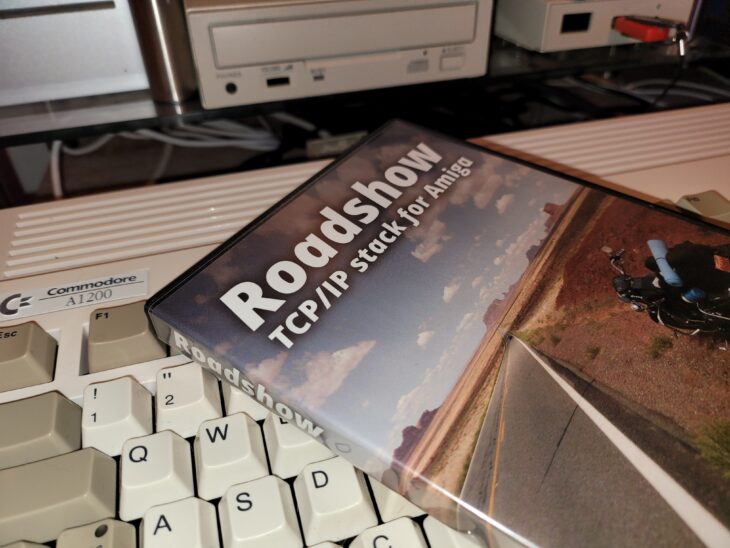
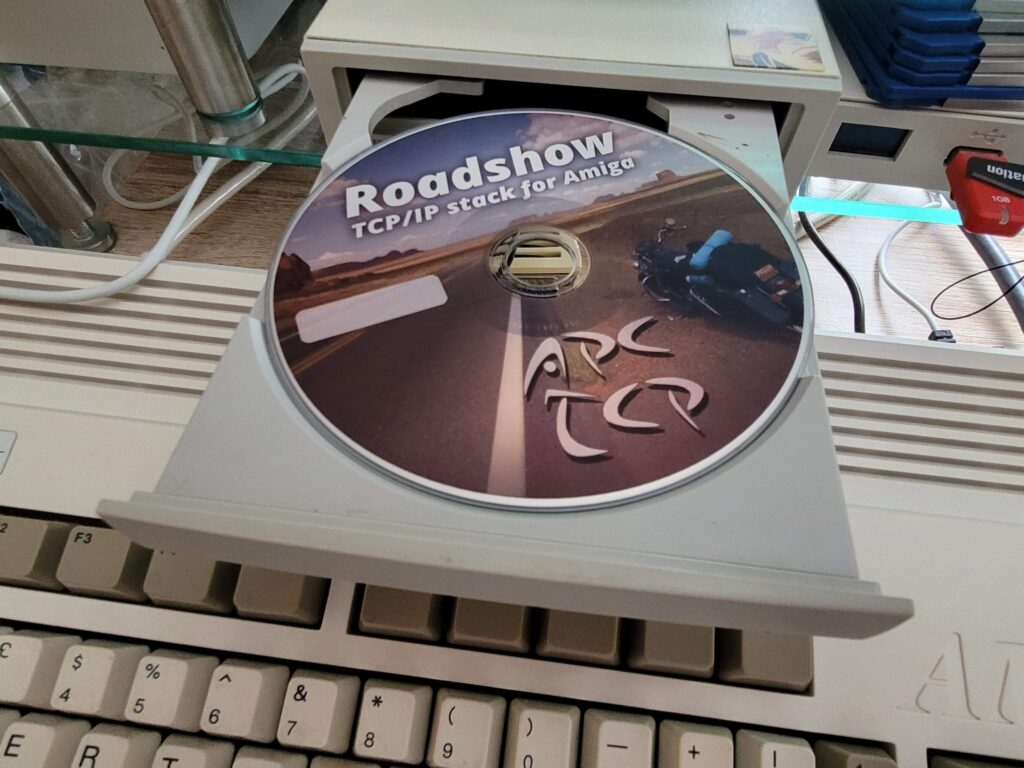
Roadshow installation CD.


I bought a physical copy of the software on CD but it can be downloaded too and burned onto a CD (it’s too big to go on a floppy).  A free demo is available if you just want to try it out… it’s fully featured but times out after 30 mins.


Amiga TCP/IP Stack

Roadshow installer.


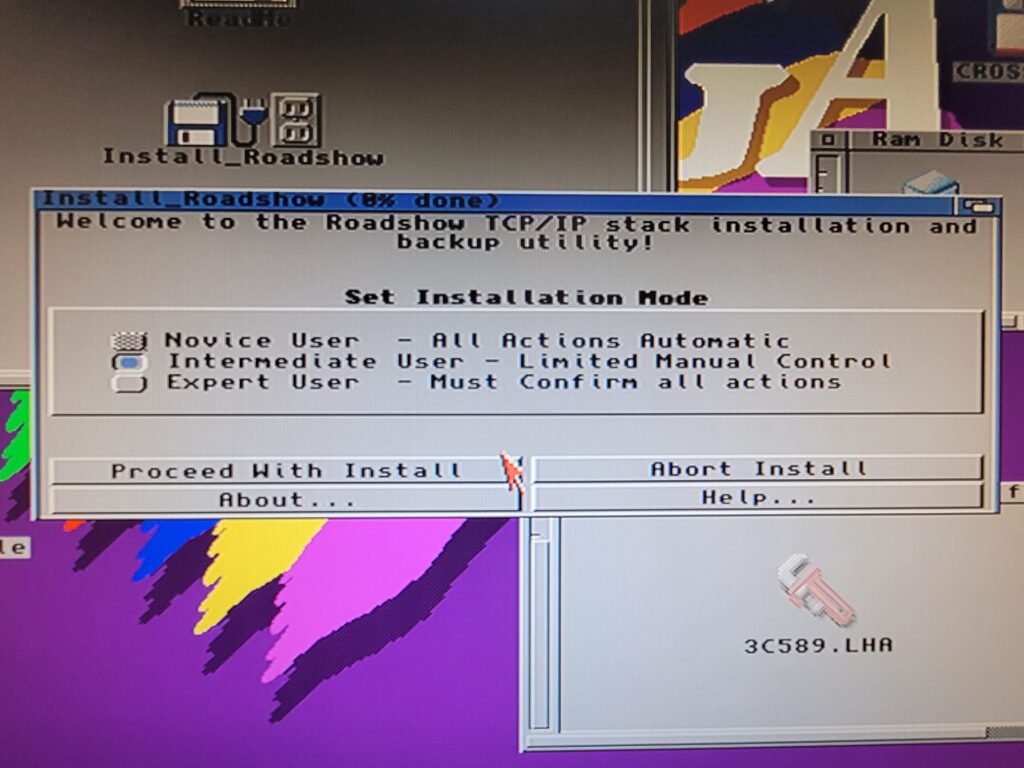
After running the installer I opted for the ‘Intermediate User’ and clicked ‘Proceed with install’.


Amiga TCP/IP Stack

Roadshow Installer.


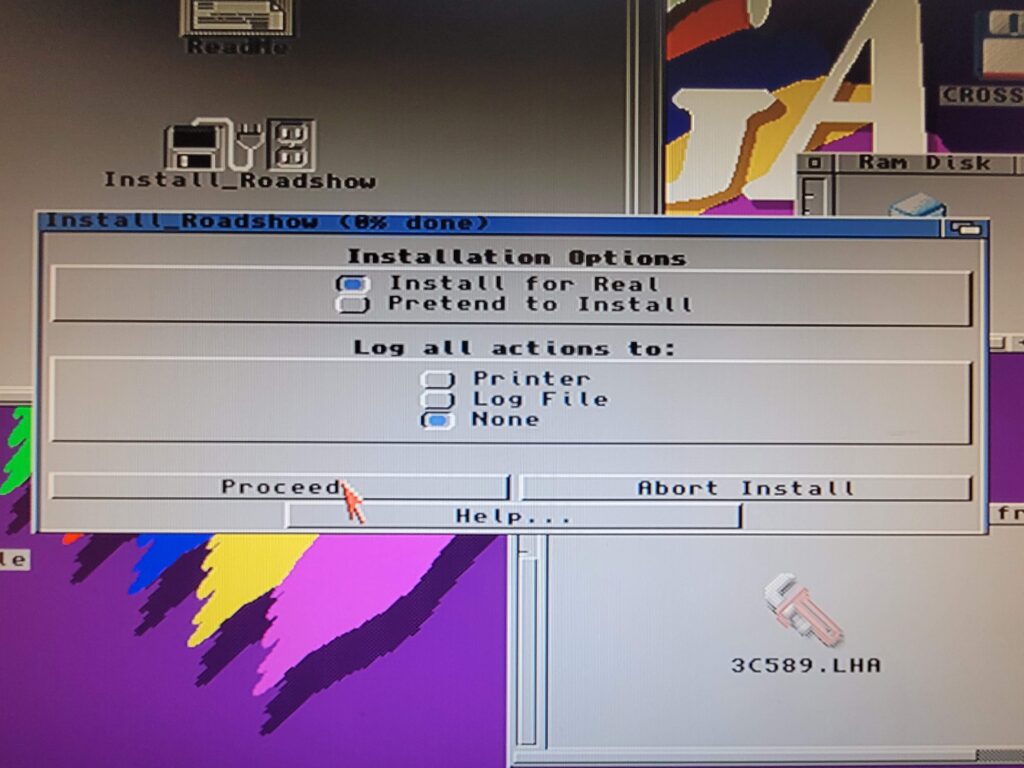
I left the next choice as ‘Install for Real’. The ‘Pretend’ option is just there in case you want to perform a dry run.


Amiga TCP/IP Stack

Option to install optimised 68020 version of bdsocket.library.


The next choice is an important one. It asks whether it should install a special version of bdsocket.library and drivers. As I’m running this on an A1200 with a 68030 CPU I answered ‘yes’. The answer would still be yes even on a stock A1200 as that has a 68020. Of course if you were doing this on an unaccelerated A600 then the answer would be ‘no’.


Amiga TCP/IP Stack

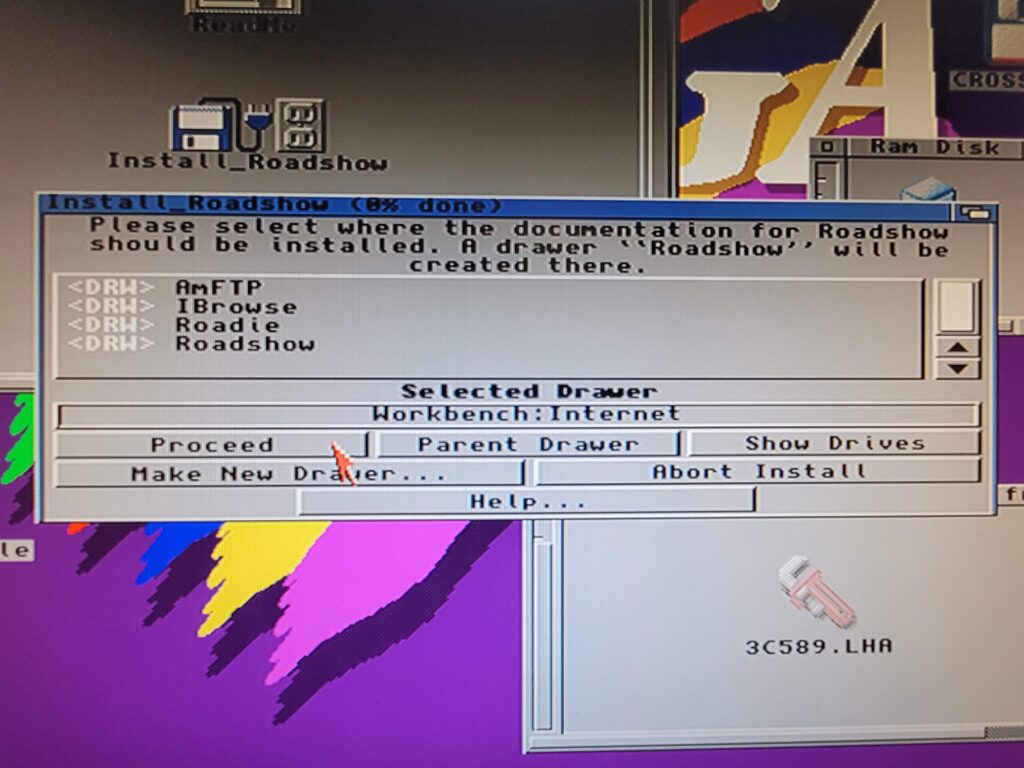
Selecting where to put the Roadshow install.


Next the Installer asks where to install everything. This can be anywhere really but I created a directory called ‘Internet’ on my Workbench partition so I could keep everything tidy and logical. To create a directory just use the ‘Make New Drawer’ button.


Amiga TCP/IP Stack

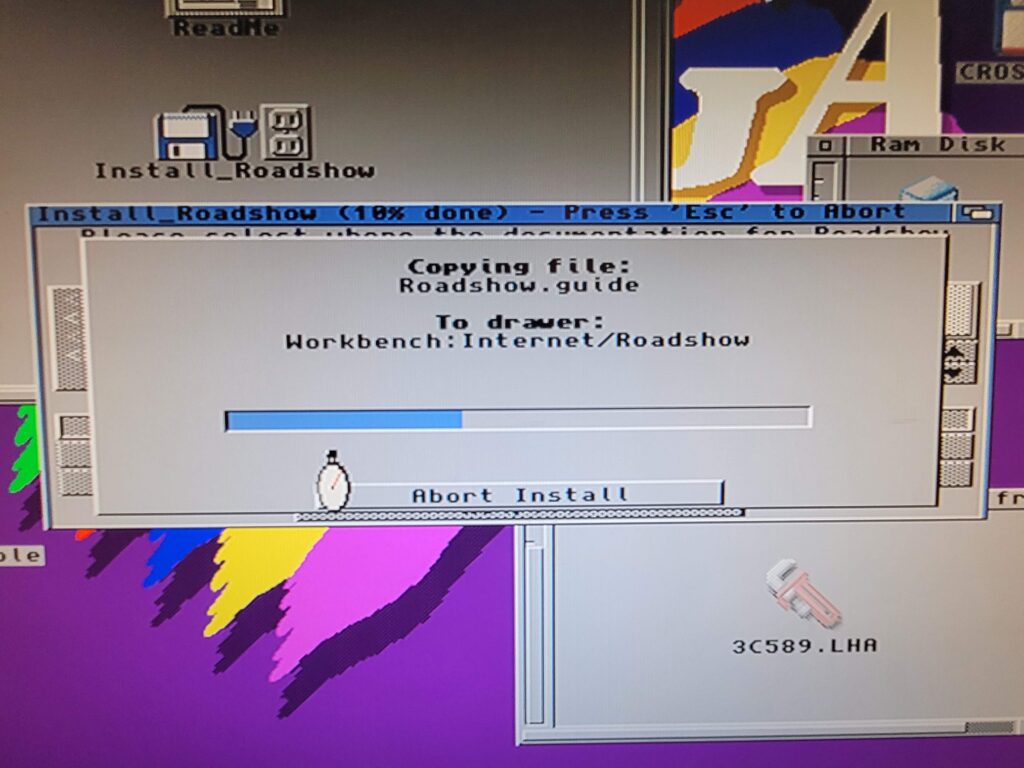
Installer copying files across.


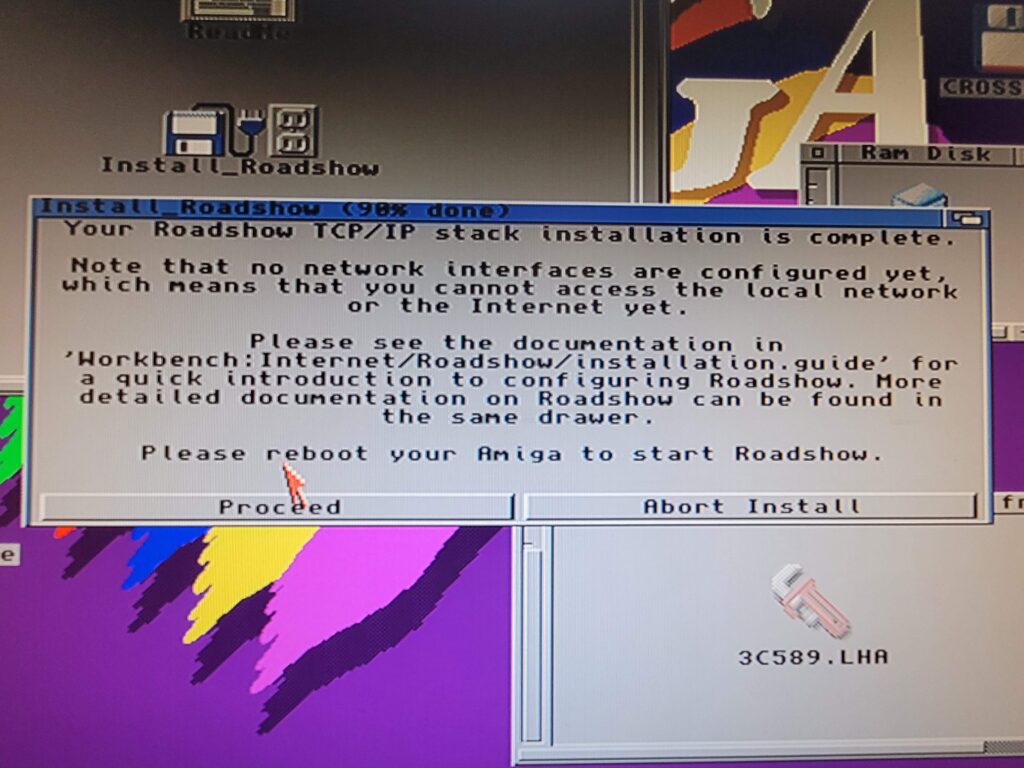
At this point a whole bunch of files were copied over. After a short while the penultimate ‘installation is complete’ message appeared.


Amiga TCP/IP Stack

Installation (almost) complete.


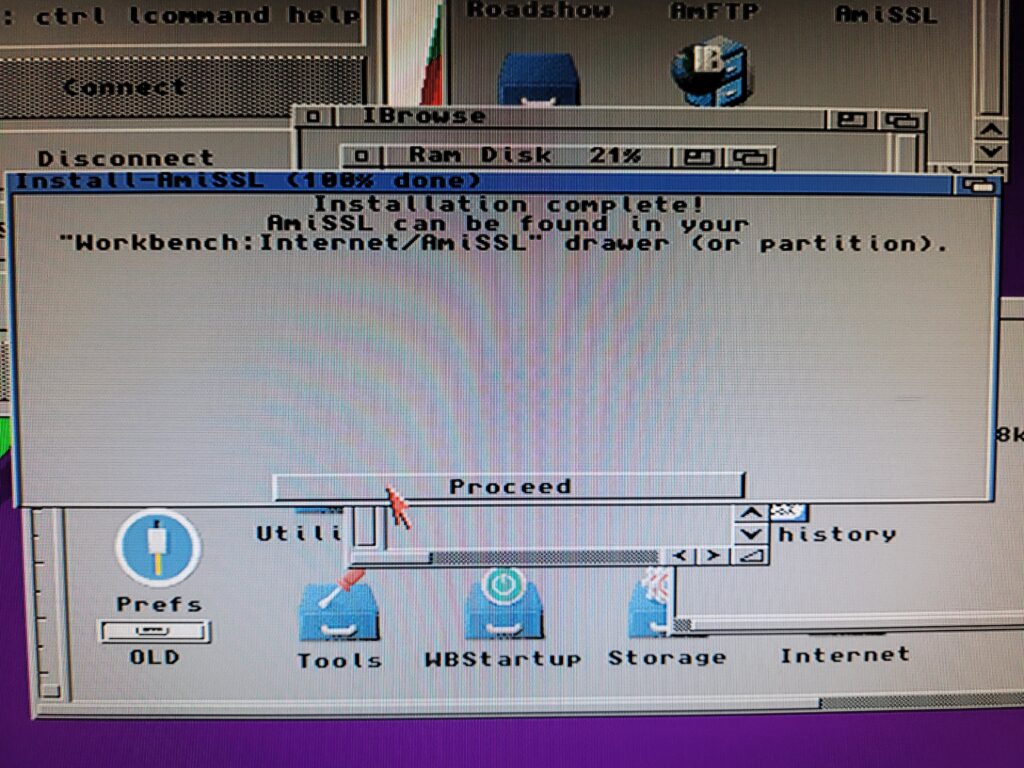
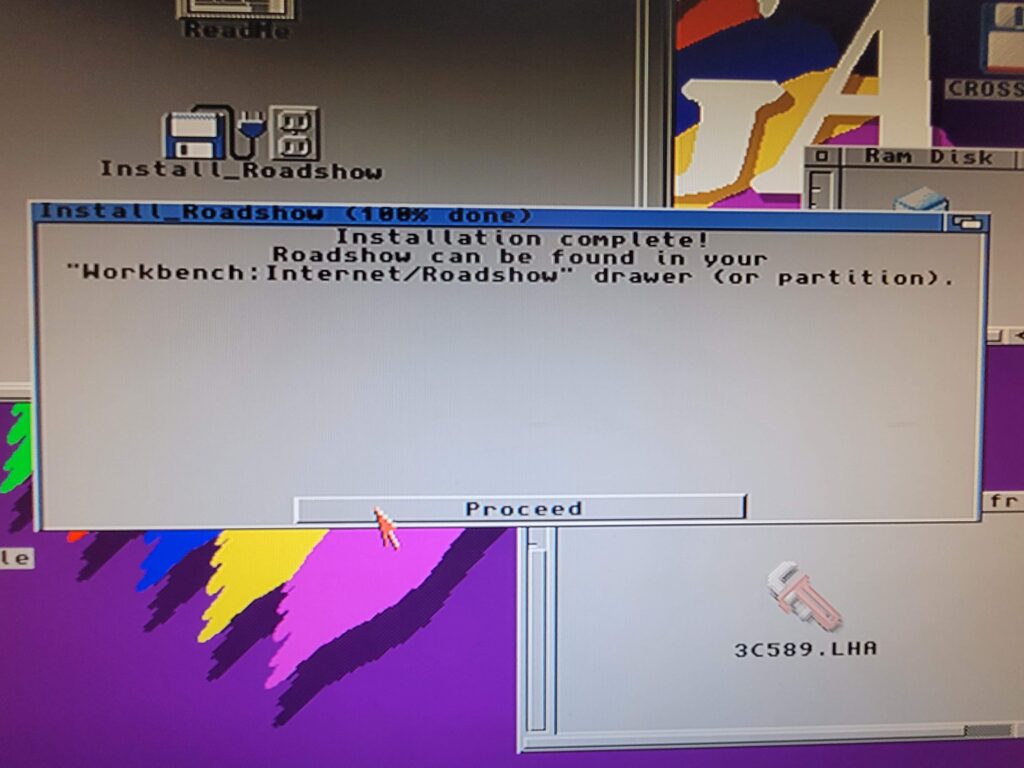
Clicking ‘proceed’ brought up the final ‘100%’ complete window.


Amiga TCP/IP Stack

Installation complete.


Manual Changes

With the automatic installation part now complete we need to finish things by hand. We need to have a configuration file that tells Roadshow which network card it should use to connect to our network and just how it should go about getting an IP.

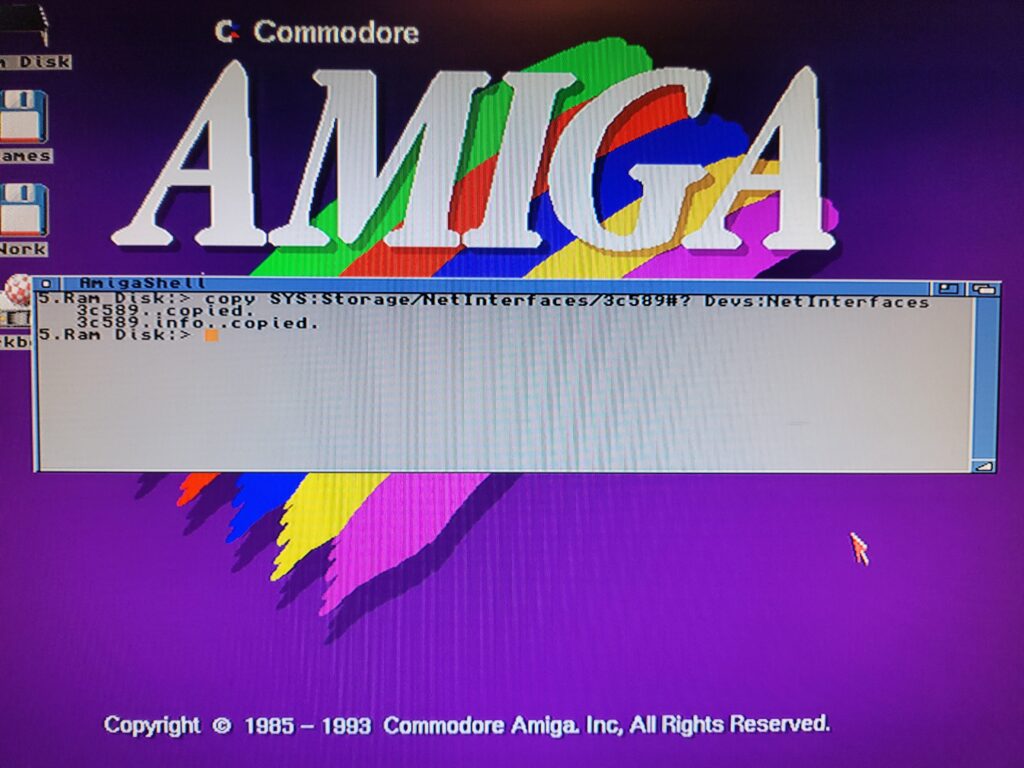
Helpfully the installer put several template configuration files for many popular network devices in the SYS:Storage/NetInterfaces directory. The file we need for our 3Com card is called 3c589 and it needs to be copied into Devs:NetInterfaces. To do this we enter the following command into a Shell window:

Copy SYS:Storage/NetInterfaces/3c589#? Devs:NetInterfaces

The ‘#?’ is a wildcard which instructs the Amiga to copy all files that start with ‘3c589’ across. We need to specify this to ensure that the corresponding 3c589.INFO file gets copied over as well.


Amiga TCP/IP Stack

Copying the 3c589 files across using the Shell.


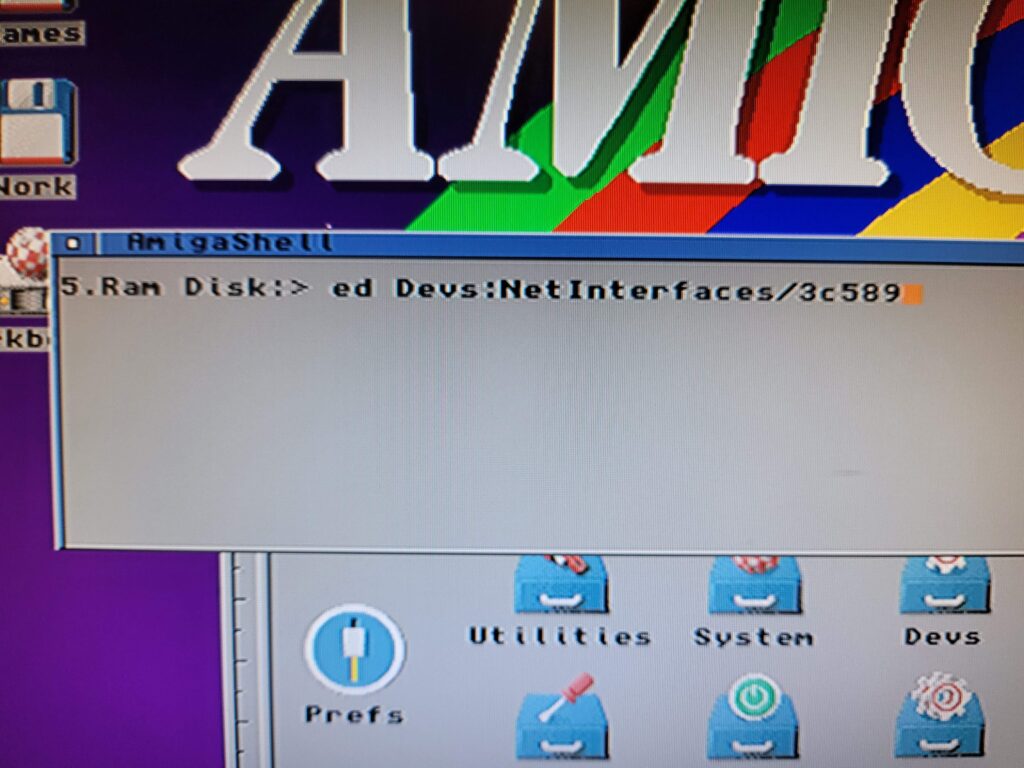
Once the file has been copied to its new home we need to edit it. Type in the following to use the Shell’s built in editor to make the necessary amendments:

ed: Devs:NetInterfaces/3c589


Amiga TCP/IP Stack

Launching the editor.


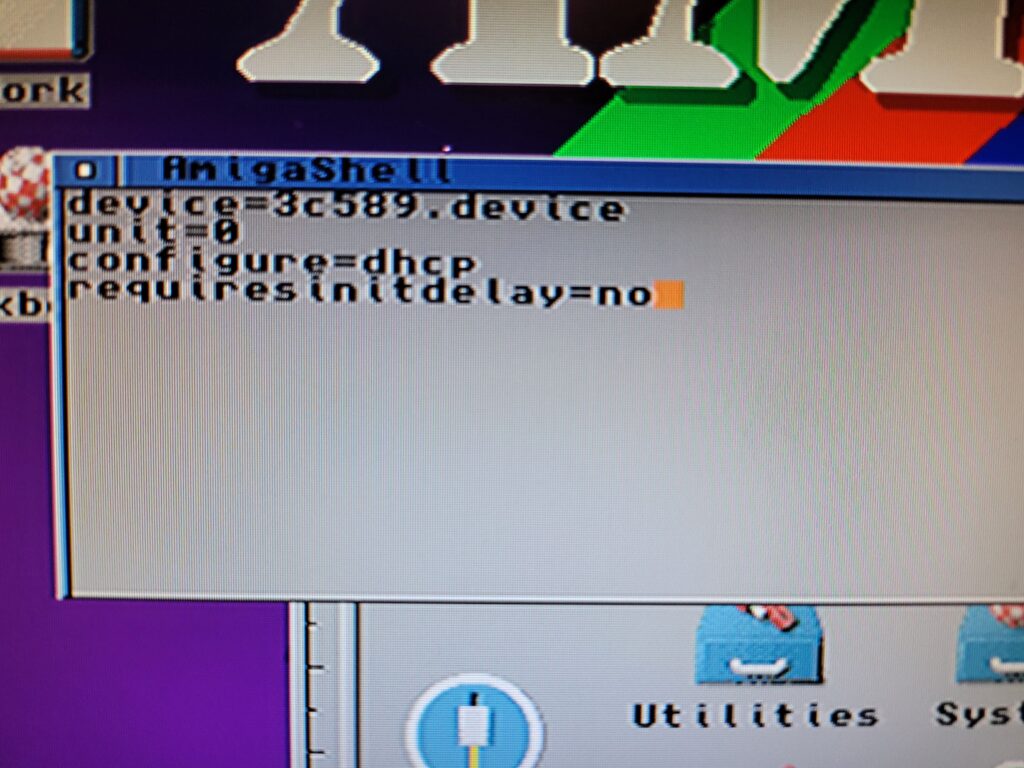
The screenshot below shows the entries that need to be made. The file contains a lot of unnecessary commands and comments designed to explain what everything does. All we actually need though is the following 4 lines of code.

device=3c589.device

unit=0

configure=dhcp

requiresinitdelay=no

To save the file press ESC, then x then press return. Alternatively select ‘Save and exit’ from the Project menu.


Amiga TCP/IP Stack

The 3c589 file should look like this.


This configures Roadshow to connect via the 3Com card and obtain an IP address over DHCP (i.e. automatically).


Testing

With the changes saved to the file it’s possible to check everything is working by typing the following command into the Shell.

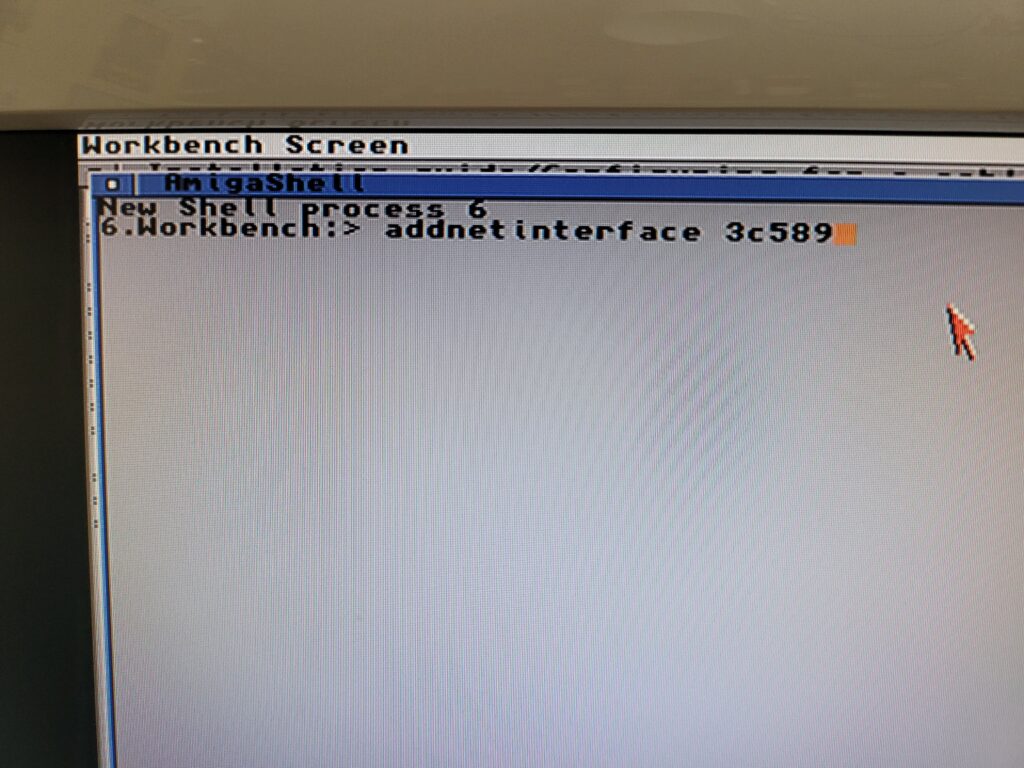
addnetinterface 3c589


Amiga TCP/IP Stack

Adding the network interface manually for testing.


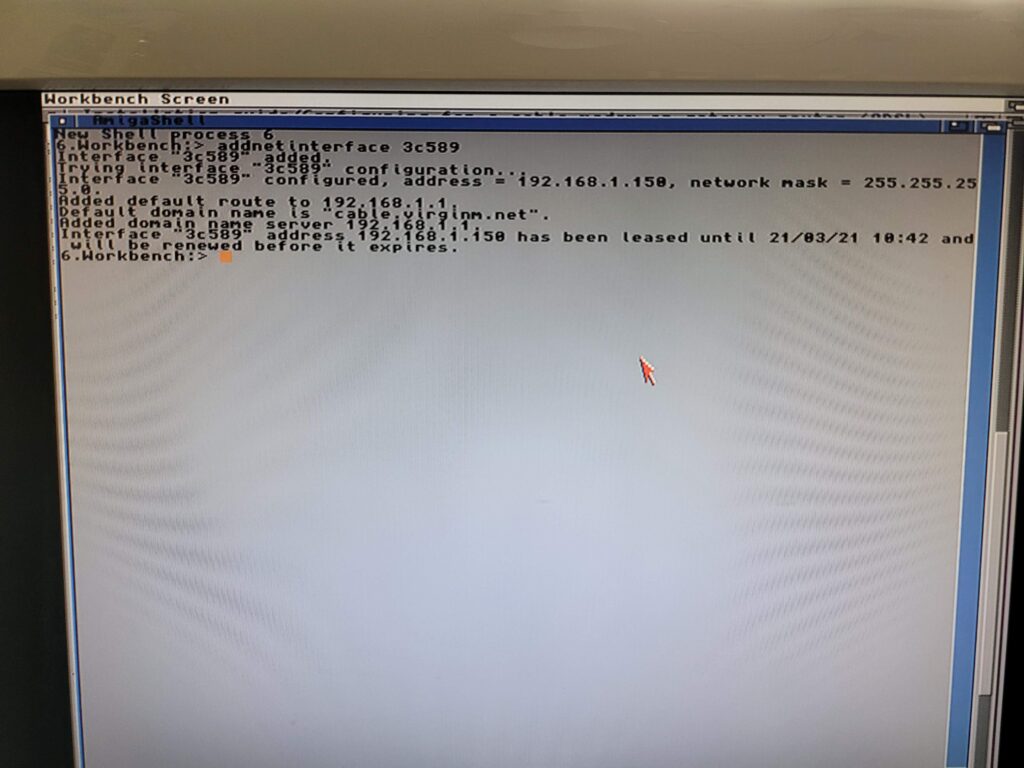
All being well this should add the network configuration, connect to your router and acquire an IP address. Happily this worked first time for me when I tried it and brought up the screen below.


Amiga TCP/IP Stack

Success – Roadshow has successfully connected to the network.


With that little test being successful the Amiga Roadshow TCP/IP Stack install is now complete. Every time the Amiga is turned on it will automatically connect to the internet. It does this behind the scenes so you won’t even be aware of it.


A Couple of Additions

Because of the lack of a visual interface for Roadshow I recommend a couple of other small programs (Netmon and Roadie) to provide a bit of feedback and convenience.

These programs are available from Aminet here:

Aminet – comm/net/netmon.lha

Aminet – comm/net/Roadie.lha

Both programs require no installation, just extract the archives to a folder somewhere on your Amiga and run them from there. I opted to put them into the ‘Internet’ folder that I created during the Roadshow install.

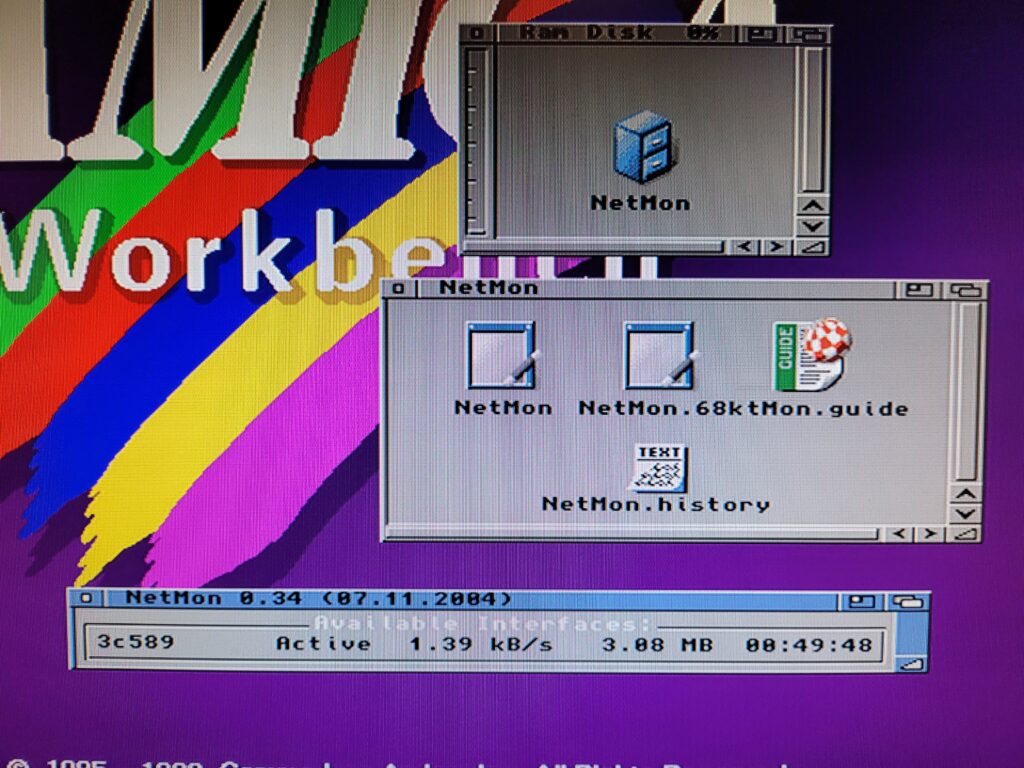
Netmon displays a little toolbar on the desktop containing info about download speed, total traffic and time connected.


Amiga TCP/IP Stack

NetMon Floating Info Bar.


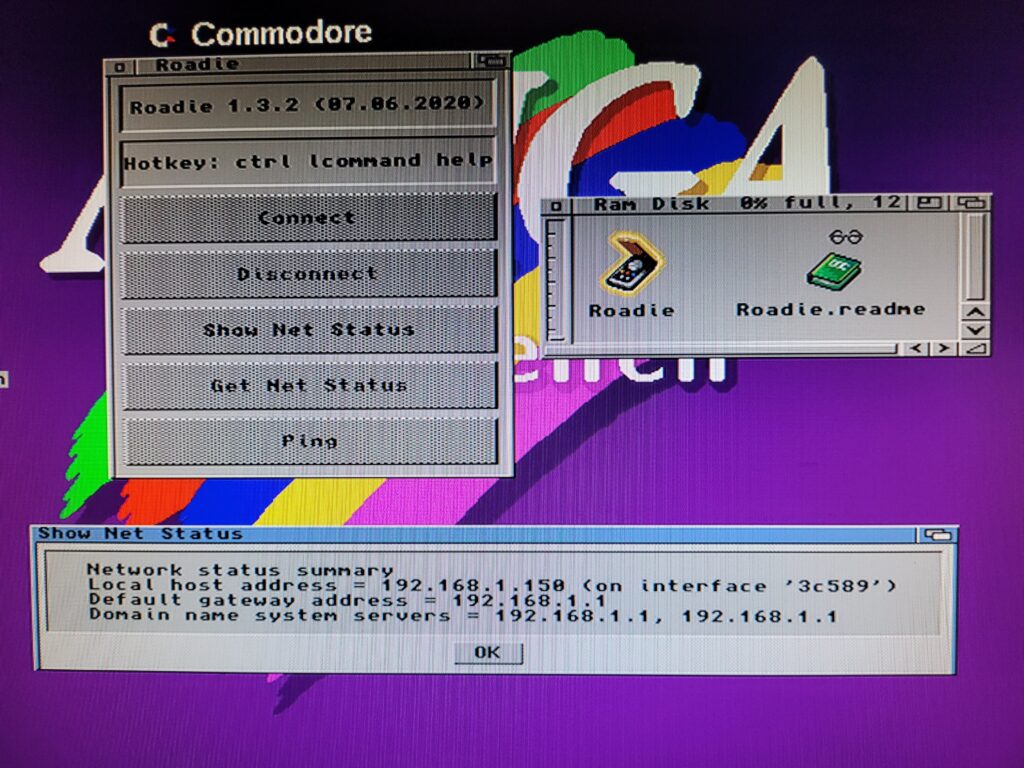
Roadie provides a GUI for connecting and disconnecting to and from your network. It also provides information about your current connection such as IP address and DNS servers etc.


Amiga TCP/IP Stack

Roadie – ‘Show Net Status’.


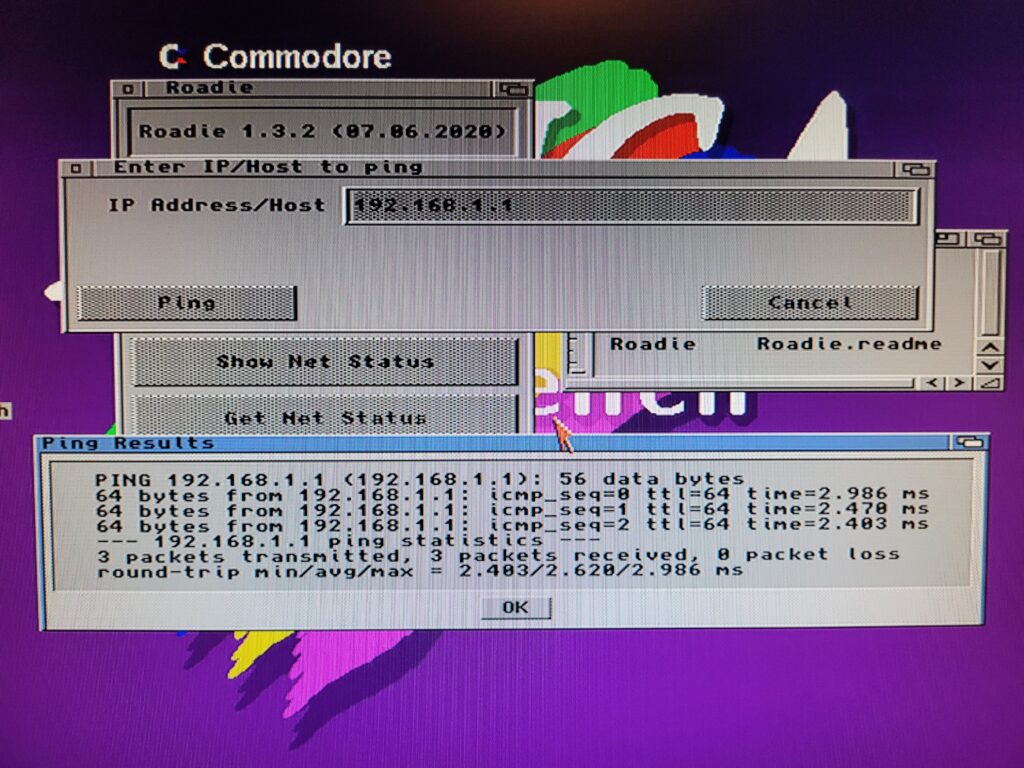
It also offers quick access to the PING command which comes in very useful for troubleshooting. Of course all these commands are available from a command line within the Shell but it’s very convenient to have them accessible via a GUI.


Amiga TCP/IP Stack

Roadie – ‘Ping’.


So now we have our Amiga A1200 with a working network card, configured TCP/IP stack and successfully connected to our network with a few extra tools to make life easier. In Part 3 I will look at installing a modern web browser capable of accessing https websites so we can finally do something on the Internet!

Getting an A1200 Online Part 1 – Adding a Network Card

In this guide I’m going to document how I got my Amiga A1200 online. I’ll cover installing a network card and configuring a TCP/IP Stack. I’ll also cover installing a Web browser and email program and maybe a few other bits and bobs too.

Prerequisites

  • Amiga OS 3.1.4 is already installed on my A1200 so this guide will reflect that.
  • My system includes a SCSI CDROM as part of my setup which I will be using to transfer larger files across in the early stages.
  • I have access to a floppy drive on my PC system that can format, read and write 720k DS/DD floppy disks that my Amiga can also read.

These are not all essential but if you intend to follow the guide you may need to find an alternative means of doing certain things as a result.

The Network Card

There are a few different options when it comes to network devices for non ‘big-box’ Amigas. On my A500 for example I’ve used a Plipbox device which plugs into the parallel port. There’s also the really old school option of using a serial Modem and a dial-up connection (there are still some companies that offer dial-up!)

However since I’ve freed up the PCMCIA port in my A1200 by replacing my Squirrel with a Blizzard SCSI Kit I decided to go for a PCMCIA ethernet card. Although PCMCIA technology is now obsolete there are still plenty of cards knocking around. I found a few in a ‘junk’ box that I used in Windows 98/XP laptops around the turn of the century. They’re usually available quite cheaply on eBay too. As a general rule it would appear 10Base-T cards are most likely to work whilst 100Base-T ones should be avoided.

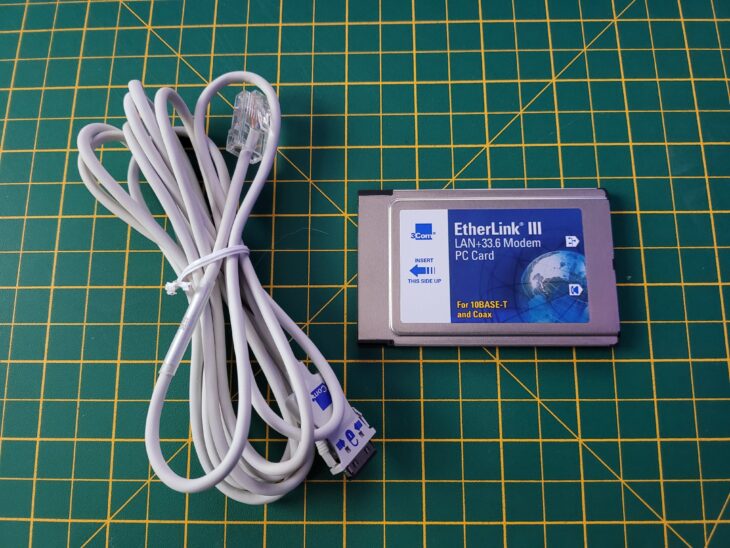
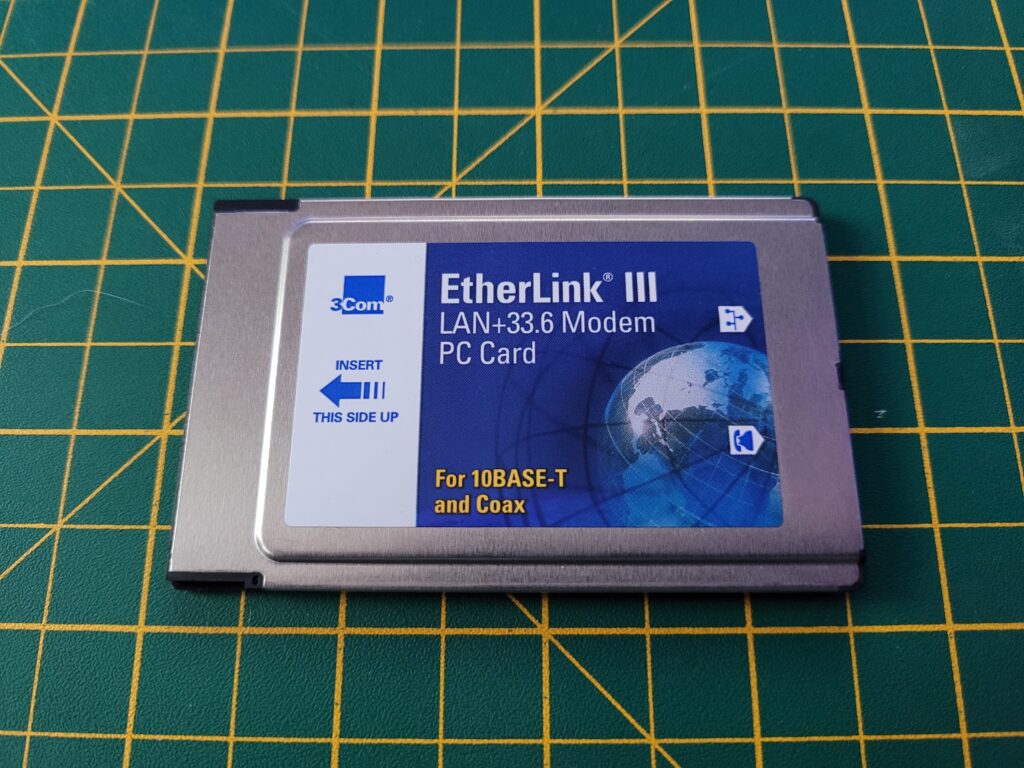
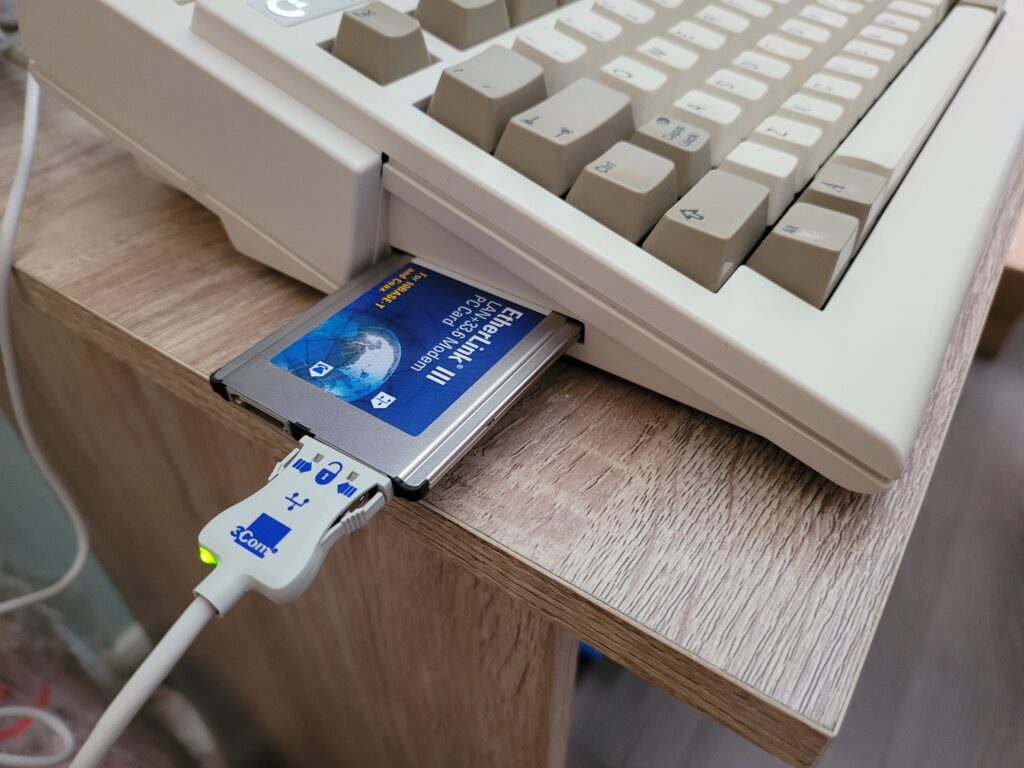
After a rummage through my box and checking Aminet I settled on the old 3COM 10Base-T card shown below.

Amiga A1200 online

My Ethernet card.

Driver

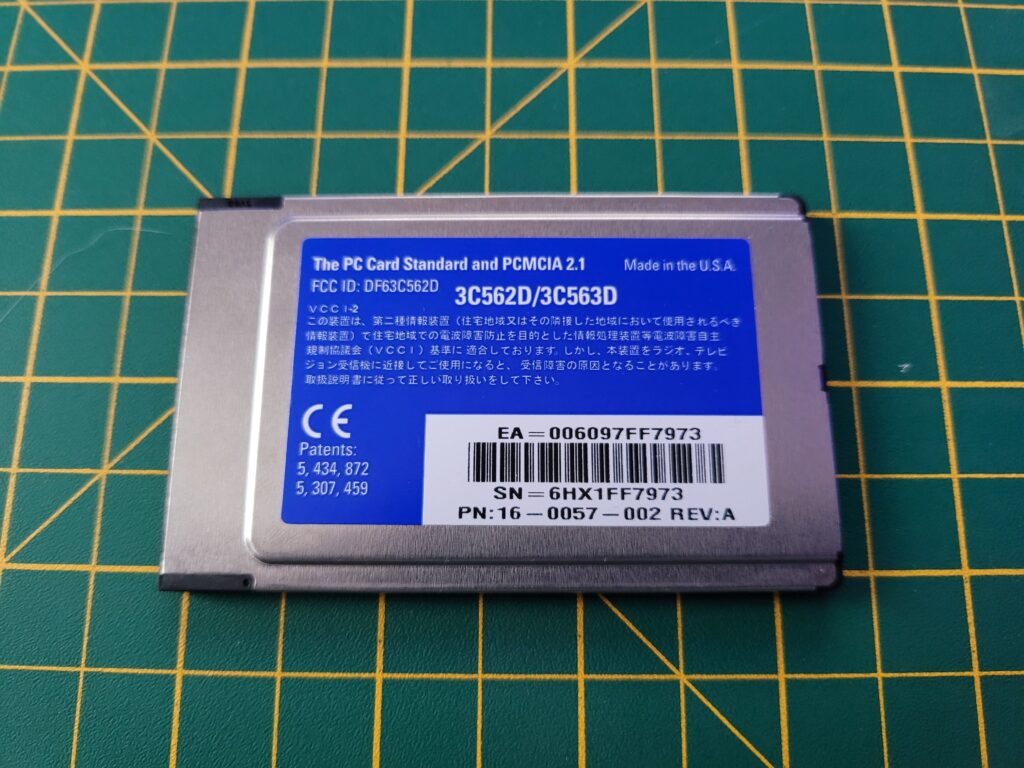
The part number is 3C562D and there is a SANA-II driver on Aminet that supports this card (and a whole bunch of others).

The driver can be found here: Aminet – driver/net/3c589.lha.

Below I’ve included a list of all the cards supported by this driver. If you are trying to get hold of a card yourself then make sure it is one of the models listed to avoid disappointment.

3C5623, C562B, 3C562C, 3C562D, 3C563B, 3C563C, 3C563D, 3C589B, 3C589C, 3C589D, 3C589E, 3C3FEM556C, 3CCE589EC, 3CCE589ET, 3CCEM556, 3CCEM556B, 3CXE589D, 3CXE589EC, 3CXEM556.

Amiga A1200 online

Back of my Ethernet card with model information.

Installing the Card

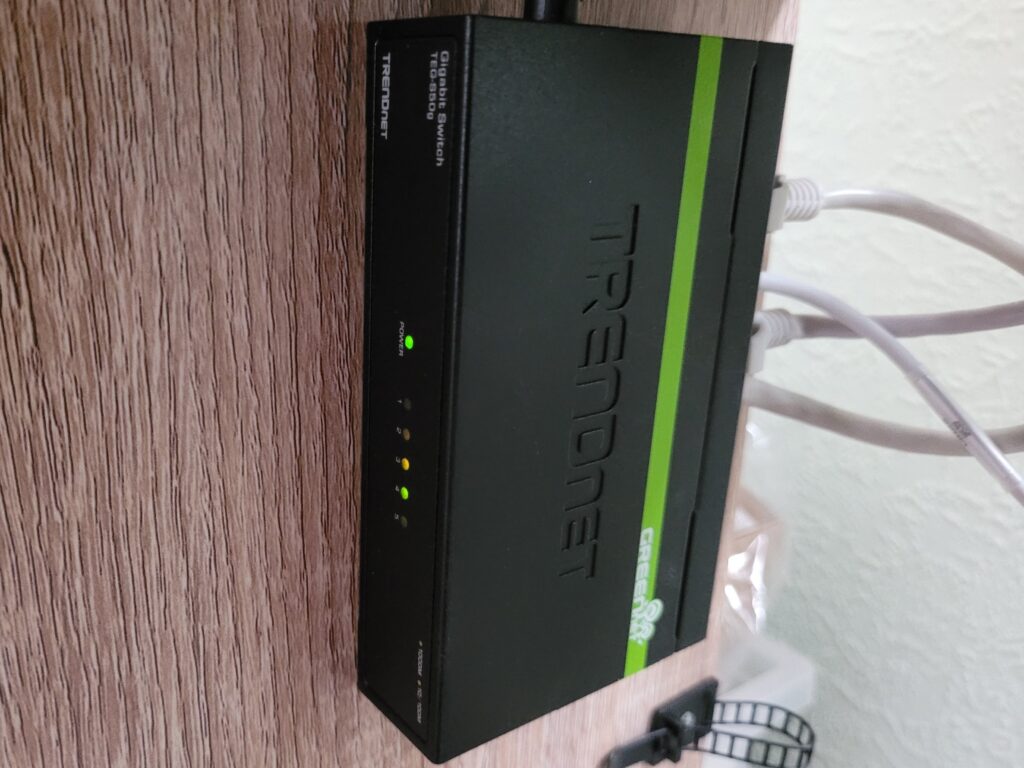
Installing the card couldn’t be simpler, it just slots into the PCMCIA slot on the left-hand side of the Amiga. It will only fit one way (usually label side up) so don’t force it. The Ethernet ‘tail’ plugs into an adjacent RJ-45 socket or in my case a cheap and cheerful little 5-port switch under my desk.

Trendnet Gigabit Switch

My cheap and cheerful Gigabit switch.

However I wasn’t terribly happy with how the card and the tail hung over the edge of my desk. With the connecter on the ethernet cable already being quite fragile it just looked like an accident waiting to happen. Sooner or later I was probably going to catch that cable and snap the connecter off!

Amiga A1200 online

Accident waiting to happen.

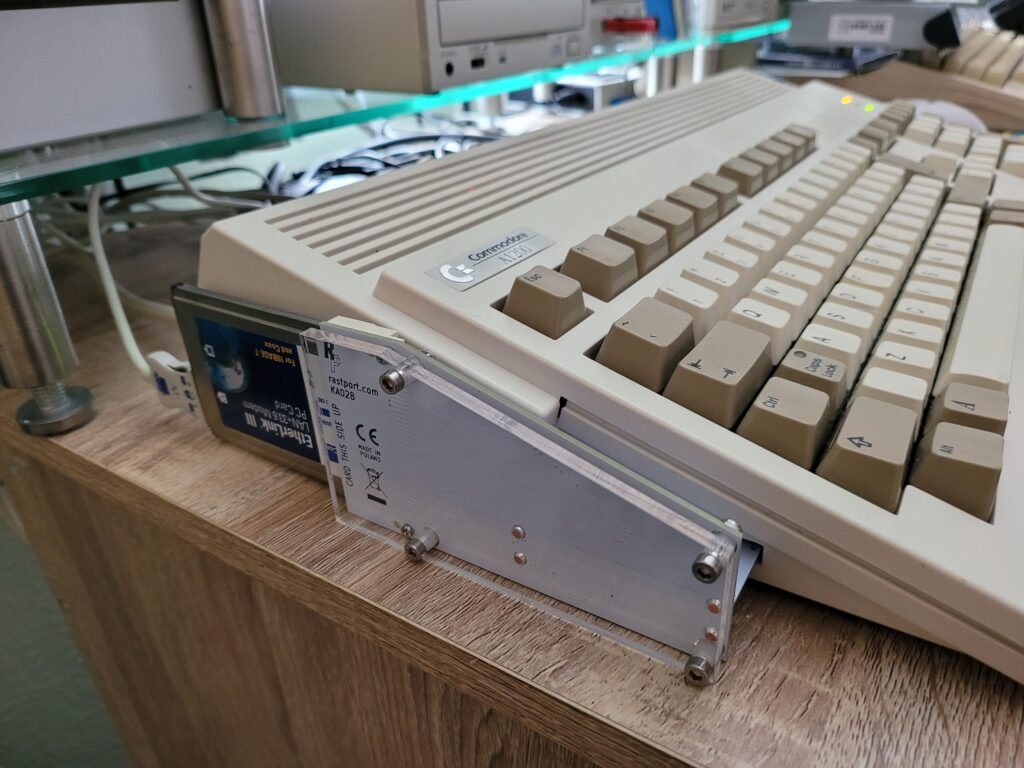
Obviously I wasn’t alone in thinking this as a search online lead me to an pre-existing solution. This little gizmo I found on eBay takes the PCMCIA slot and twists it through 90 degrees so that cards can be inserted flat against the side of the machine.

This slideshow requires JavaScript.

With the card fitted this way I no longer had to worry about snapping the connector off. Cabling was also streamlined thanks to the ‘tail’ now facing the back of my desk.

Amiga A1200 online

Ethernet card fitted to the PCMCIA adapter. Much better.

Installing the Software

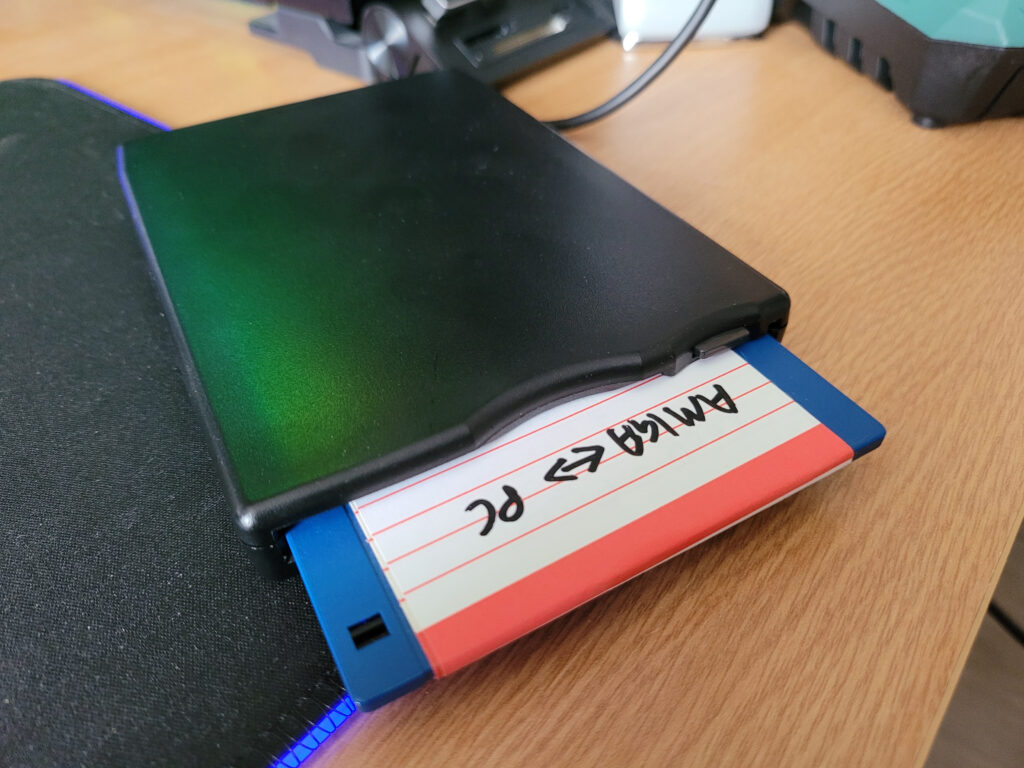
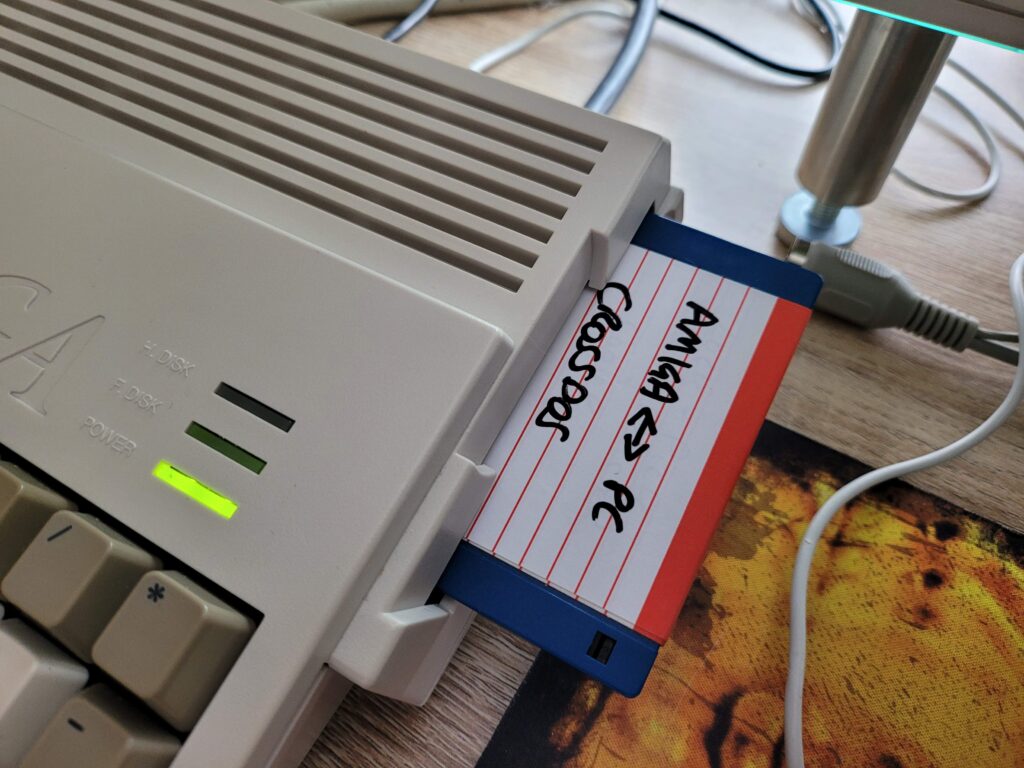
Having downloaded the driver off Aminet on my Windows 10 PC I needed a way of transferring this to my A1200. For this task I used my trusty 720K PC formatted floppy disk to move the file across.

Amiga CrossDOS disk.

Putting files onto a PC formatted ‘CrossDOS’ disk on the PC.

I used a USB floppy drive on the PC side and CrossDOS (which is part of Amiga OS 3.1.4) on the Amiga to read the disk. This method only works for files smaller than 720k (the max capacity of DD disks on PC) but the LHA archive was only 54K so not a problem.

Amiga CrossDOS disk.

Using a PC formatted ‘CrossDOS’ disk on the Amiga.

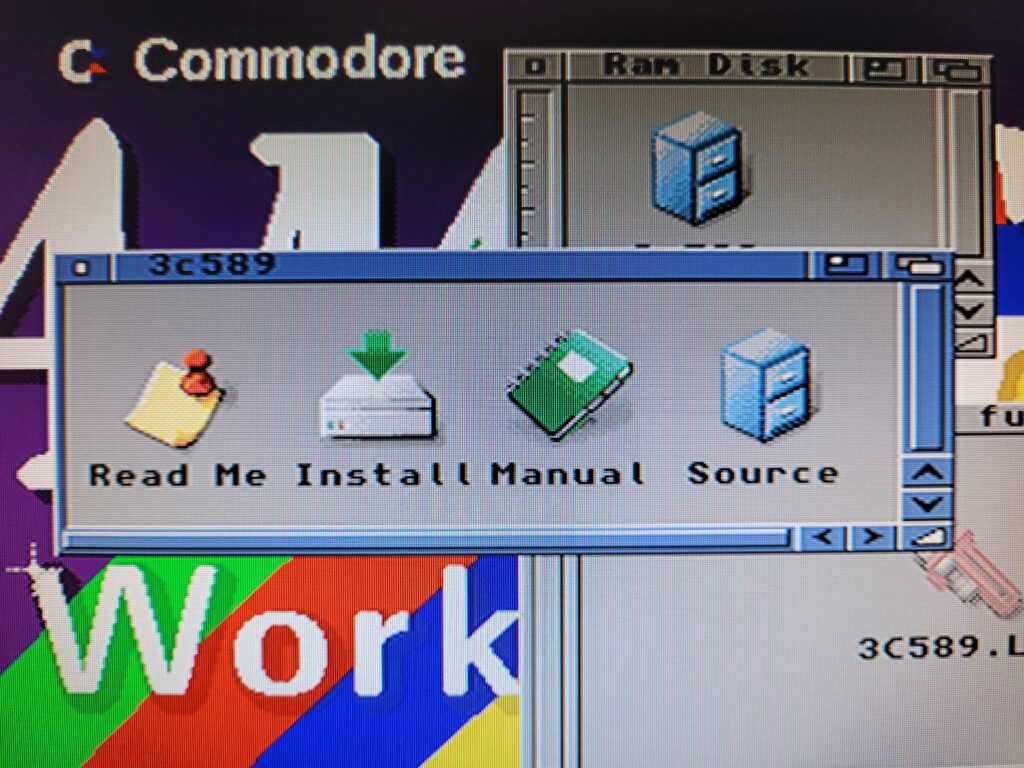
The LHA archive unpacked to a single ‘3c589’ directory that contained the installer for the driver.

Amiga A1200 online

This is what the unpacked archive should look like.

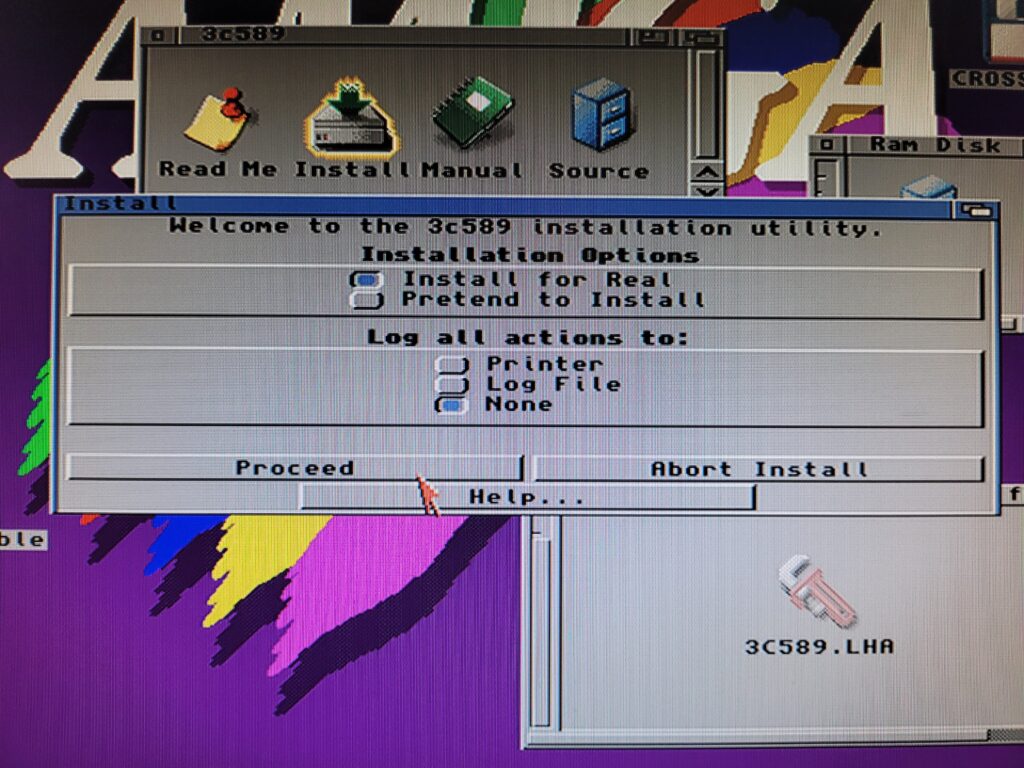
Running the installer was very straightforward, there were no options that needed to be tweaked.

Amiga A1200 online

Running the 3c589 installer.

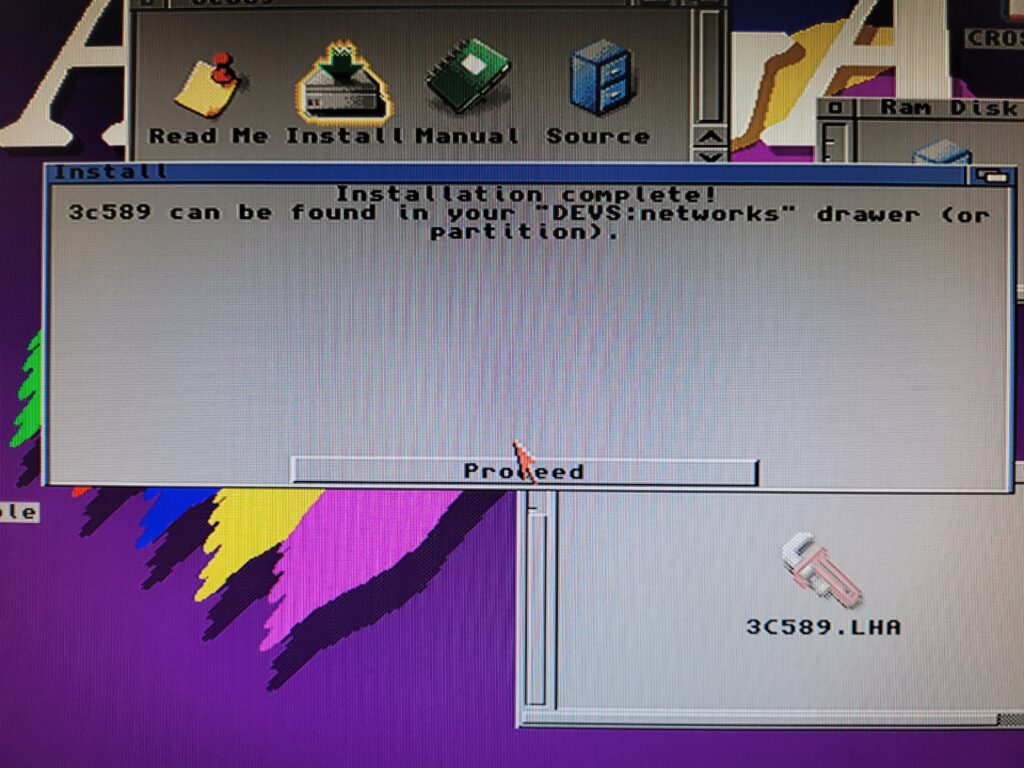
I simply clicked on ‘proceed’ a couple of times to complete the installation, whereupon it informed me that the driver could be found in the DEVS:networks directory.

Amiga A1200 online

Installation complete.

That’s all there was to it for the network card driver installation. However there’s one more thing that needs installing which I’ll explain below.

PCMCIA Bug Fix

Unfortunately there’s a bug in the implementation of the PCMCIA slot on the A1200 that was never fixed. It’s nothing major but it can cause a few irritations if not dealt with. Basically it’s supposed to be a hot-pluggable system and cards should be reset automatically when inserted. However the bug prevents this from happening so you can be left in a situation where the card stops working and requires a full power cycle of the A1200 to fix. For me this manifested itself each time I reset my Amiga using ‘CTRL A A’. It happened frequently enough to encourage me to look for a solution.

Fortunately there’s a fix available Aminet which requires the installation of two command line programs called CardPatch & CardReset. They’re available here:

Aminet – util/boot/CardPatch.lha

Aminet – util/boot/CardReset.lha

There’s no dedicated installer for them so they need configuring manually.

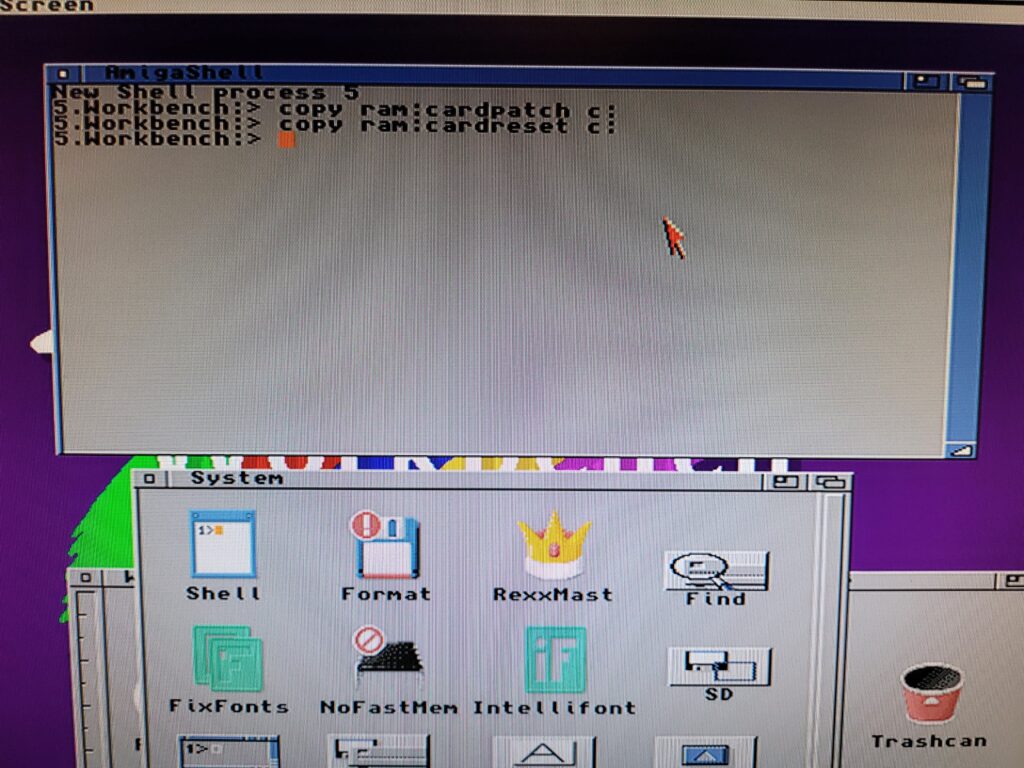
Once I had the LHA archives on my Amiga I extracted them to my RAM Disk. The CardPatch and CardReset commands need copying to C: and this can be achieved by opening up a Shell window and entering the following two commands:

COPY RAM:CardPatch C:

COPY RAM:CardReset C:

Amiga PCMCIA Bug

Copying commands to C:

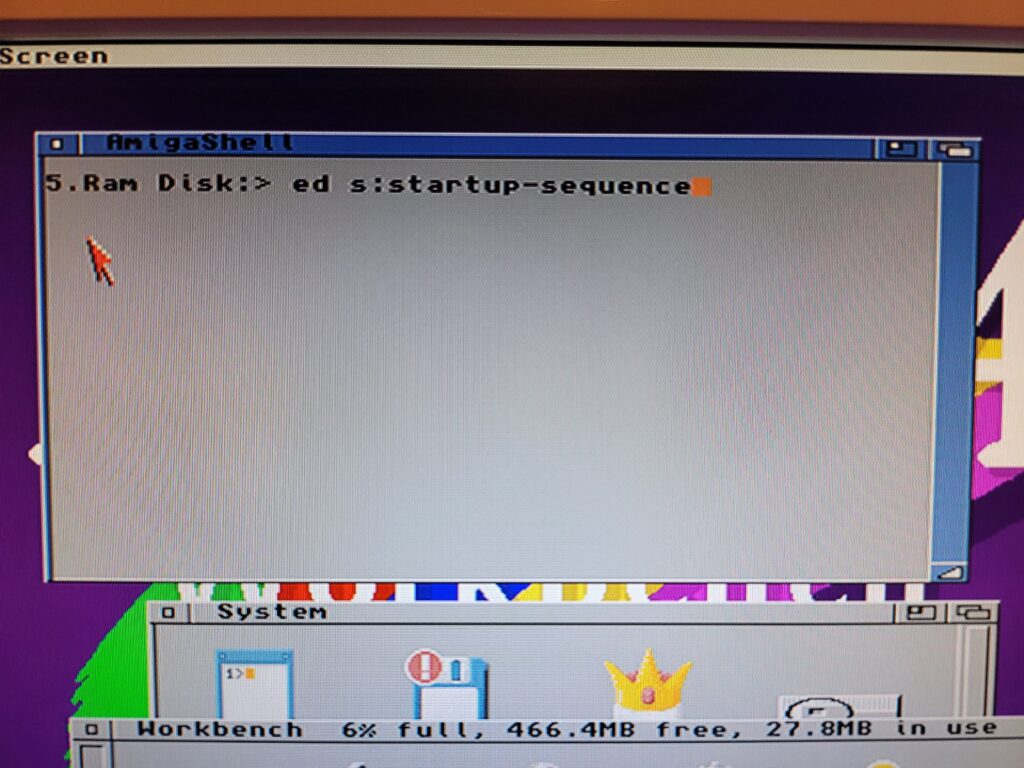
Now we need to get these commands to run during the Amiga’s boot-up so that the card will work after a system reset. To do this we need to edit the Amiga’s ‘startup-sequence’ file. You can either use your editor of choice or the one built into AmigaOS.

To use the built in editor to amend the startup-sequence enter the following command:

Ed S:Startup-Sequence

Amiga PCMCIA Bug

Command to use the built-in editor to amend the startup-sequence.

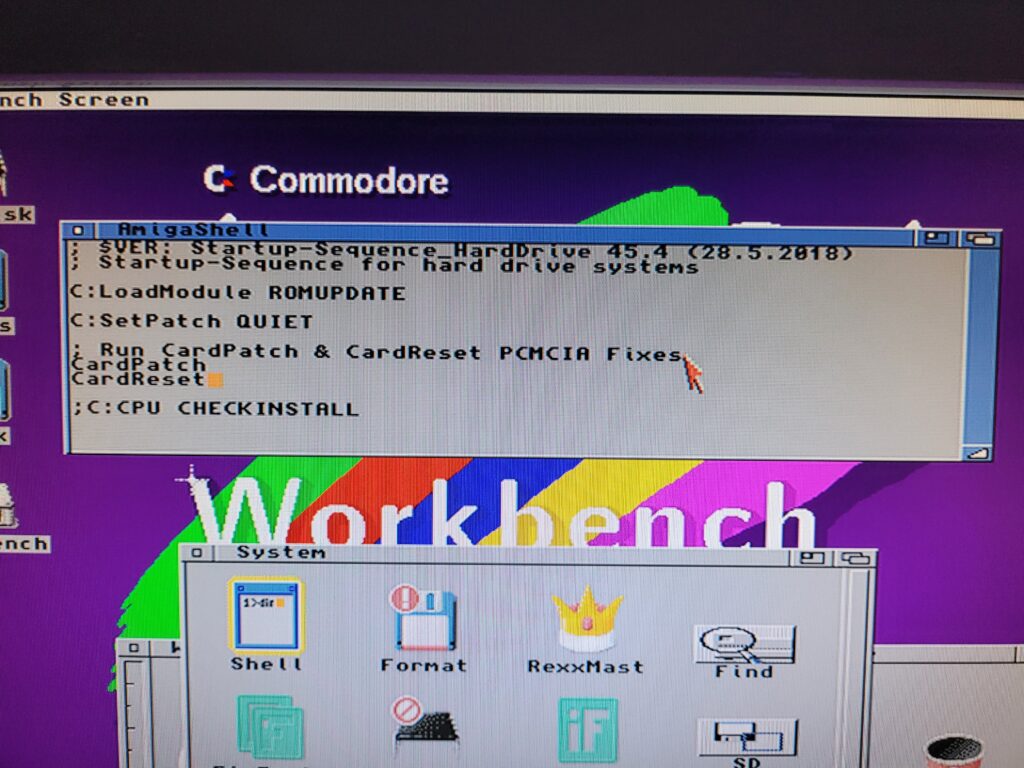
This will open up the file ‘startup-sequence’ into the editor ready to edit. Now add the following 2 lines near the beginning of the file after the SetPatch command:

CardPatch

CardReset

As shown in the screenshot below. I’ve also added a comment (indicated by the use of a semi-colon) to remind me what these commands do for future reference but this is entirely optional. Don’t worry if your startup-sequence looks different. Every setup will differ depending on what hardware and software you’ve installed on it.

Amiga PCMCIA Bug

Add these lines to the startup-sequence.

To exit and save the changes press Esc, then press x and finally press enter. Alternatively select ‘Save and Exit’ from the Project menu.

And that wraps up Part 1 of this guide for now. In Part 2 I’ll go through setting up a TCP/IP stack which will finally connect our A1200 to the Internet!

Blizzard SCSI Kit MkIV

Blizzard SCSI Kit

Ever since I picked up my Blizzard 1230 MkIV card last year I’ve been hankering after the SCSI expansion for it. The Squirrel SCSI system I’ve been using for the past six months certainly works great but I really wanted to free up the PCMCIA port for other things.

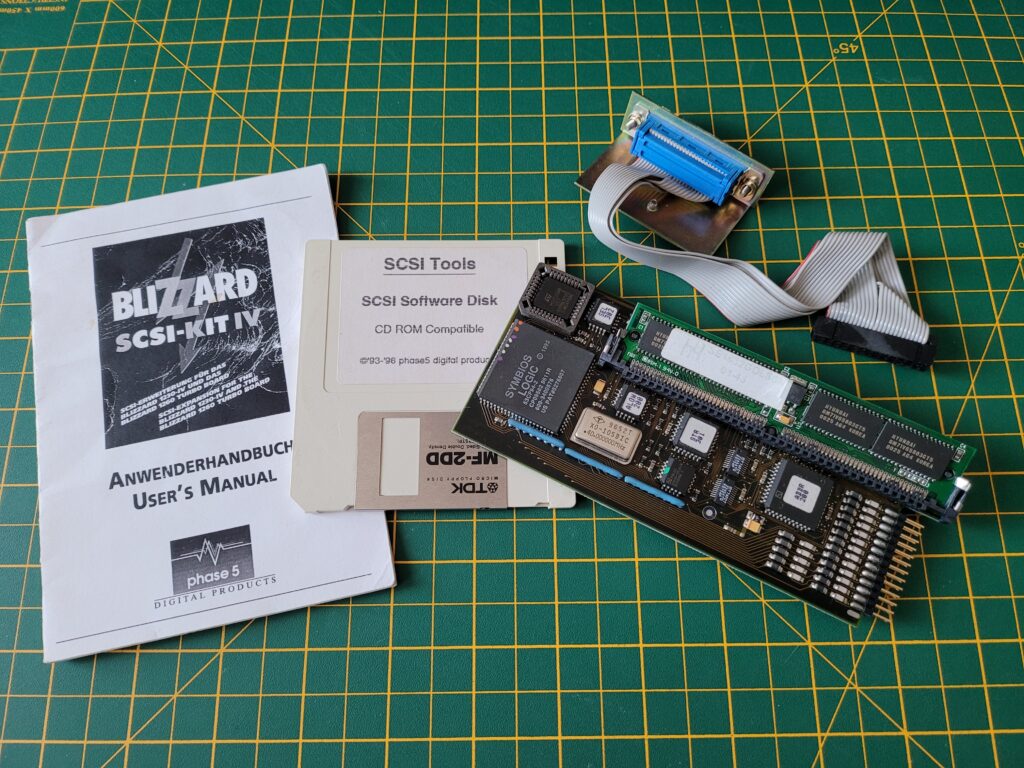
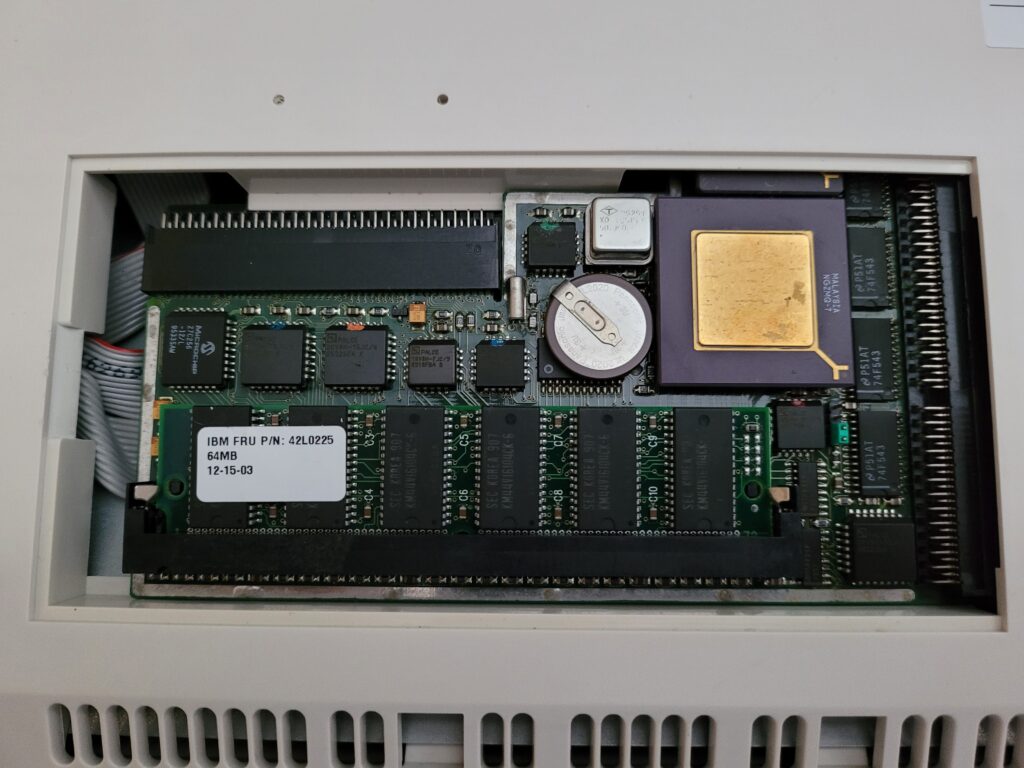
Blizzard SCSI kits are pretty thin on the ground these days but after many months of searching I finally managed to get one. It came complete with the software disk, instruction manual, SCSI breakout port and even a 64MB SIMM!


Blizzard SCSI

Everything you get in the Blizzard SCSI Kit.


It’s in beautiful condition and if it wasn’t for the faded text on a couple of the stickers it could probably pass for being brand new.


Blizzard SCSI

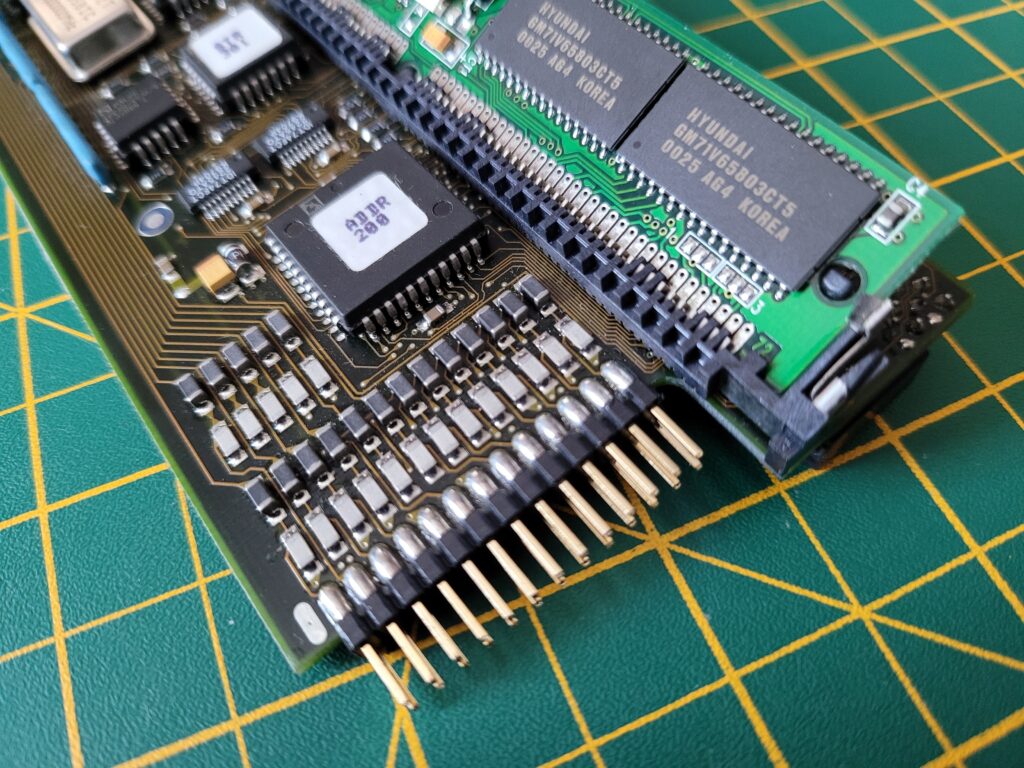
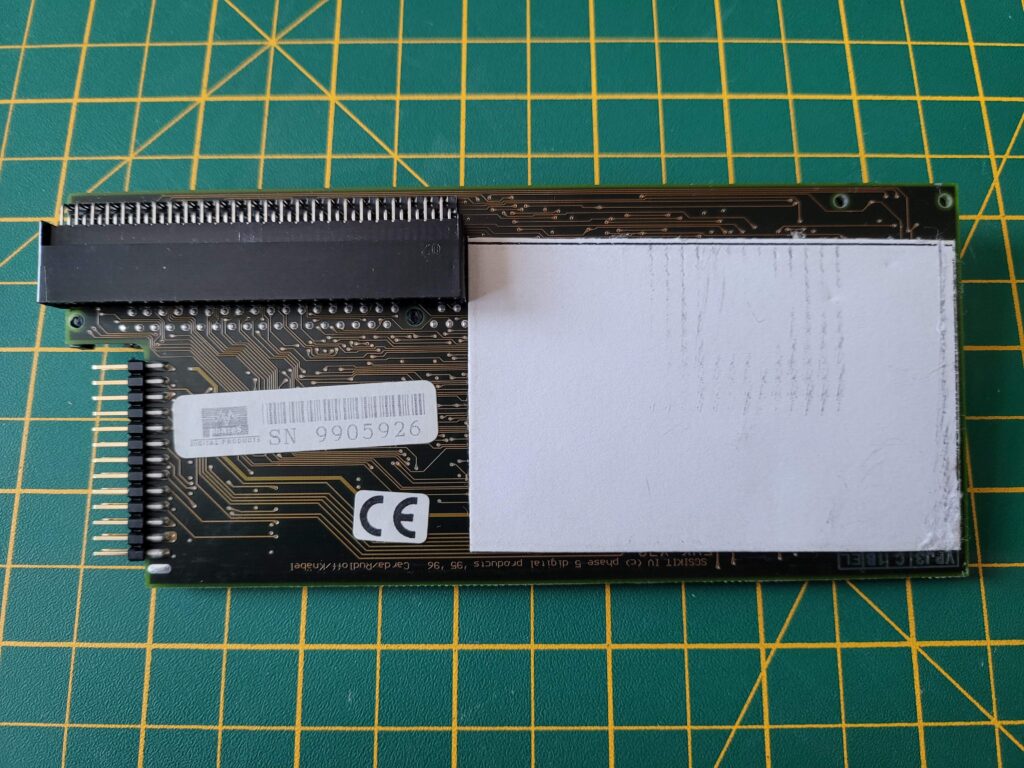
Close-up of the 26-pin SCSI header on the board.


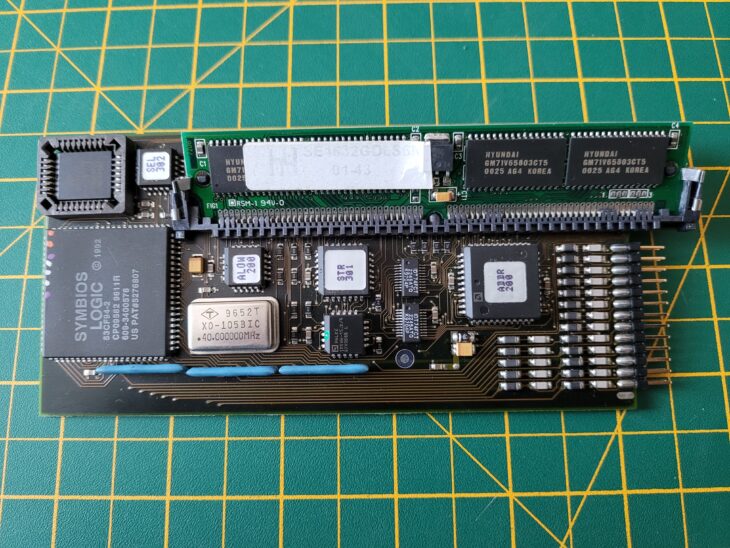
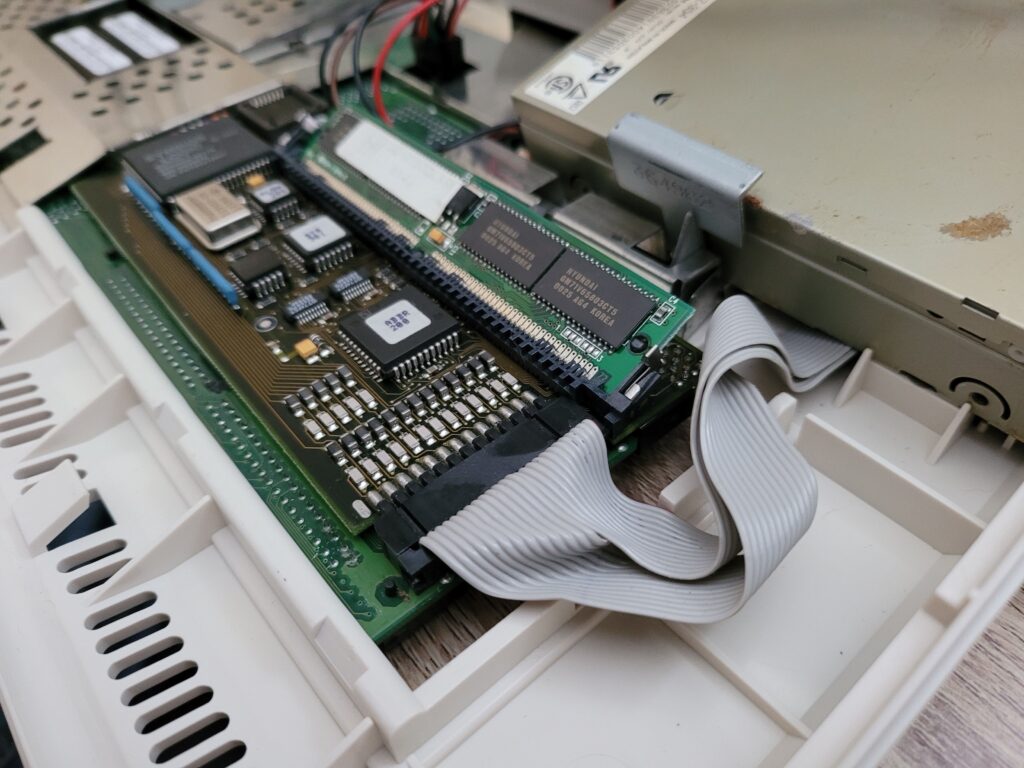
There are three connecters on the board. On the top there’s a 72-pin socket to accept a SIMM of up to 128Mb capacity.


26-pin SCSI header.


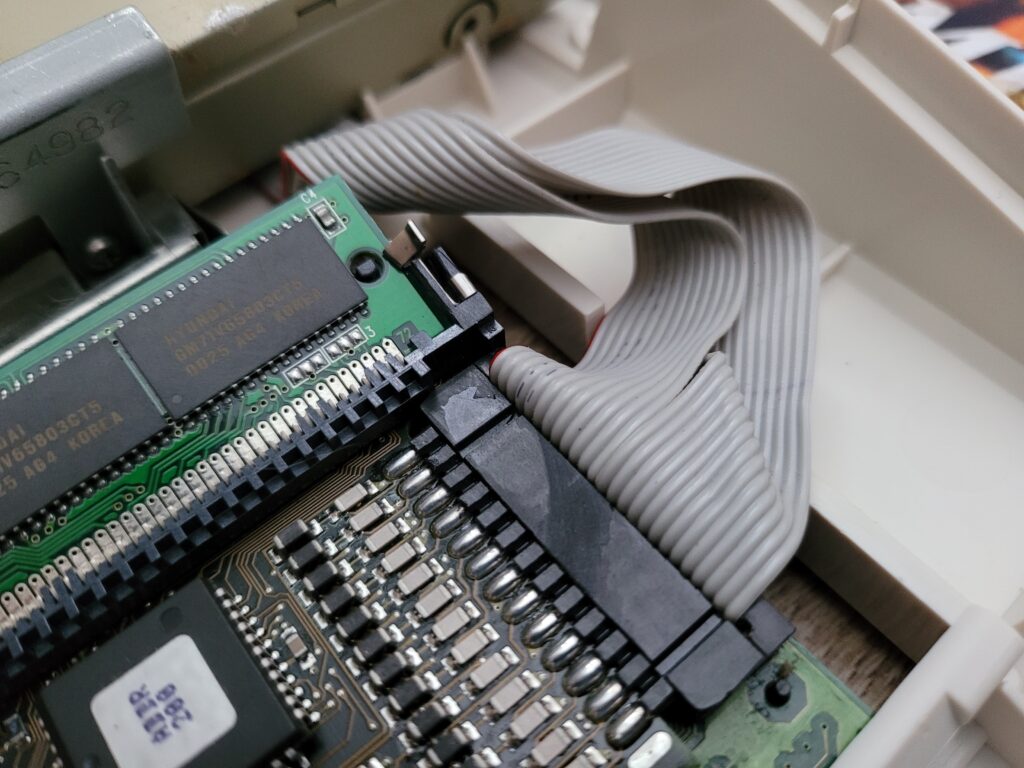
There’s also a 26-pin header for connecting the ribbon cable for the 25 pin female D-SUB SCSI port. Finally on the bottom there’s a 100 pin edge connecter which is used to connect the SCSI card to the 1230 MkIV accelerator card.


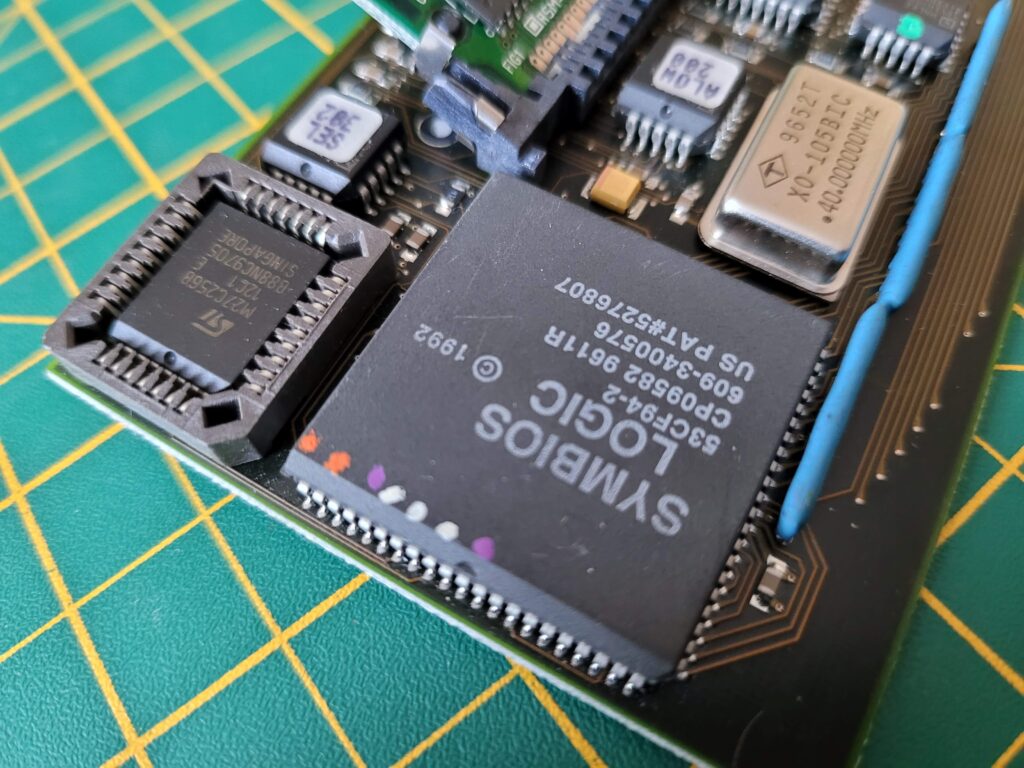
The business end of the card with a Symbios Logic SCSI Host adapter chip dated 1992.


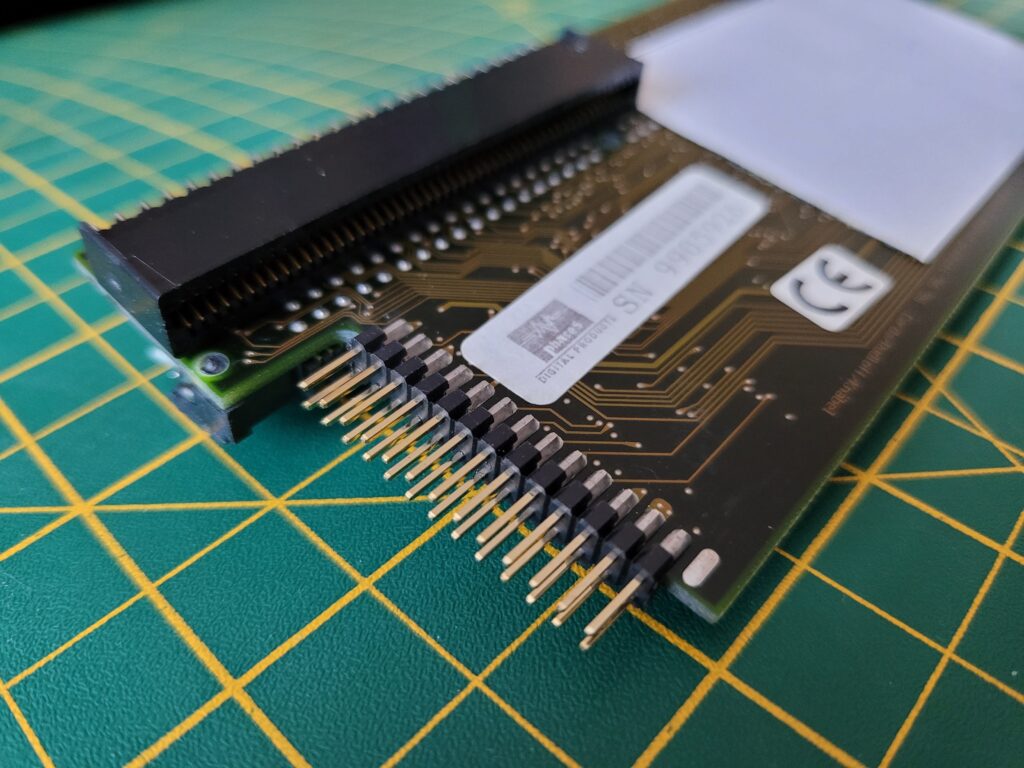
Underneath the board there’s a single 100 pin edge connecter and a white insulating pad to prevent any short circuits when the card is installed.


Blizzard SCSI

View of the underside of the board. The large white area is insulating material to prevent short-circuits.


Specifications

In the mid 90’s these cards were pretty cutting edge and offered Amiga 1200 owners some impressive features. The manual proudly claims that it will “set new performance standards in its class”.

The headline specifications are listed below:

  • Fast SCSI-II DMA Controller for the Blizzard 1230-IV or Blizzard 1260 Turbo Boards.
  • Transmission rates up to 7Mb/s asynchronous and up to 10 Mb/s synchronous on the SCSI bus.
  • 72-pin standard SIMM socket for memory expansion by up to 128Mb in addition to the memory already installed on the Blizzard Turbo Board. Completely auto-configuring.
  • Ability to connect 6 SCSI devices with ID’s between 0 and 7 (the Blizzard SCSI Card itself is device 0).


Fitting the SCSI Connecter Port


Fitting the card is a little more involved than the accelerator was as installing the rear-mounted SCSI port requires removing the floppy drive to gain access to the expansion port.


Amiga 1200 Expansion Port.

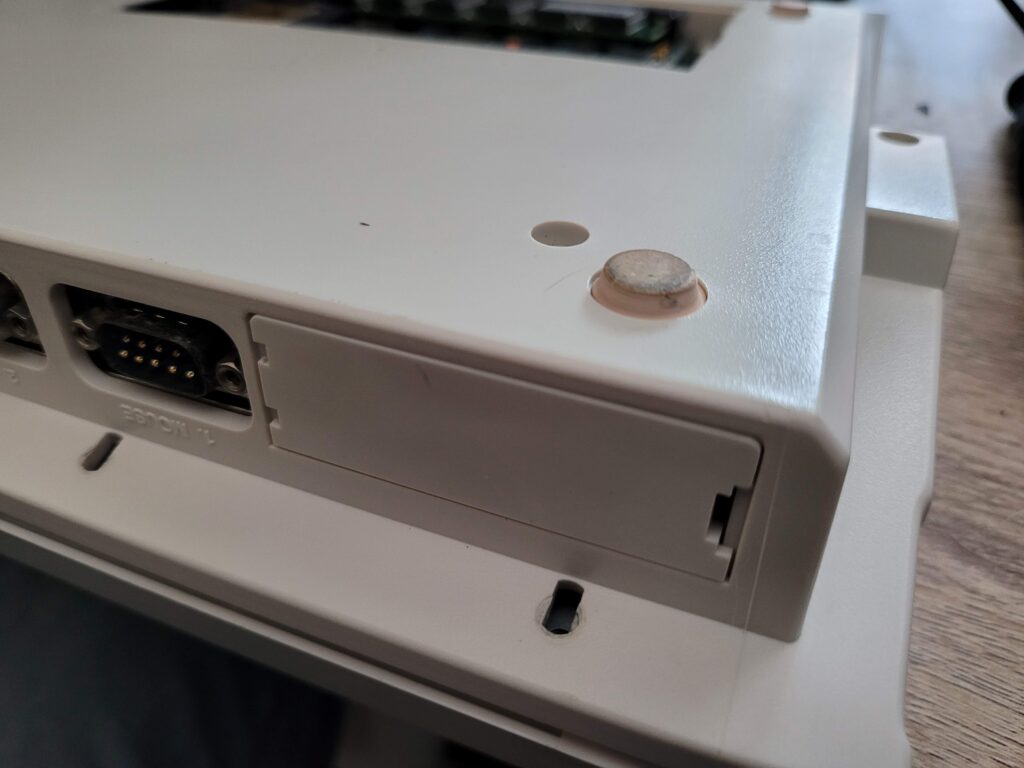
Expansion port blanking plate and the holes where the two floppy drive mounting screws fit.


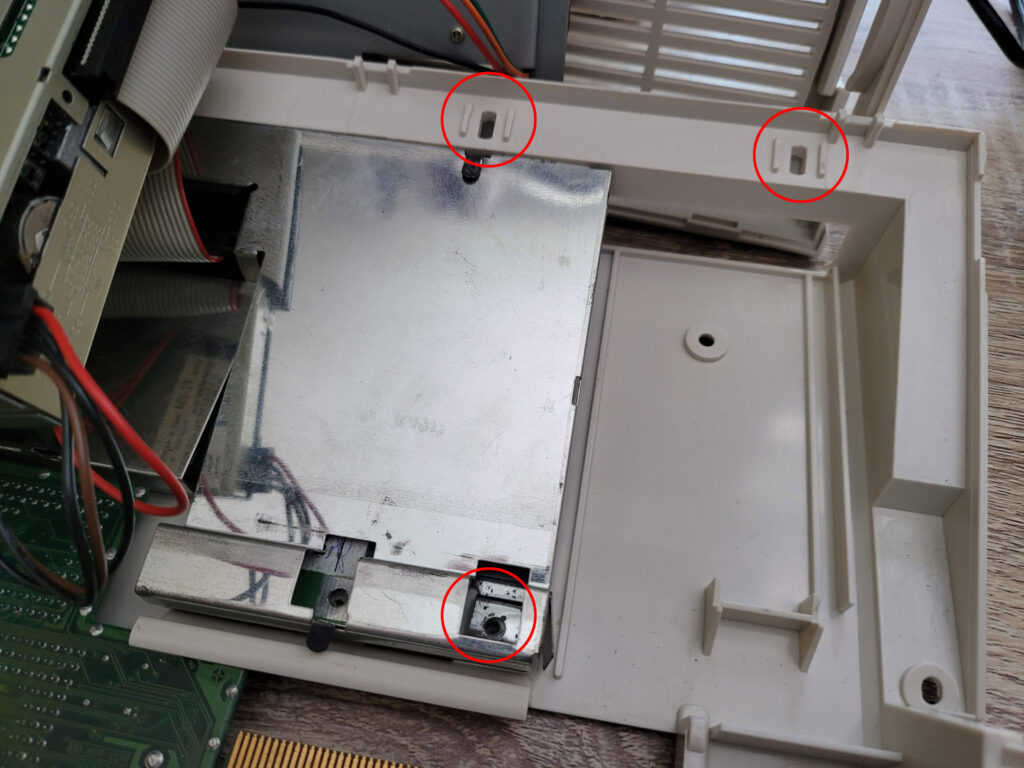
There’s two screws holding the drive in place from the underside of the case, found next to the expansion port. The other screw is located inside the case along the lower edge of the drive just above the trapdoor. Once these have been removed the drive can be safely lifted to one side revealing the expansion port area.


Amiga 1200 Floppy Drive mount points.

Location of the three screws holding the floppy drive in place.


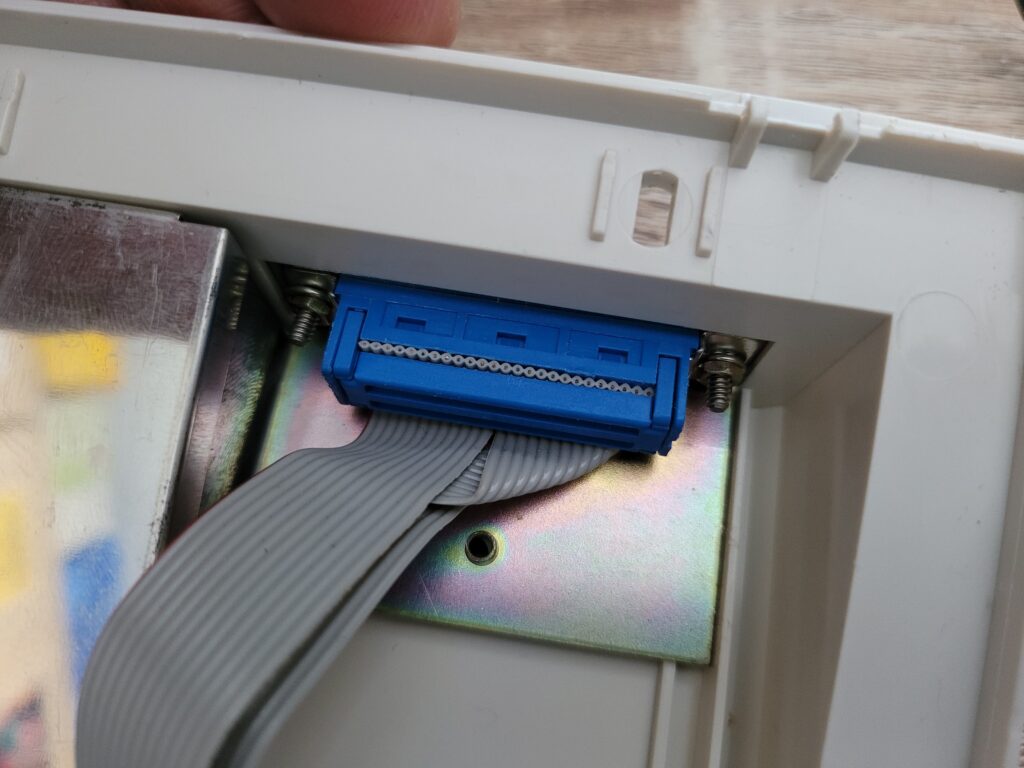
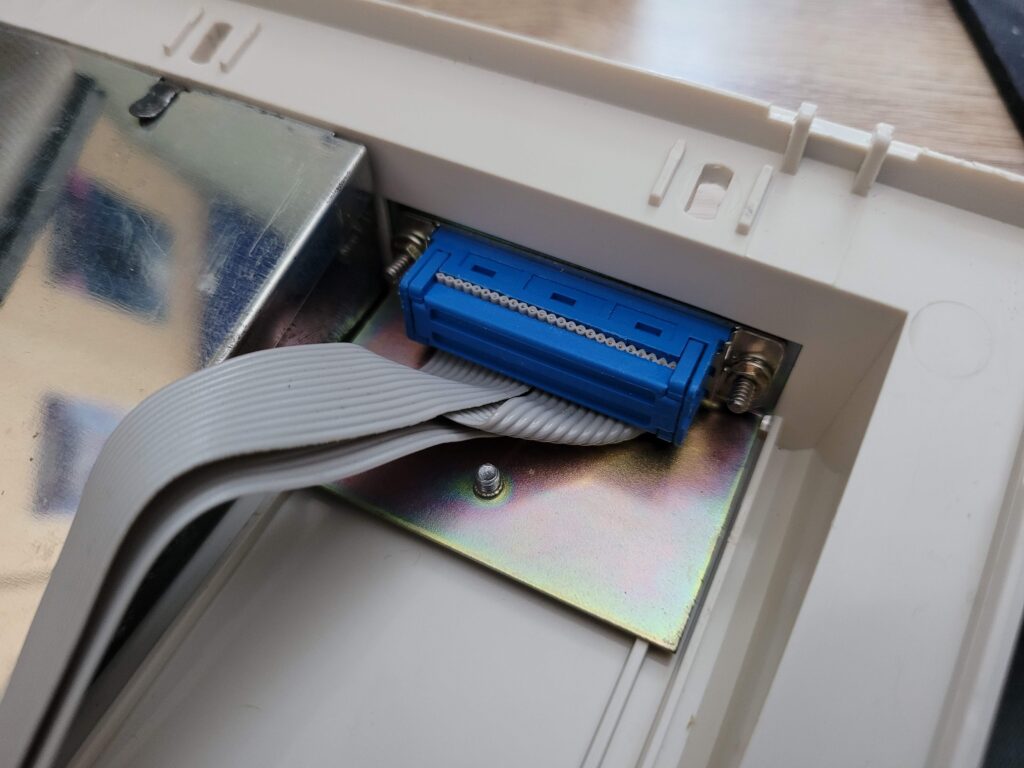
After removing the plastic blanking plate, the SCSI connecter slides into the vacant slot from the rear. If done correctly the hole in the metal plate should align with the hole in the Amiga case perfectly.


Blizzard SCSI

SCSI port connecter inserted into expansion slot.


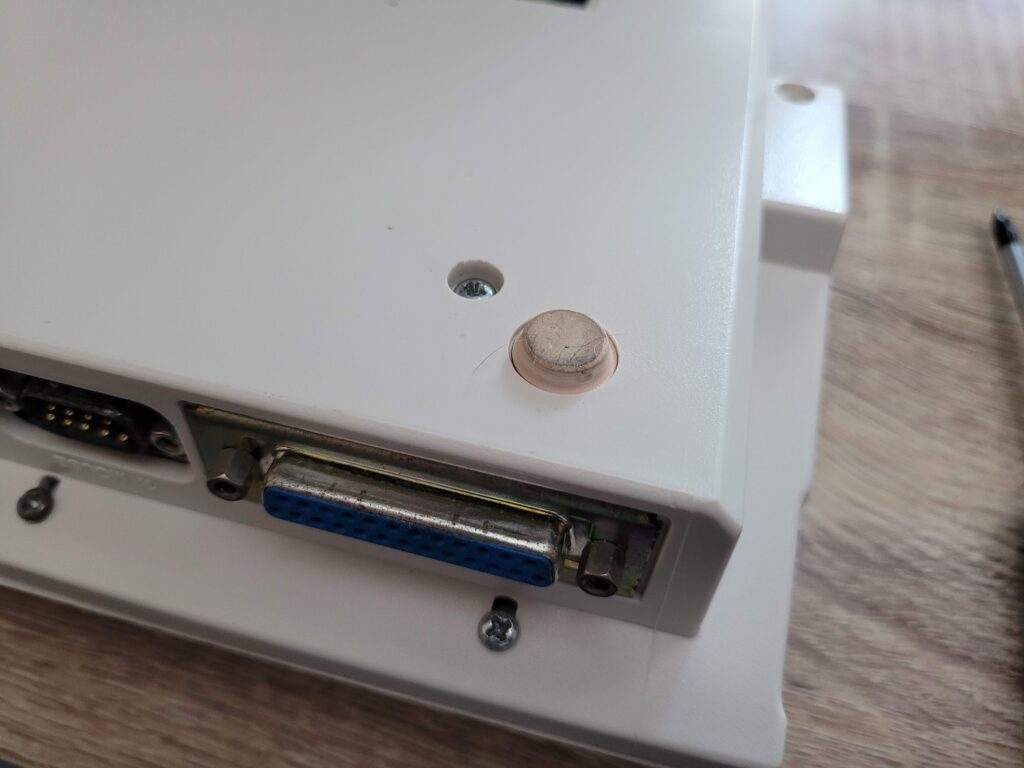
The provided screw can then be inserted into the hole from the base of the Amiga and fastened into the threaded hole in the metal plate.


Blizzard SCSI

SCSI port fully fitted – you can see the securing screw on the base of the case next to the rubber foot.


This screw is the only thing that holds the port in place whilst inserting and removing SCSI cables so it needs to be securely fastened.


Blizzard SCSI

Metal plate now secured with the supplied screw.


It’s a pretty neat and surprisingly robust solution and looks almost factory fitted.


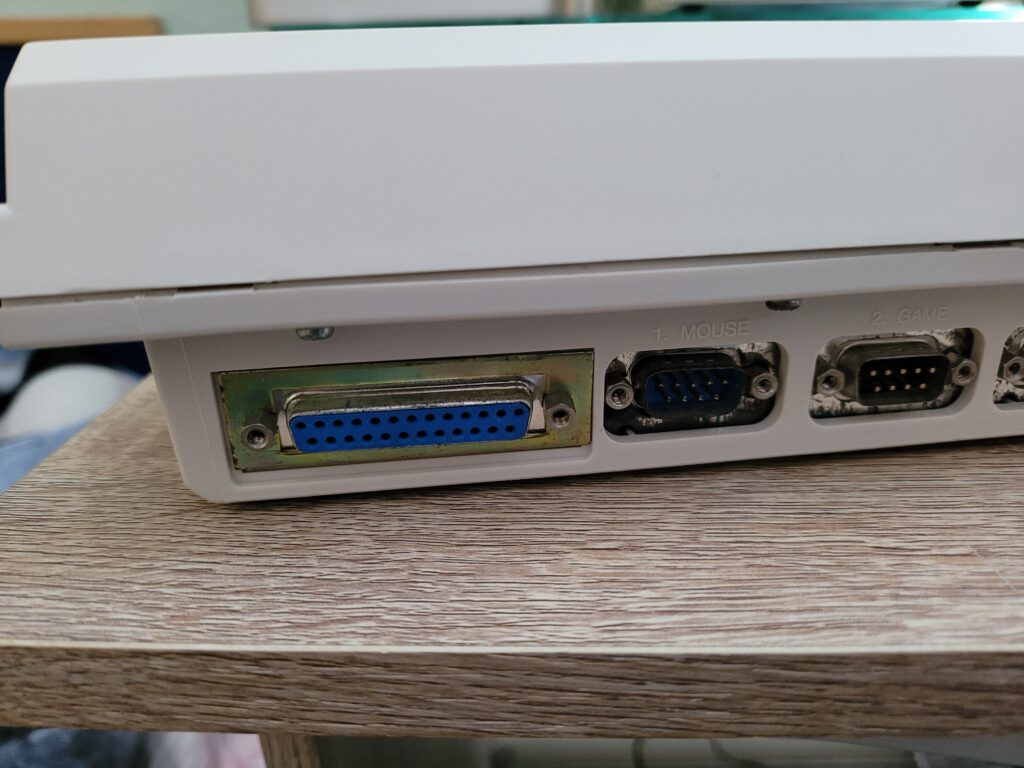
Blizzard SCSI

This is how the SCSI port looks once fitted. Also – I hadn’t noticed how corroded my mouse port was until I took this photo!


Fitting the SCSI Card

With the fitment of the SCSI port dealt with it was time for the main event – fitting the SCSI card.


Blizzard SCSI

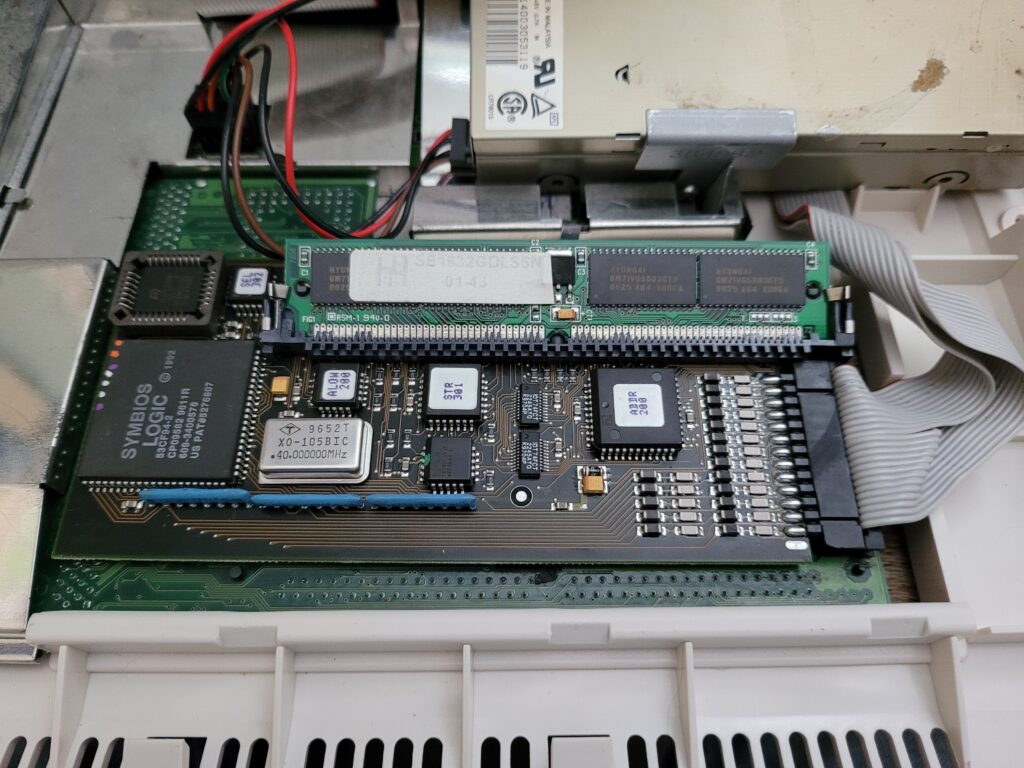
View of the Blizzard 1230 MkIV and SCSI Kit IV installed in the trapdoor expansion bay.


The SCSI card needs to be married to the Accelerator card before it’s fitted into the slot. There simply isn’t enough room inside the case to attach the SCSI card once the accelerator has been installed. I took my time here as there’s only one way the two cards will successfully slot into place and I didn’t want to damage either by trying to force anything.


Blizzard SCSI

Another view of the Blizzard 1230 MkIV and SCSI Kit IV installed in the trapdoor expansion bay.


Once the two cards are correctly aligned the accelerator card (and only the accelerator card!) can be firmly pressed into its socket. Pushing the edge of the SCSI card might damage the edge connecter.


Blizzard SCSI

Close-up of how the ribbon cable connects to the SCSI card. Pin one is nearest the SIMM socket.


Pin 1 is next to the SIMM socket and the ribbon cable should be attached such that the red edge aligns with it. However in reality the SCSI cable will only fit one way due to how close the pins are to the circuit board.


View of the Blizzard 1230 MkIV Accelerator and SCSI MkIV cards from below.


Testing it all Works!

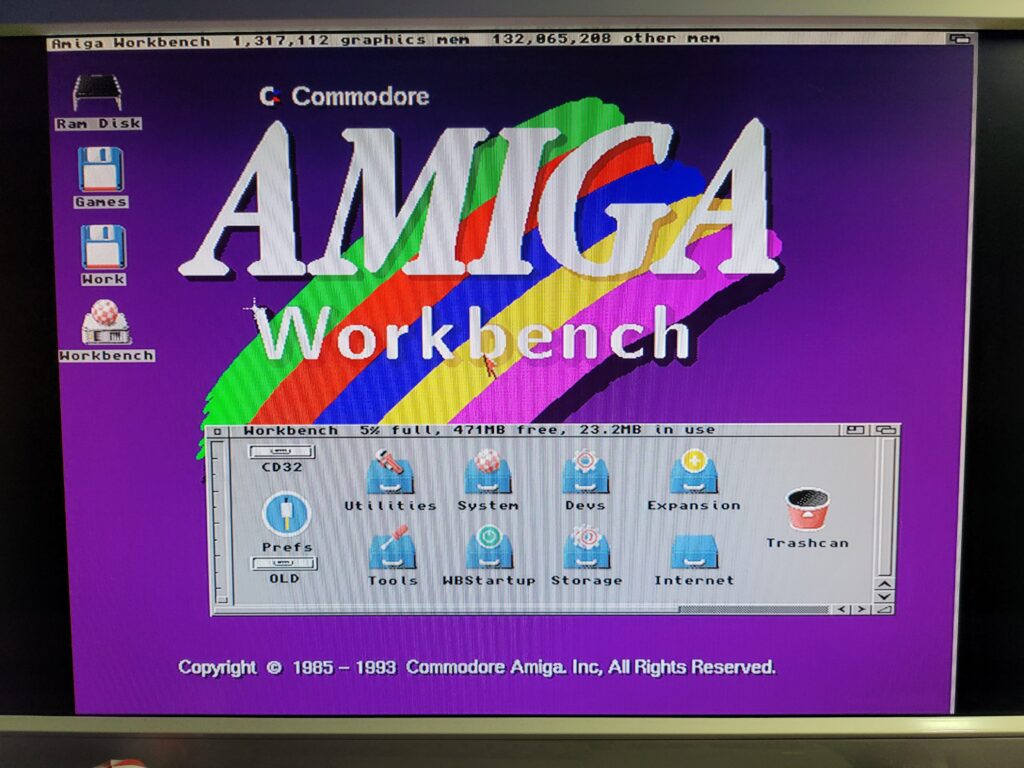
As always with an old upgrade like this I was quite anxious about whether it would actually work. After double-checking that everything was connected correctly I powered on my A1200 and waited. Thankfully a few moments later Workbench appeared and was reporting approximately 128Mb of Fast Ram available. Definitely a positive sign!


Amiga Workbench

132,065,208 bytes free – a very promising sign.


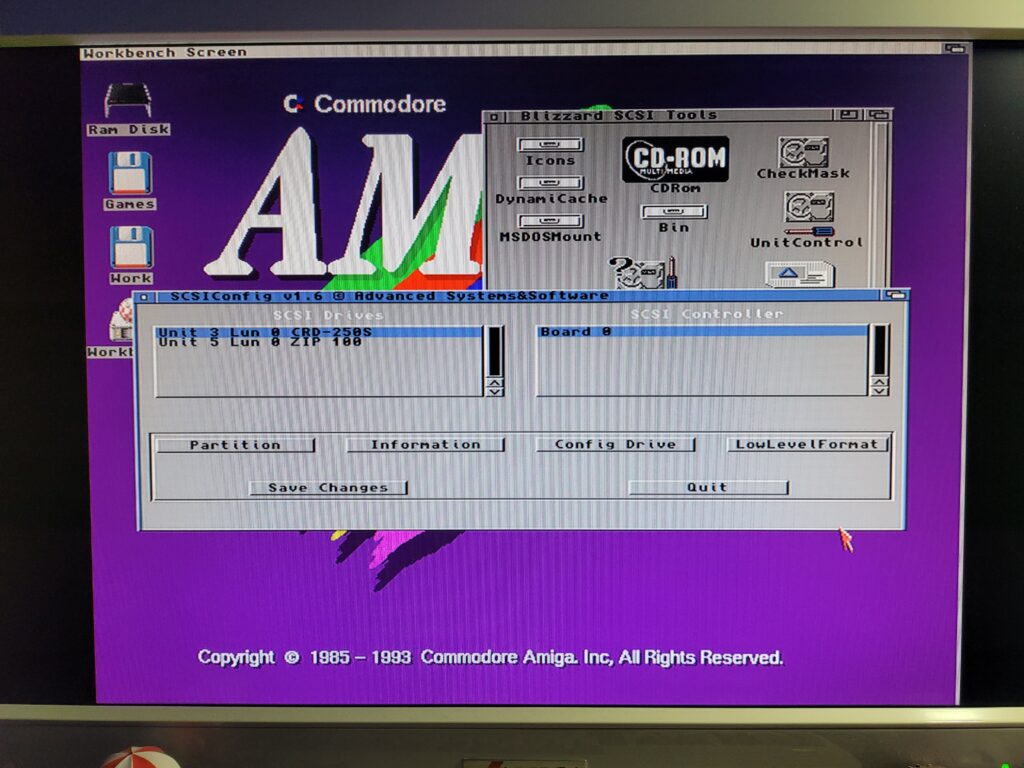
Next I loaded up the SCSI Config software off the Blizzard Tools disk to see if my devices were being recognised. Sure enough both my Zip drive and CDROM appeared as unit 5 and 2 respectively. Happy days!


Blizzard SCSI

Checking to see if my SCSI devices were recognised using the Blizzard SCSI Config utility.


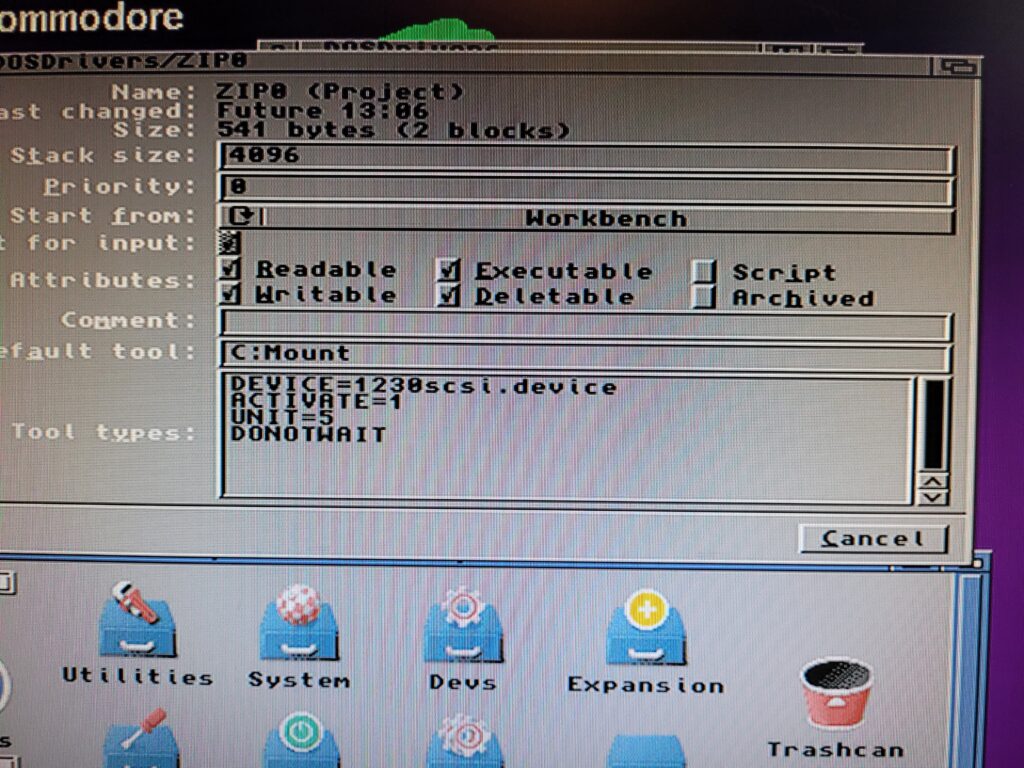
Although my devices were visible to the system, my discs weren’t showing up on Workbench yet. This was because they were still configured to use my Squirrel SCSI hardware. To get them working I edited the ‘tool types’ for my ZIP and CD mountlists in DEVS:DOSDrivers, setting the ‘DEVICE’ to ‘1230scsi.device’ for them both (the name of the Blizzard SCSI host adapter).


Blizzard SCSI

Editing the ZIP mountlist tool type to use my Blizzard 1230scsi.device.


A quick CTRL-A-A reboot and everything was working – my Zip drives, CDROM’s and Music CD’s were all recognised correctly.


Closing Thoughts

This has been another great addition to my A1200. Not only do I have all my SCSI peripherals working but now I have an extra 64Mb of Fast RAM to play with. Additionally my PCMCIA port is now left vacant so I’m free to explore the addition of a network card or maybe a card reader.

Is this the end for my Amiga 1200’s trapdoor expansions? For the time being, probably yes. I could replace the 64Mb SIMM fitted in both cards with 128Mb SIMM’s to give me a total of 256Mb. However my A1200 already has way more RAM than I ever had back in the day so not sure if that is really necessary. Mind you, if I see some RAM going cheap I’ll probably go for it.

There’s always the possibility of replacing the 1230 for an 040 or 060 accelerator (or even a PPC one). Unfortunately these expansions are obscenely expensive nowadays so that would be hard to justify. Besides, I think the 68030 is the sweet spot for performance versus compatibility for the Amiga. I never say never though…

Zzap! 64 Magazine is Back!

Zzap! 64

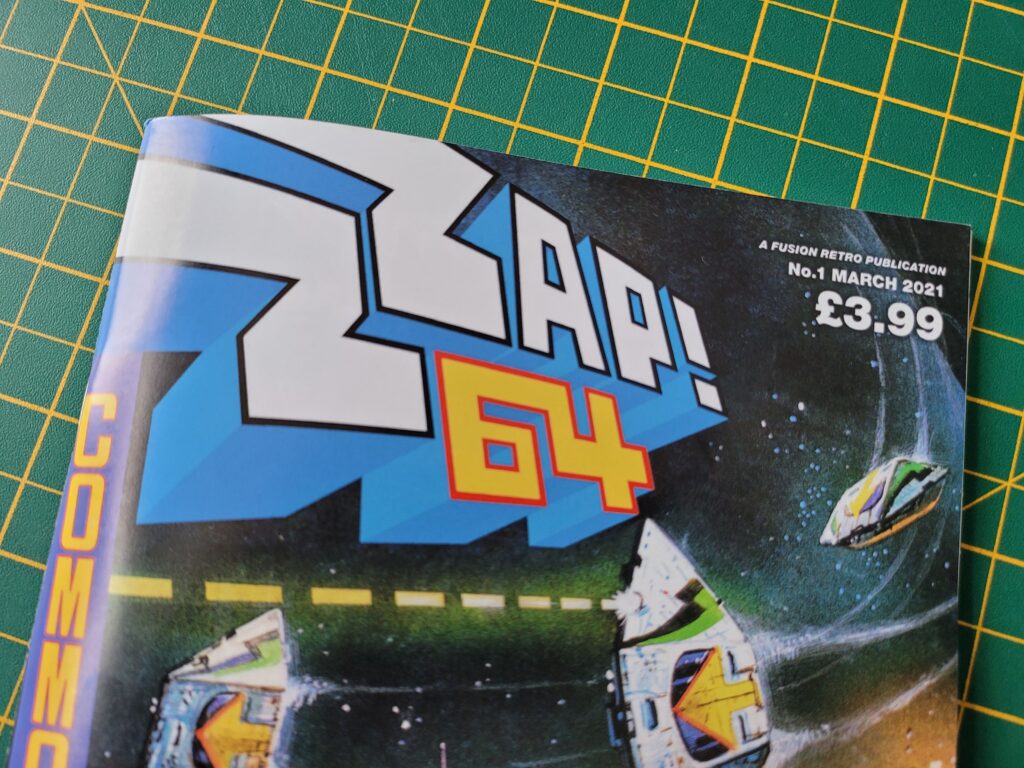
Well this is something I would never have envisaged happening a couple of years ago… the return of a printed Zzap! 64 magazine! This is an A5 sized publication produced by the same guys who make Fusion magazine, Fusion Retro Books. It’s going to be published on a quarterly basis rather than monthly. This makes a lot of sense and should ensure there’s plenty of new gaming content to fill each issue.


Zzap! 64 Issue 1

Zzap! 64 Issue 1


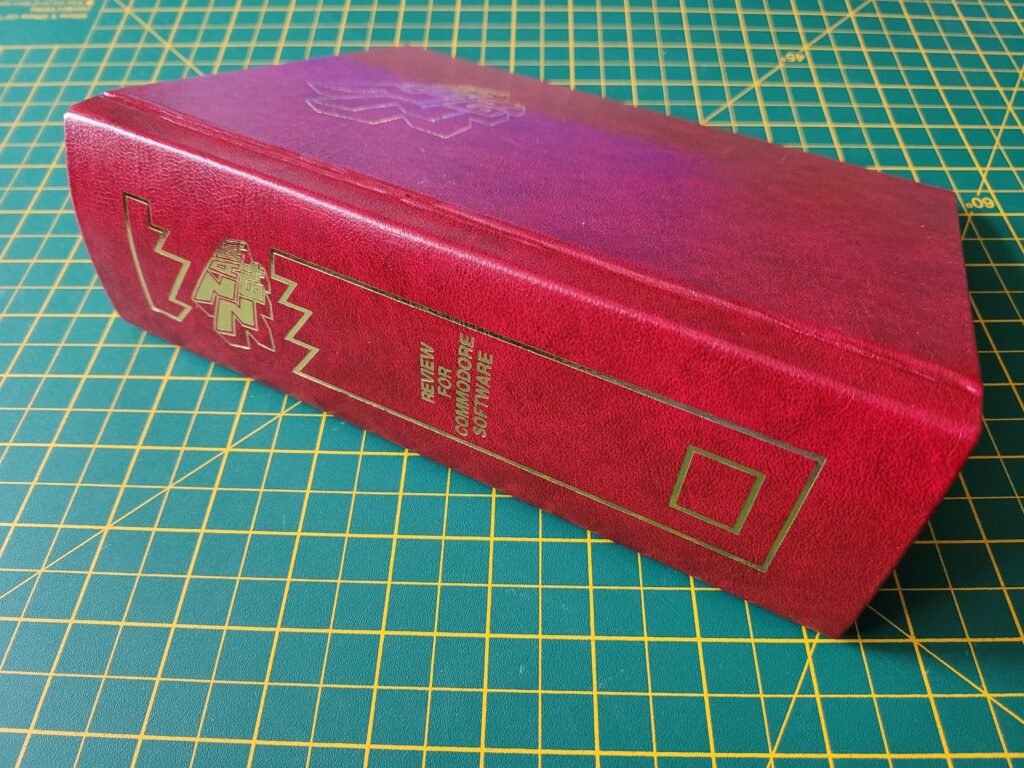
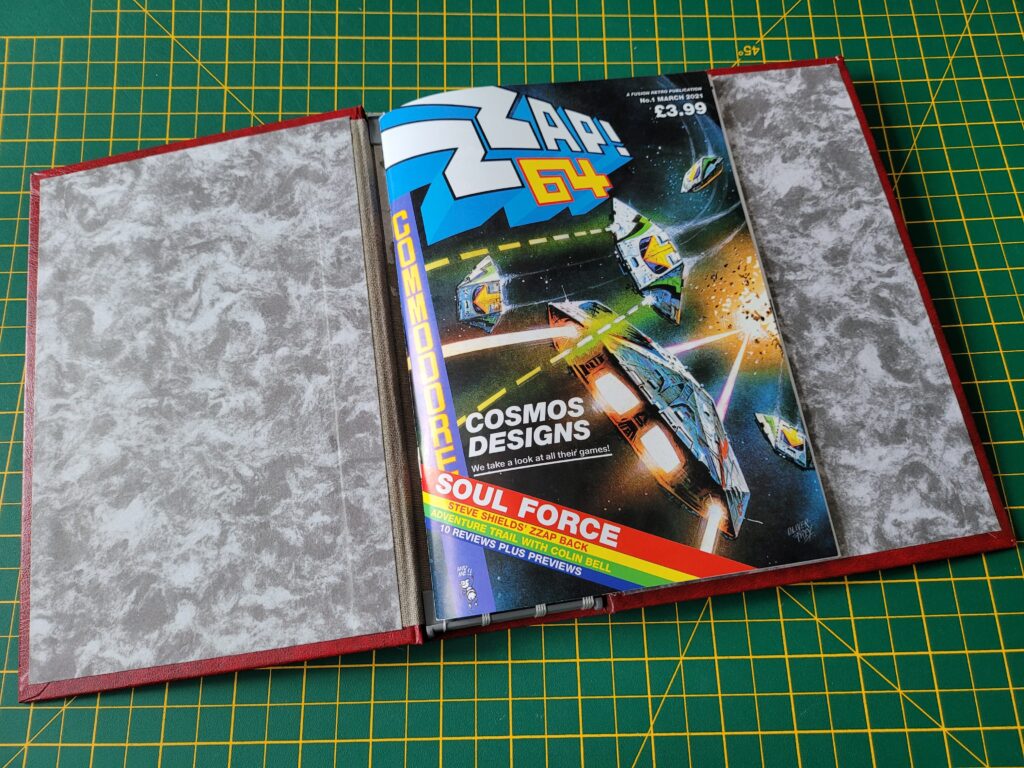
I received issue one a few days ago so I’ve had a chance to read it in its entirety now. I also opted to get the very snazzy binder to store all my future issues in. The magazine has been printed on a high quality silk paper and runs to an impressive 58 pages, all in glorious full colour (back in the day much of the magazine was printed in black and white).


Zzap! 64

Zzap! 64 Binder


Zzap! 64 magazine is packed with reviews of the very latest C64 games to hit the scene. A testament to just how popular the C64 continues to be, despite its advancing age! Speaking of reviews, they are just as good as I remember, presented in that familiar ZZap! style with a main review accompanied by comments from the other writers.


Zzap! 64

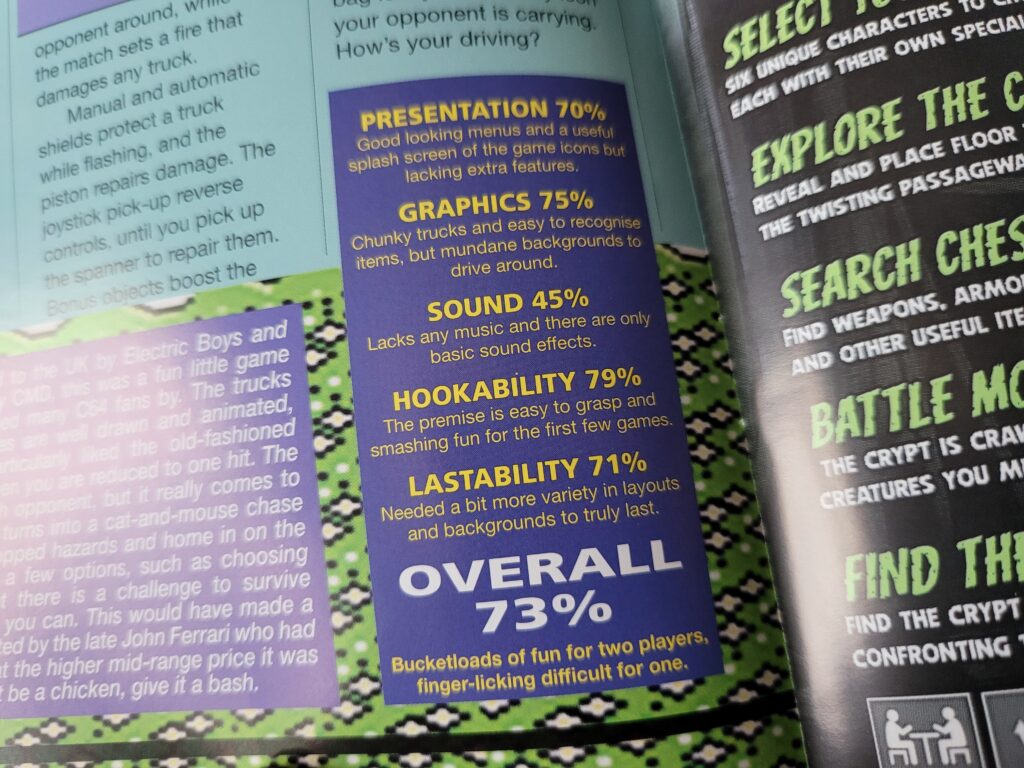
Zzap! 64 game scoring.


Games are scored on Presentation, Graphics, Sound, Hookability and Lastability and given an overall aggregate percentage score, very similar to how they used to be reviewed back in the day.


Zzap! 64

Two thumbs up – must be good!


Still present and correct are the little B&W portraits of the reviewers in various pensive poses giving you instant visual feedback about what they think of each game. Further reassurance that this is still the Zzap! 64 I know and love – just shrunk down to A5 size.


Zzap! 64

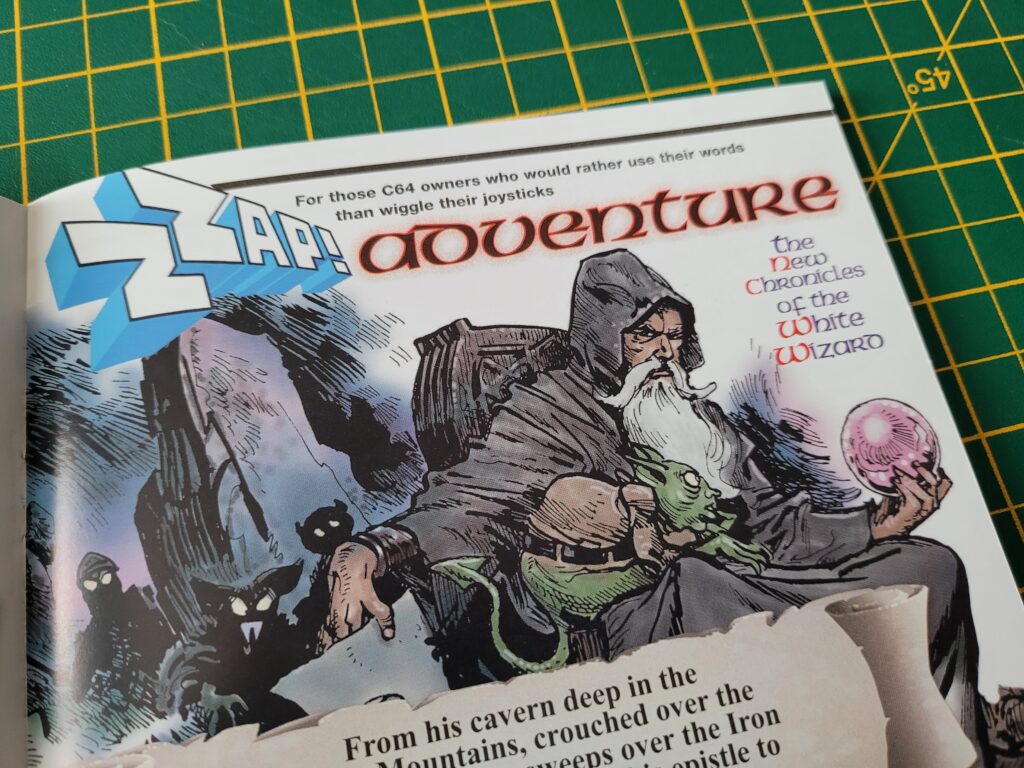
The White Wizard adventure and RPG section.


As a big Adventure game fan I was thrilled to see the reappearance of the White Wizard. This section of the mag features reviews of some of the current C64 Adventure and RPG games along with news of up and coming ones to look forward to.


Zzap! 64

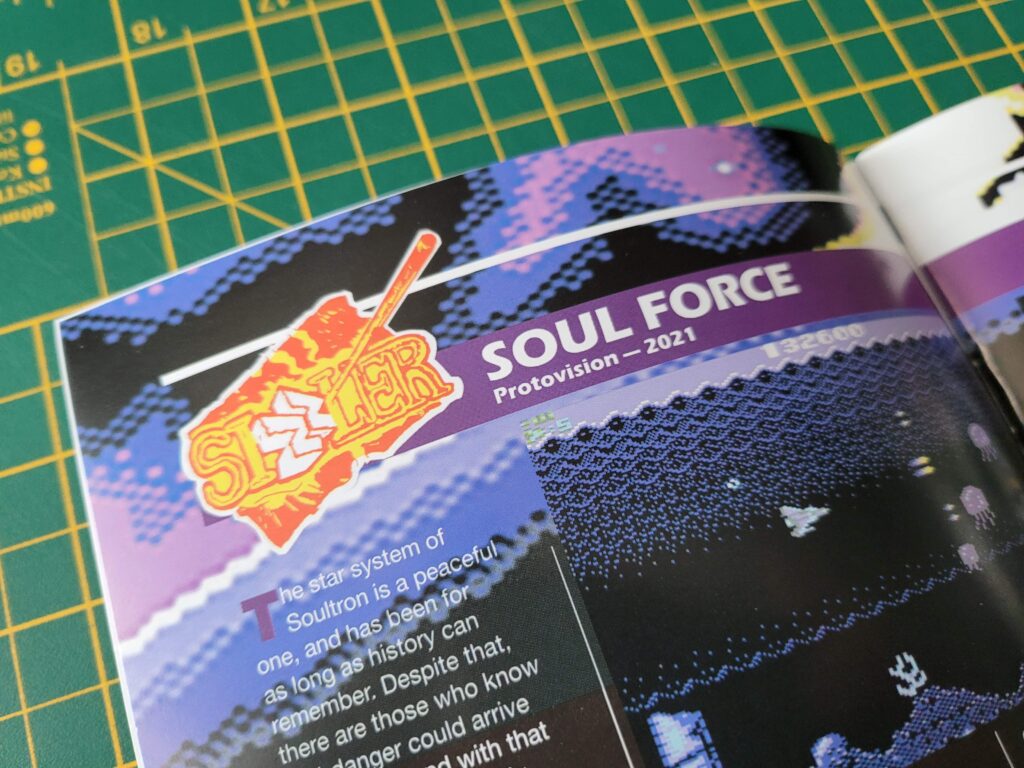
Soul Force gets the coveted Zzap! Sizzler award.


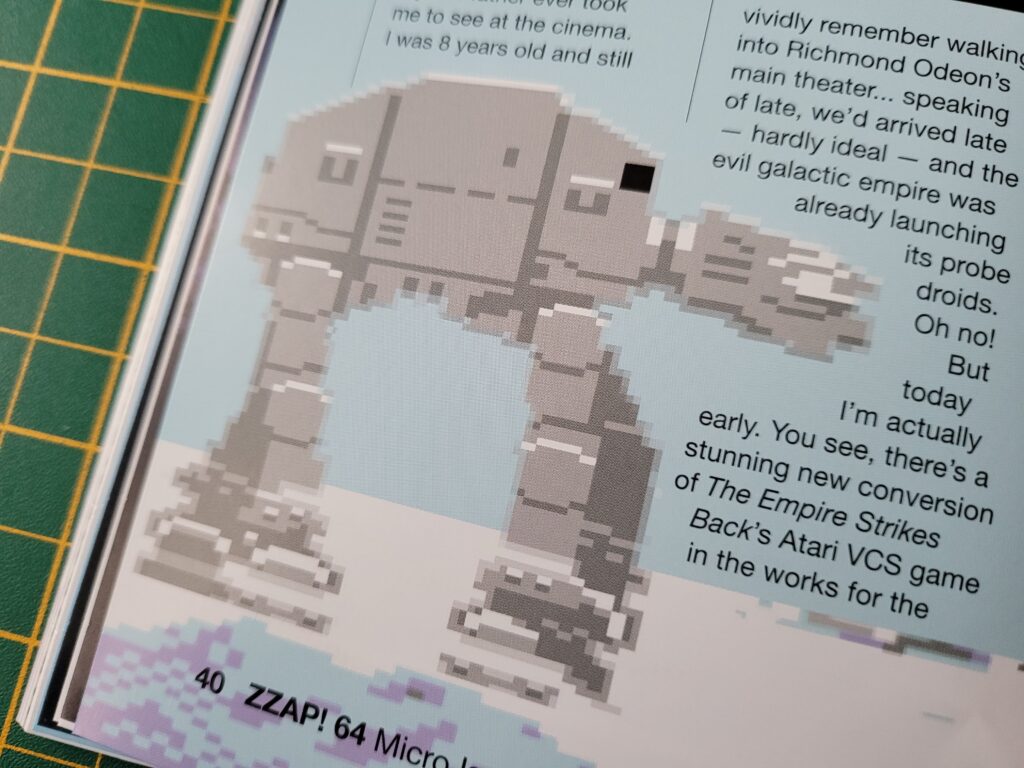
As well as the many reviews there are some previews of upcoming games such as the Empire Strikes Back and a look back at some of the more notable games of the past.


Zzap! 64

Article about the upcoming Empire Strikes Back game.


There’s a few trips down memory lane and insights into events which happened during the magazines heyday too which I found both engaging and entertaining.

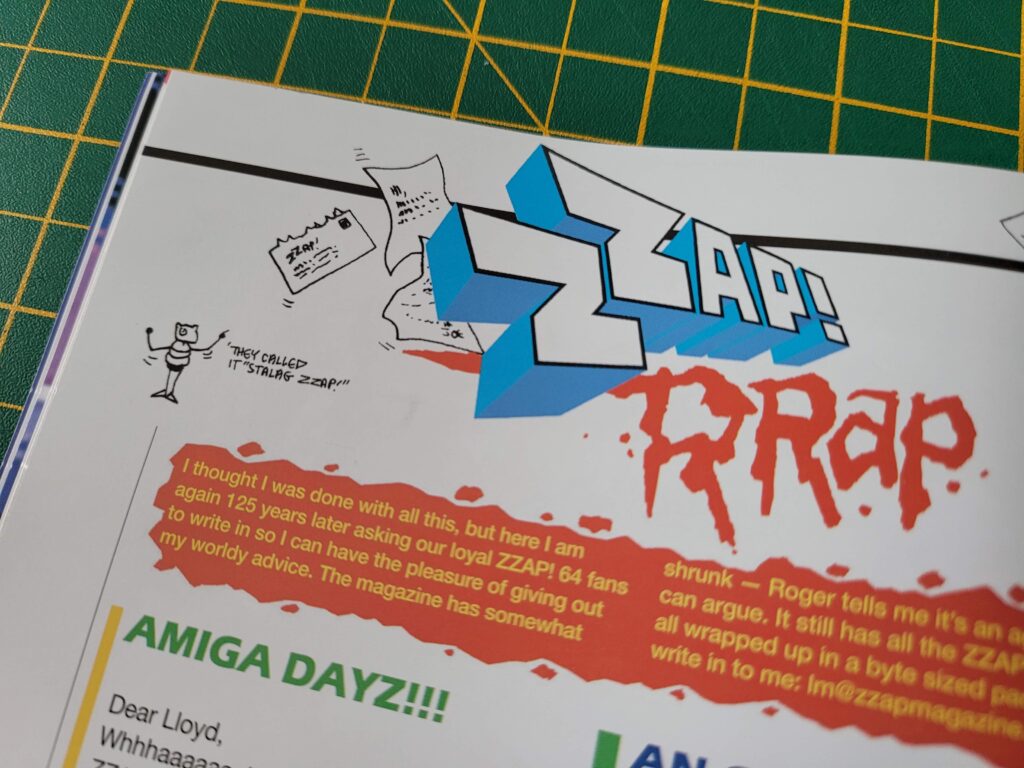
Zzap! Rrap makes a welcome return, presented by the totally real and definitely not imaginary Lloyd Mangram, complete with little cartoons of him adorning the borders of the pages.


Zzap! 64

Lloyd is back!


All in all this is a fantastic return to the C64 scene for the magazine and I thoroughly enjoyed reading it from cover to cover. Along the way I had a good few chuckles, some trips down memory lane and discovered some new games that I want to add to my collection.

This is a magazine that every C64 fan should read and the next issue just can’t come soon enough for me.


Zzap! 64

Zzap! 64 Contents page.


Zzap! 64 magazine is available from Fusion Retro Books and is priced at £3.99. The optional binder is £15 and can hold 12 issues or 3 years worth of magazines. Make sure you use the code ‘LYONSDENBLOG’ to grab yourself a nifty 15% off the price!


Zzap! 64

Issue one stored safely in the binder.


A C64 Type-In BASIC Listing – in 2021!

As a fully certified computer nerd I spent an inordinate amount of time in my teenage years typing away on my VIC20 and C64 entering BASIC programs from books and magazines.  I found the process fascinating, witnessing a program gradually taking shape before my eyes. Sometimes I would ‘run’ the program before it was even finished just to glimpse the title screen or see how it was looking.

A couple of my favourite magazines (for listings) at the time were ‘Commodore Horizons’ and ‘Your Computer‘. YC was packed with new listings for all manner of 8-bit machines every month and it always had several for the C64. I would think nothing of spending hours painstakingly transcribing reams of code into my computer and probably another few more ‘debugging’ the code to fix all the mistakes! It was a fun, occasionally frustrating but always rewarding experience. It was also very educational. Typing in other peoples code helped me learn how to program myself. I used to experiment a lot, changing their code to make the program do something different. Eventually I went on to get a few of my own programs published in magazines and ultimately it’s what got me into a lifelong career in computers.


C64 Type-In BASIC Listing

Typing in a listing!


Why the trip down memory lane? Well because it’s now 2021 and I’ve just spent several evenings typing in a brand new game into my Commodore 64! The game in question is a version of the every popular Klondike solitaire card game written by Roman Werner.


C64 Type-In BASIC Listing

A snippet of the Klondike Solitaire PDF.


It’s available to download in PDF format (it is a type-in listing after all) from his itch.io page.


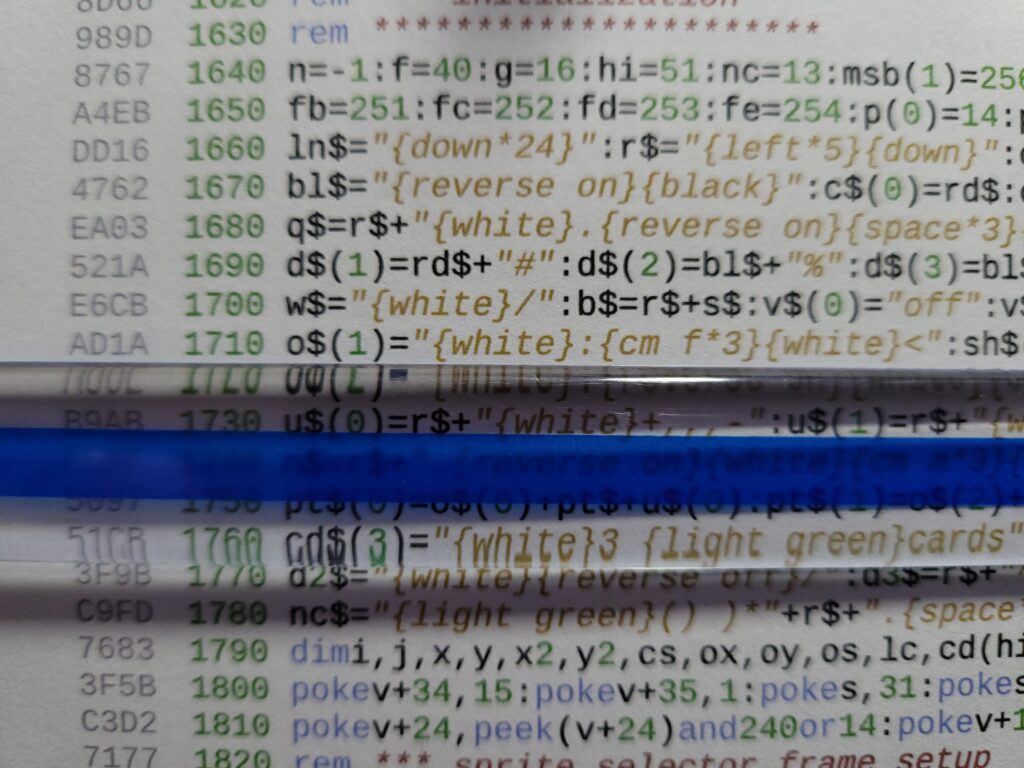
C64 Type-In BASIC Listing

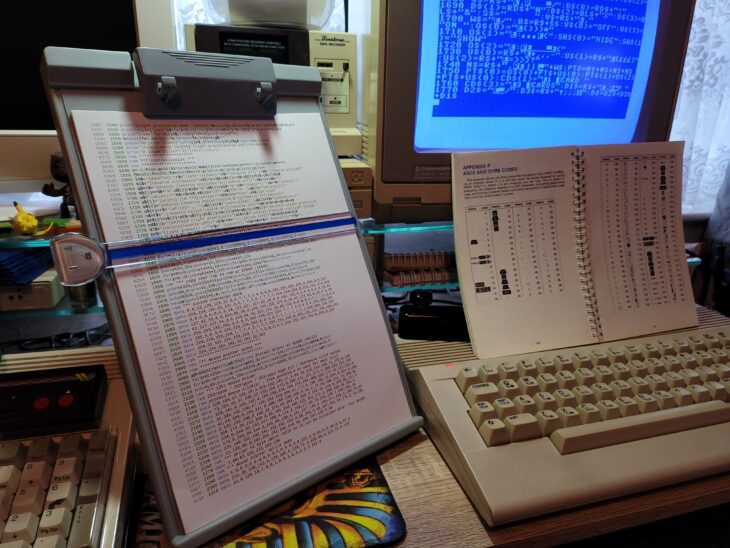
This is how the listing is presented. The colour coding helps makes things easier to follow. Note the 4 digit hex code in grey at the start of each line. This is the checksum code.


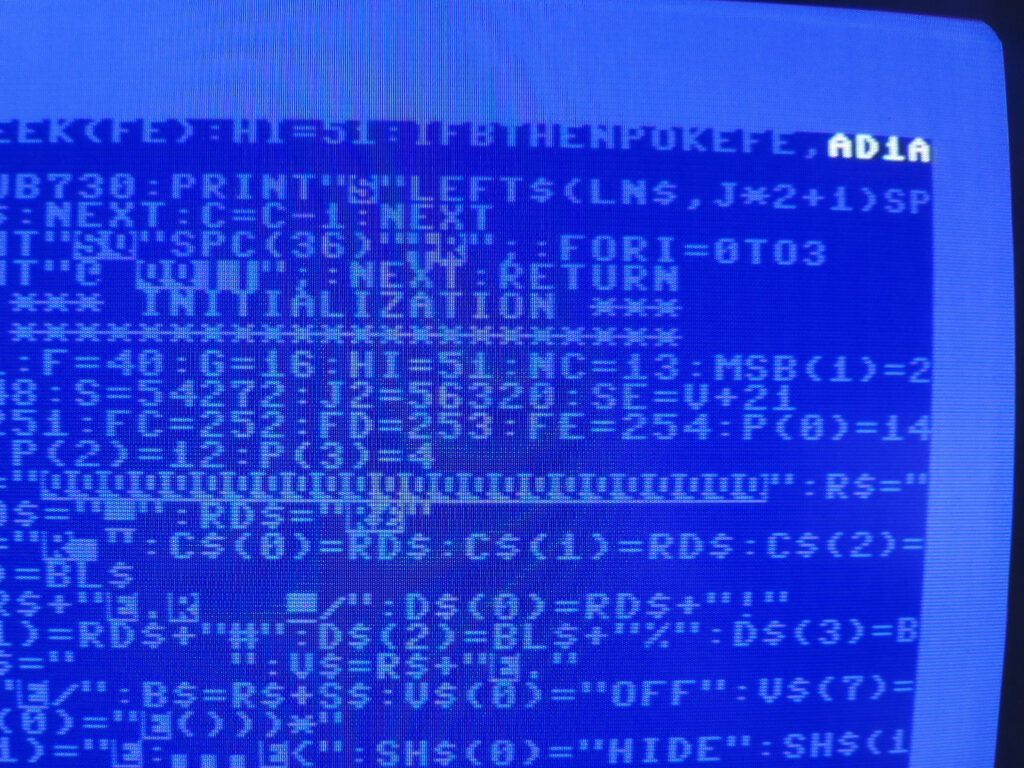
What made the idea of typing in his listing all the more appealing was the fact that he has utilised a new checksum tool when creating the listing. The way it works is this; each line of code in the listing is given a checksum number. Every time you type in a line of code the tool examines it and generates a code so that you can check it matches. If it doesn’t then you know you’ve made a mistake and can correct it straight away. That way, when you reach the end of the program it should run first time without issue.


C64 Type-In BASIC Listing

The checksum code in white appears after entering each line of code. If the checksum on the screen matches the one in the listing you are good to go. If not then it’s time to check where you’ve gone wrong!


Obviously I had to type in the small checksum tool program initially and get that working but it only took about 15 minutes. The checksum system was fantastic in use. Inevitably I did make several errors along the way but I was able to correct them immediately and move on. It was certainly far better to know I’d made a mistake straight away than try to fix multiple errors within hundreds of lines of code later on. Occasionally it did lead to some prolonged head-scratching as I tried to figure out what I’d entered wrong though!


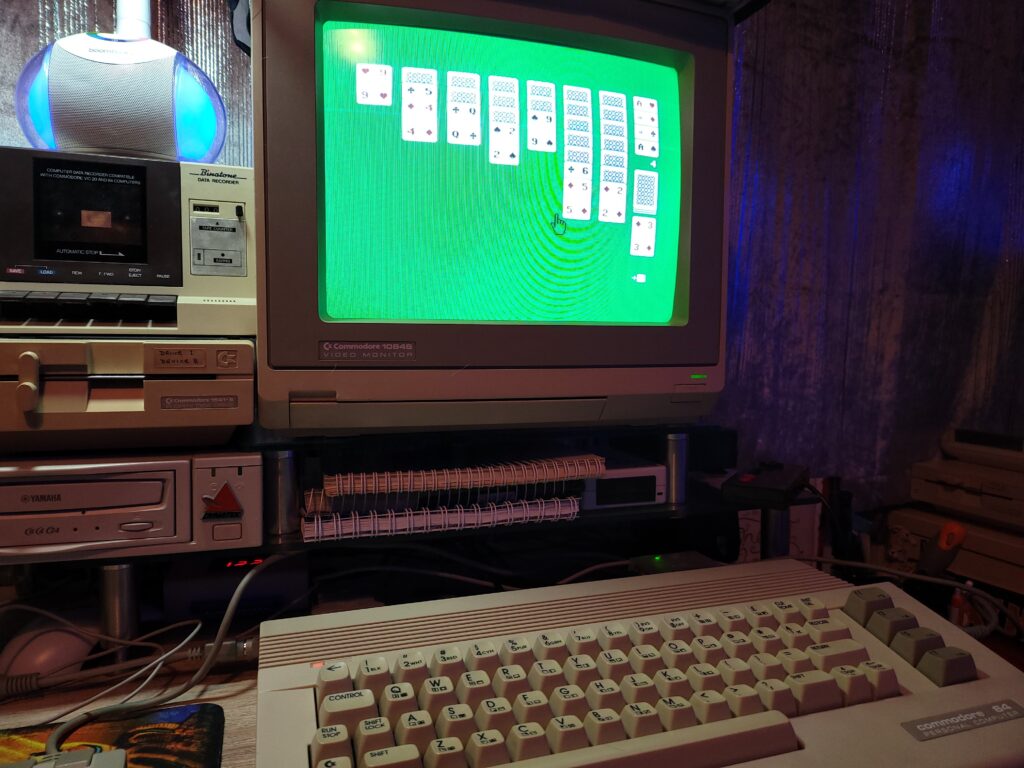
C64 Type-In BASIC Listing

Playing the completed game.


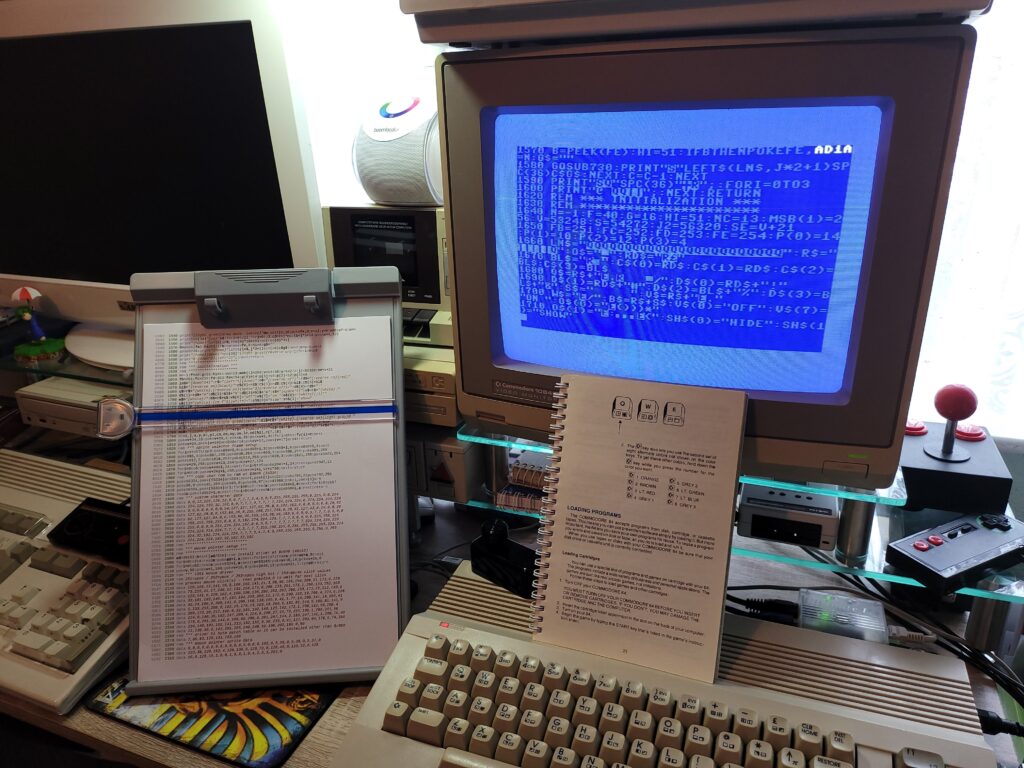
I did struggle a little at first – it’s been nearly 40 years since I’ve had to deal with the C64’s weird and wonder special symbols and some of them took me a while to figure out! The fact that ‘Light grey’ is accessed by holding down the C= key and pressing 8 for example had long since faded from memory.

The entire listing took me around 5-6 hours to complete from start to finish and that included ‘debugging’ time. If I had to do it again I’d be much faster now I’m familiar with most of the PETSCII characters once more.

I still found it a very enjoyable experience, even though I now have to deal with wearing varifocal glasses. I was quite surprised to discover that you can still purchase copy holders so I picked one up to help keep the listing and the screen the same distance from my eyes which helped a lot.


The Game

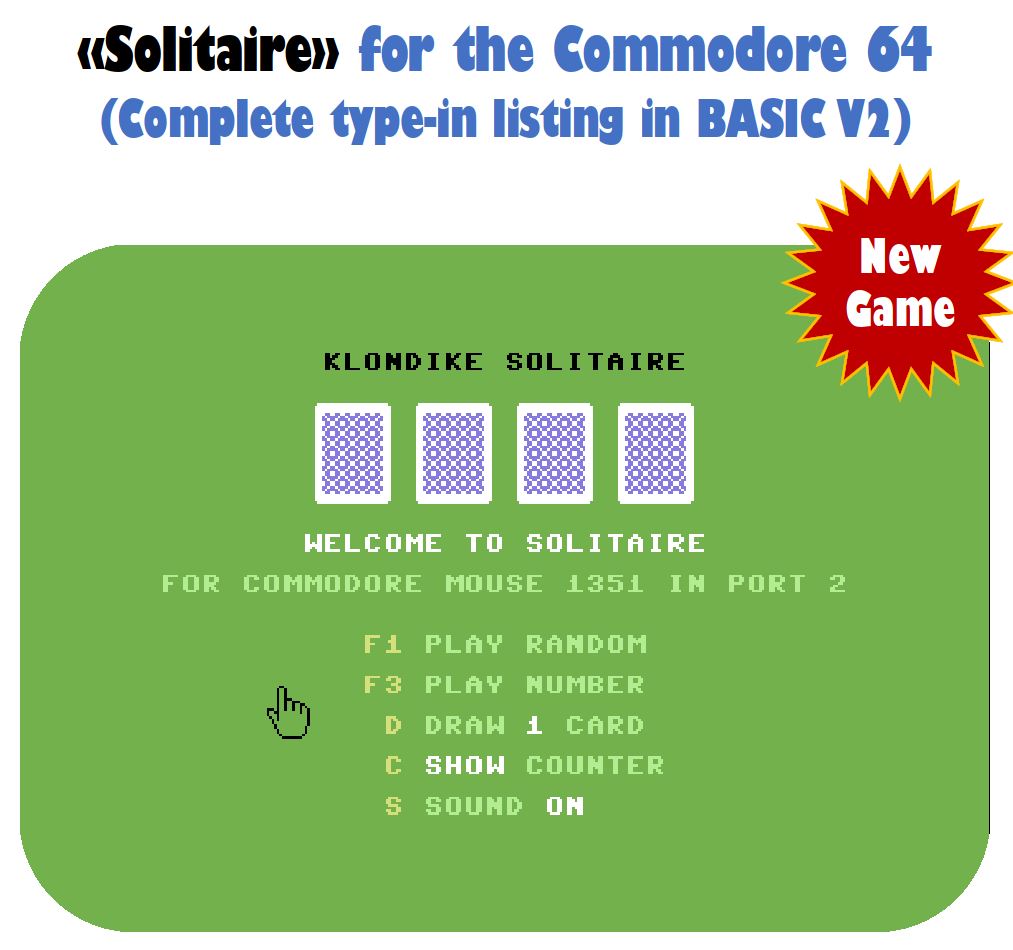
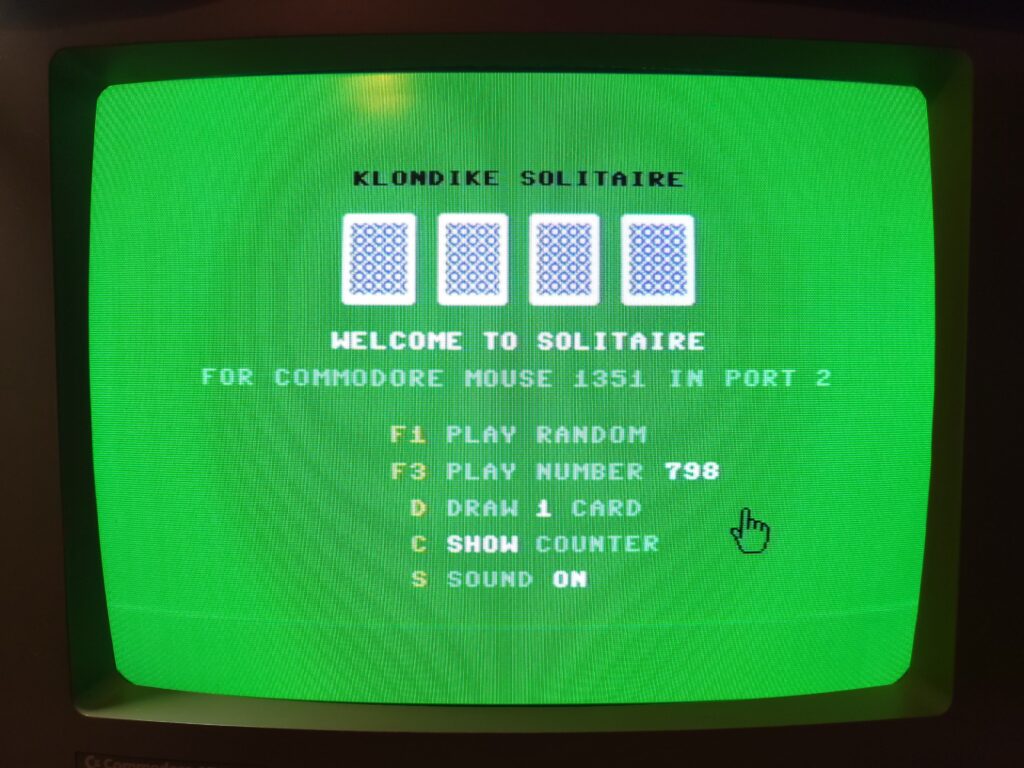
For probably the first time in my life ever the program ran successfully first time! A testament to the success of that Checksum tool for sure. I was greeted with an attractive title screen that includes some options for customising the game.


C64 BASIC Solitaire

Title Screen.


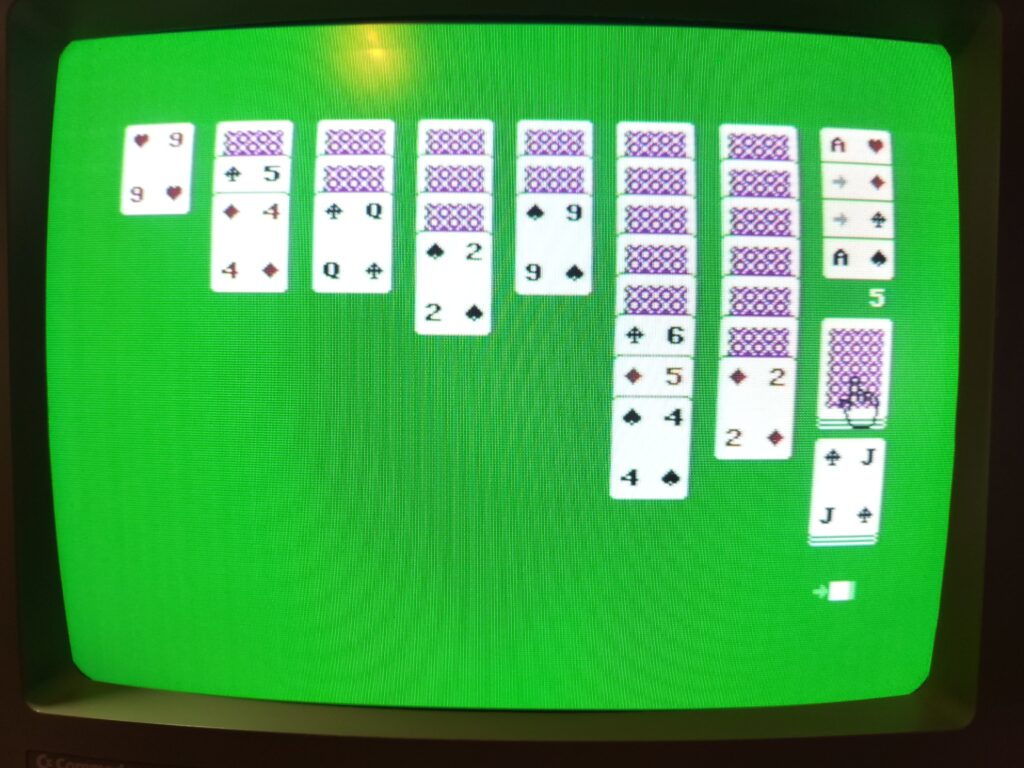
Considering the game is written in BASIC it looks great and plays really well. It utilises the Commodore 1351 mouse which just feels like the natural way to play a game like this. There’s some extra code provided to add joystick support too should you wish to have it. The mouse pointer utilises a sprite in the form of a hand which looks really slick in operation.


C64 Solitaire

Using one of the alternate coloured decks.


The game plays exactly as you would expect a game of solitaire to play. By utilising mouse input it ‘feels’ like a much more modern game during play.

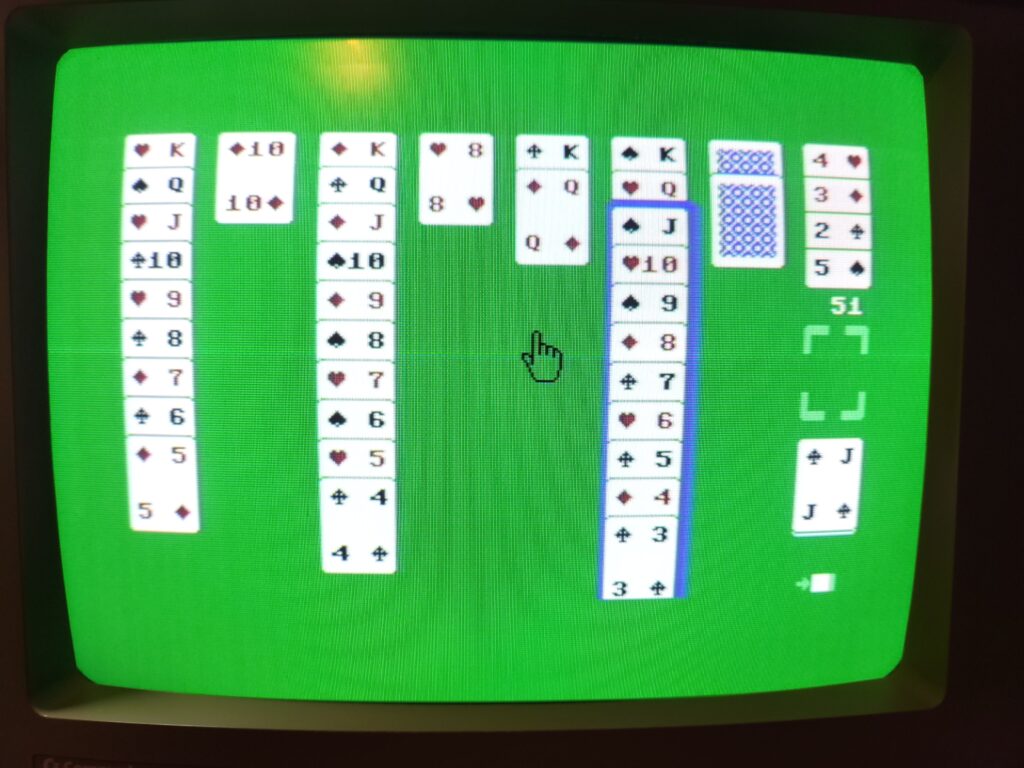
You can opt to play drawing 3 cards from the deck or just 1. Right-clicking on a card sends it to the appropriate foundation pile. You can also select a group of cards to move from one column to another.


C64 Solitaire

You can select a group of cards just like you would expect to move across to another column.


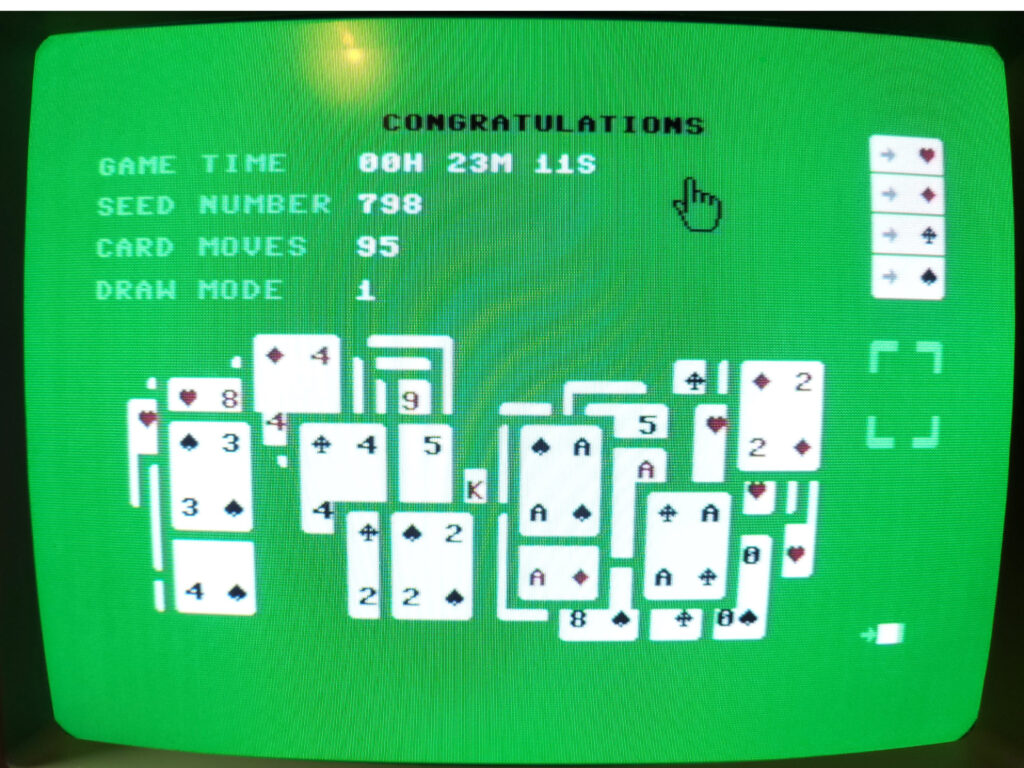
The card backs can also be changed to one of 4 different colour choices (red, grey, purple and blue) simply right-clicking the top card on the deck. Limited but effective sound effects are used to represent both the shuffling of the deck and card movements during the game. There’s even an animated ‘win’ screen at the end.


C64 Solitaire

The ‘win’ screen complete with animation. Game tracks the time played and number of moves you have made which is a nice touch.


SuperCPU

The game runs really well as I said but it is a little on the slow side when first setting up the cards on the screen or if you move a large stack of cards from one column to another. I’m only talking about a few seconds and it certainly doesn’t ruin the game, but it did encourage me to dust off my Turbo Chameleon V2 and test out the SuperCPU functionality.


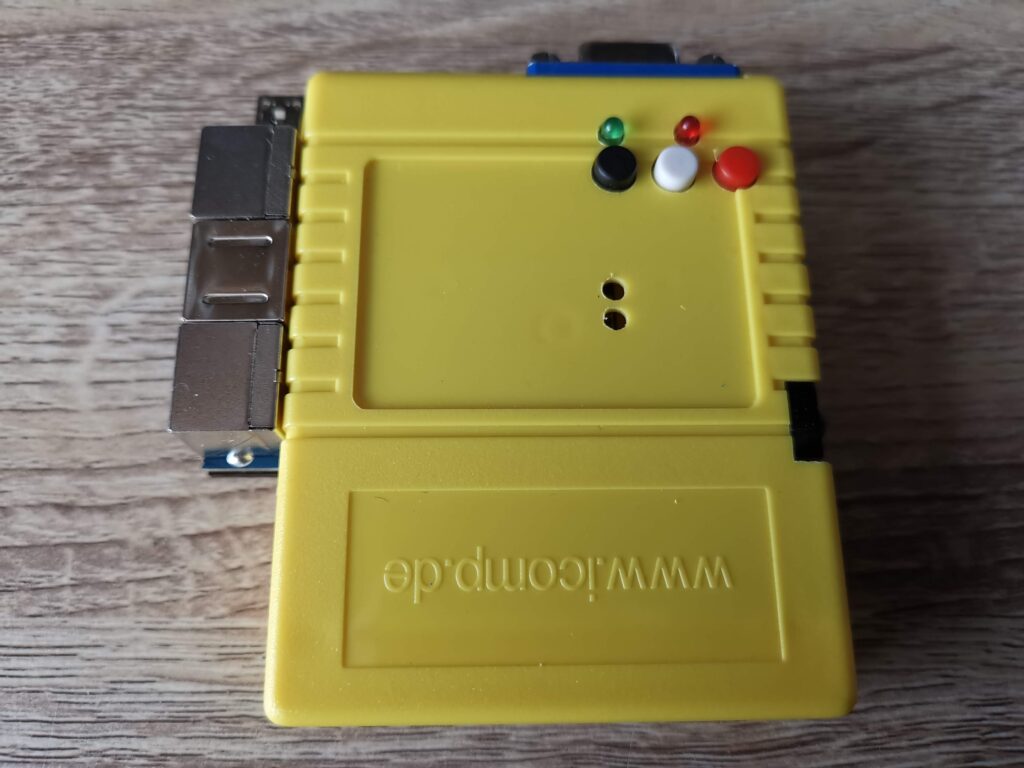
C64 Turbo Chameleon

My Turbo Chameleon cart.


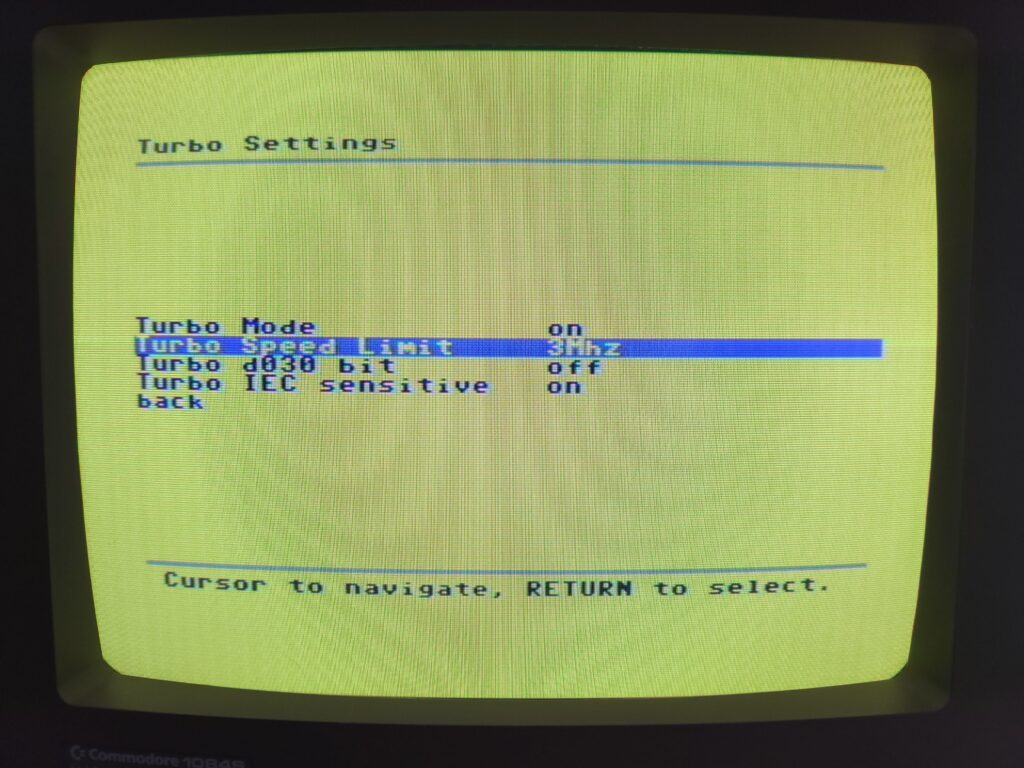
I tried it set to various speeds to see how it would affect the game. After some experimentation I found 3Mhz to be the sweet spot. Any faster and the mouse pointer started jittering all over the screen. 3Mhz gives the game a real boost to the point where the cards appear at the speed you’d expect. Any faster and you lose the impression that the cards are actually being dealt anyway and thus some if its charm.


C64 Turbo Chameleon

Setting the CPU speed to 3Mhz.


You can see the difference the improved CPU speed makes in the video below. The quality is pretty ropey as my camera lacks the ability to fine tune the shutter speed which is necessary to match the CRT’s refresh rate but it serves its purpose.

The video starts off with the cards being laid out at normal speed. Then you can see me going into my Turbo Chameleon settings and enabling ‘Turbo Mode’ with the speed set to 3Mhz (which is 3x faster than a standard C64). Now that the CPU is running at 3Mhz I demonstrate the cards being laid out again, but noticeably faster this time. This is definitely my preferred way of playing the game now.


Amiga Addict – A Brand New Monthly UK Amiga Magazine!

Amiga Addict

Who would have thought that the beginning of 2021 would see the launch a brand new monthly UK Amiga magazine? But that’s exactly what has happened with the publication of ‘Amiga Addict’ magazine.  Of course there are quite a few Amiga-centric mags out there now and I have covered these in the past but I believe this is the first UK Amiga mag and certainly the only one released on a monthly basis. Issue 1 was released in January, issue 2 in February and the March issue has just appeared on their website now too!


This slideshow requires JavaScript.


The cover design looks comfortingly familiar, and certainly wouldn’t have looked out of place on a 1980’s WH Smith shelf. At first glance it could easily be mistaken for a copy of Amiga Format but the magazine makers make no bones about the fact that they were inspired by all those great Amiga mags from the 80’s and 90’s.


Amiga Addict

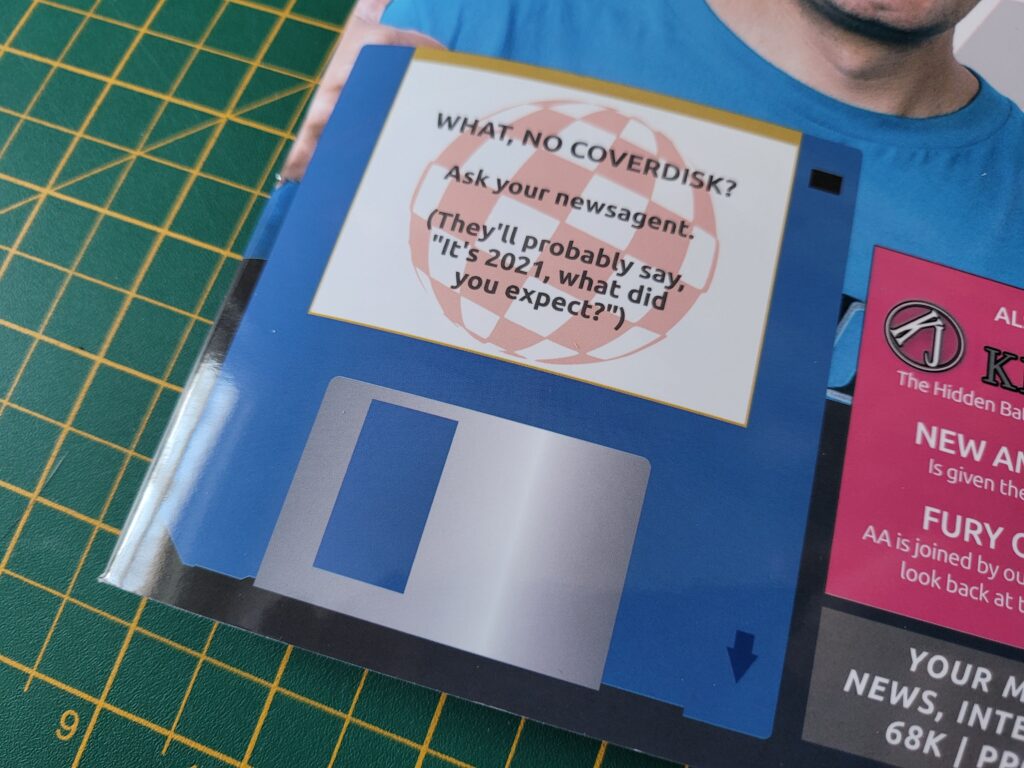
Someone’s nicked my coverdisk!


I thought the tongue-in-cheek picture of a 3.5″ floppy disk with the message ‘What no coverdisk? was a particularly fun touch. It certainly brought a smile to my face along with fond memories of seeing this message under my coverdisks after peeling them off back in the day. It would have been awesome to have a coverdisk as an option with the first issue but I fully understand why this wasn’t practical.

The magazine itself is A4 sized and has a premium glossy cover with silk finished pages inside. Both issue 1 and 2 run to 55 pages in total and feature a number of adverts from the current Amiga scene too. I always enjoyed browsing the adverts to see what games and gizmos I could get for my Amiga back in the day and I still get that same enjoyment from doing the same thing now with Amiga Addict.


Amiga Addict Contents Page

Contents Page.


A Look Inside Issue 1

Inside issue 1 there’s healthy mixture of gaming, news, letters, reviews, interviews and ‘how to’ articles. It aims to cater to all Amiga users whether they be using classic 68k machines, emulators or FGPA systems. I’ve only read issue one so far but I have to say I was really impressed with it.

The writing style is terrific and very entertaining and I could feel the passion that the authors have for the Amiga throughout their writing. It was refreshing to find a real sense of humour in a lot of the articles that constantly made me smile too. I do appreciate some light hearted banter in my magazines – it helps elevate them to something that I really look forward to, to lift my mood and provide some much needed escapism. This could well just be a British thing but it’s something I don’t find much of in the other current Amiga mags.


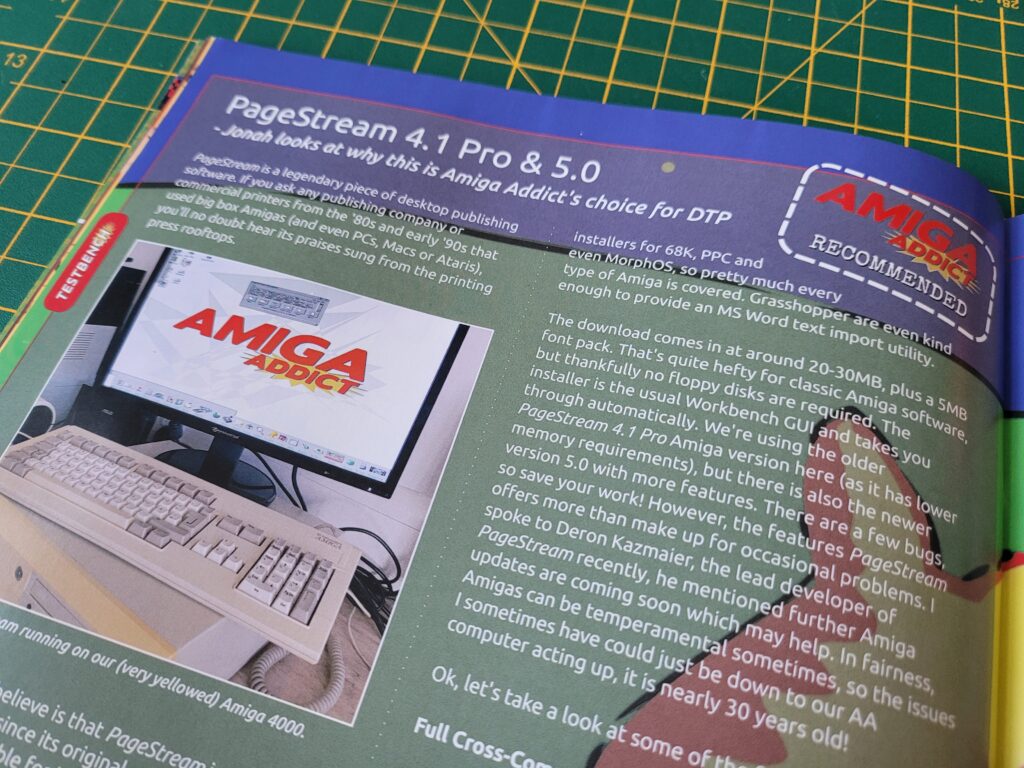
Amiga Addict

A review of the PageStream DTP software that is used to create some of the pages of Amiga Addict!


I found the reviews to be excellent; very informative and entertaining in equal measure. I discovered a couple of great new games that I was unaware of and proceeded to order them straight away. At the end of the day this is what it’s all about – helping to keep the Amiga community informed and thriving. Of course much of this info is probably available online… but it is likely spread across various social media and other retro oriented sites which can sometimes feel impossible to keep track of. Personally I think it’s fantastic to have all this info distilled into a single monthly publication. Something that I can read at my leisure without any political posts, irrelevant ads or trolls to annoy and distract me. Spoken like the true grumpy old man that I am.

What I personally find really impressive is that the entire magazine is actually laid out using PageStream on an Amiga X5000. You certainly couldn’t ask for a better demonstration that the Amiga is still relevant today! Suddenly I now how a strong hankering for an X5000 myself!
Anyway here’s a look at just few of the articles that can be found in the inaugural issue.


This slideshow requires JavaScript.


I’ve still got issue 2 to read and have just ordered issue 3 so am eagerly awaiting the arrival of that in the post soon!

If the magazine looks interesting to you then head over to the Amiga Addict website straight away and order yourself a copy – it deserves all the support it can get. Copies are available both digitally and physically and discounted subscriptions are available too!

Commodore 64 IRQ LED Mod

This Commodore 64 IRQ LED mod is a fun little hack that I spotted on eBay last year. Since my C64 mainboard has just come back from being re-capped I finally took the opportunity to fit this whilst I had the case open.

It’s a very simple little device that changes the colour of the C64 (or VIC20) power LED according to IRQ activity. When the computer is just idling the LED will glow red as usual. However when the CPU is active and generating interrupt requests (IRQ’s) the colour changes to green. This allows you to instantly see at a glance if your C64 is doing something. Anything that causes rapid IRQ’s will actually make the LED appear to be orange as it flicks rapidly between red and green.


Commodore 64 IRQ LED Mod

Everything supplied in the regular breadbin kit.


I picked up two of the devices, one for my 64 and the other for my VIC. I should point out that this isn’t a destructive hack. Nothing is permanently altered or damaged in any way and it can easily be reversed if desired. The device itself is really simple and there’s (usually) no soldering required. It consists of a tiny circuit board containing an LED, a couple of resistors and a single chip that detects the IRQ signals and triggers the LED colour changes. Connected to the board are 3 wires that are terminated with IC clips. These clips attach to the cartridge port pins and this is how the device monitors IRQ’s.


Breadbin Install


VIC20 Power LED.

Original VIC20 Power LED.


For breadbin C64’s and VIC20 computers fitment is extremely simple. You just unplug and remove the existing power LED and replace it with the little circuit board. There’s a small black plastic ring on the inside that needs pulling off and then the LED should push into the case from the outside with a little bit of force.


Removing a VIC20 Power LED.

Removing a breadbin C64/VIC20 Power LED.


There’s a spare black plastic collar for mounting the LED supplied in the kit in case you break the existing one. Also supplied is a little double-sided adhesive pad that you can use to fix the board in place. The new LED will need a little pressure to snap it into place and with the help of the adhesive pad it should be held nice and secure.


Commodore 64 IRQ LED Mod

Fitted board – held in place with a double-sided sticky pad sandwiched between the case and the chip.


Now it’s just a matter of wiring the board up. The 3 wires need to be attached to the front row of cartridge port pins using the IC clips as indicated below.


Commodore 64 IRQ LED Mod

IC clips connected to VIC20 cartridge port.


One the VIC20 the green clip goes onto pin 22 (Ground), Red – Pin 21 (+5V) and White – Pin 19 (IRQ).

On the C64 it gets wired up as follows; Green – Pin 1 (Ground), Red – Pin 3 (+5V), White – Pin 4 (IRQ).


Commodore 64 IRQ LED Mod

View showing the completed mod fitted.


Time for the moment of truth – putting the case back together and giving it a test drive. The LED in my kit had been soldered on in reverse so when my VIC was idle it lit up green and when busy it changed to red. I could have solved this by de-soldering it and flipping it round but it really doesn’t bother me so I left it alone. Other than that it works exactly as advertised and I’m really happy with the result.


This slideshow requires JavaScript.


C64C Install


UPDATE [March 2024]

Tim over at SharewarePlus now produces a version specifically for the C64C too incorporating a rectangular LED and also a much longer set of cables to allow the clips to actually reach the cartridge port as the LED is on the opposite side to the older ‘breadbin’ style machines.


C64C Version.


This makes the installation process just as simple as it was for the breadbin case one.


Close-up view of the C64C version with rectangular LED.


I’ll leave the details of my original installation modification below just in case anyone else finds themselves needing to fit a round peg into a rectangular hole. However realistically this info is now obsolete so long as you are getting one after March 2024 as you can just choose the right one for the job when you buy it.


ORIGINAL INSTALL

I hinted earlier that non-breadbin installs aren’t quite so simple. I have a C64C and as supplied the mod will not work with this model. There’s a couple of reasons for this. The most obvious being the C64C has a rectangular LED rather than the usual round one found in Breadbin style machines.


Commodore 64 IRQ LED Mod

Board supplied without a round LED and a rectangular one waiting to be fitted.


The other problem becomes apparent once you open up the case. As can be seen in the photo below the power LED is at the opposite end of the case to the cartridge port so the supplied wires are too short.


Commodore 64 IRQ LED Mod

Here you can see that the supplied wires in the kit only reach half-way across the board.


Fortunately these issues are easy to sort. I mentioned about the LED to the seller (Tim Harris who runs Shareware Plus) and he kindly supplied the board without an LED fitted so I could fit a rectangular one myself. These ones here are a good fit: rectangular LED’s on eBay.


Commodore 64 IRQ LED Mod

LED fitted to 10′ long wires to allow it reach across.


In order for the LED to fit in the existing hole I soldered it to three 10 inch lengths of wire and then soldered the wires to the circuit board. I fitted some heat shrink tubing over the joints to insulate them. This allowed me to mount the circuit board close to the cartridge port and also have the LED in the correct place.


Commodore 64 IRQ LED Mod

Here you can see the mod fully fitted and wired up. Note there are several other IC clips on this photo – these are from my SIDFX (twin SID chips).


I attached the board with a small double-sided sticky pad to hold it in place. I also carefully bent the wires on the LED 90 degrees so the cables would lie flat along the top of the case.

The IC clips were connected to the cartridge port pins as follows:

  • Green – Pin 1 (Ground)
  • Red – Pin 3 (+5V)
  • White – Pin 4 (IRQ)


Verdict

After giving it all a quick test I put the case back together and had a play around with it. When idle the LED lights up red as normal – a much more vivid red than the photos show. When the CPU is actively generating an IRQ such as when loading off a disk the LED with light green. Rapid IRQ activity that can happen when playing a game makes the LED appear orange.

I’m really impressed with this little mod. It’s one of those things that’s kind of pointless but also completely essential at the same time. I love having a visual indicator that my computer is doing something and during loading or saving operations it functions as a kind of drive activity light.

You can see it working clearly in the video below, taken whilst I was loading a program off a floppy disk.


If you enjoy tinkering and like the idea of having an activity light on your C64 or VIC then I can thoroughly recommend this. Did I mention that it costs less than a tenner too? A real no-brainer for me. You can pick up either version from Tim over at SharewarePlus.

VIC20 Game Box Preservation

It’s winter here in the UK so recently I decided to spend a particularly cold and rainy afternoon on a little VIC20 game box preservation project I’ve been meaning to do for some time.

Why did I want to do this?

Unfortunately, unlike Sega games which came in sturdy plastic clamshell boxes, Commodore cartridges were supplied in flimsy cardboard boxes. Consequently many of these have not stood the test of time – as a quick glance at all the box-less cartridges on eBay will attest to. I’m really proud that my collection has remained largely in tact for almost 40 years but for them to survive another 40 I figured they’d need a little helping hand.

I’d already found some great looking box protectors on eBay and also picked up some sachets of Silica Gel off Amazon for good measure. All I needed was a some time to apply them to my VIC20 cartridge collection.


Sachets of Silica Gel

Sachets of Silica Gel


The Silica Gel sachets came in a sealed bag of 100. The moment you open the pack they will start absorbing any moisture in the air so it’s important to minimise their exposure and keep them in a sealed container once opened.


VIC20 Box Protector

A VIC20 Box Protector folded flat (this is how they are supplied).


The Box Protectors

The box protectors are made of PET material which according to Wikipedia “makes a good gas and fair moisture barrier, as well as a good barrier to alcohol (requires additional “barrier” treatment) and solvents. It is strong and impact-resistant”. The boxes were supplied with a protective film on them to prevent scratches in transit. I have to admit I hadn’t realised this at first and was wondering why they looked slightly opaque. When the penny dropped and I removed the film they were crystal clear. You can see the difference clearly in the photos below.


This slideshow requires JavaScript.


Protect and Preserve

After ensuring that my game boxes were dust free and that the cartridge inside was similarly clean I added a couple of sachets of gel inside each box. The plastic box protectors should do a good job of protecting the contents from the environment but they’re not air-tight so the gel will absorb any moisture that makes its way inside. This should prevent any mould from forming on the contents. At some point in the future the sachets will need replacing but as I’m keeping the games in a nice warm room they should be fine for years.


VIC20 Cosmic Jailbreak Cartridge

Game box, with the cartridge and instruction manual laid out alongside it.


If I was placing them in a damp, cold basement, loft or garage then they would need replacing far sooner. However in those locations the games would need to be sealed in an air-tight box too.


VIC20 Game Box Preservation

Silica gel sachets placed inside the bottom of box.


The protective cases were supplied flat-packed so needed folding into shape before they could be used. I found this really easy to do and it took less than a minute per box.


VIC20 Game Box Preservation

A completed box… with the protective film still attached in this photo!


Now it was simply a matter of carefully sliding the game box into the protective case. The cases were a very snug fit so I did need to ensure the box went in straight before it would fit inside.


VIC20 Game Box Preservation

Game box fitted inside a protective case.


There is a seam down one edge (where the box spine is) so I made sure to position that at the back when displaying them on my shelf.


VIC20 Game Box Preservation

Notice how the game on the far left looks slightly opaque – this box still had the protective film on it. It has been removed from the other two.


I think the games look terrific inside the boxes and from most angles you can’t even tell they’re inside a cover.  In fact I’d go as far as saying some of my games looked much better inside the protective cases. Take the Menagerie game shown below which has suffered some box crushing and creasing over the years.


Before…


This slideshow requires JavaScript.


Because the protective covers are such a snug fit they actually force the game boxes back into their original shape when inserted. In effect the covers act as a kind of exoskeleton, almost eliminating the effect of the creasing. The creases are still there of course but just far less noticeable now.


After…


This slideshow requires JavaScript.


All in all I’m really pleased with how this project worked out. It was inexpensive, effective and the whole project only took me a couple of hours to complete. That included taking the photos for this post too.


VIC20 Game Box Preservation

A bunch of VIC20 games in their new protective covers.


My VIC20 games not only look better than before but I feel much happier knowing that I’ve taken steps to ensure they last for another 40 years!


VIC20 Box protectors

Row of protected games on my shelf.

Brucie Bonus

I discovered that the protectors are also a perfect fit for the Commodore 64 Microprose style boxes. This means they’ll also fit similar style boxes from the likes of Rainbird and Level 9. I can see another batch being ordered very soon!


C64 Microprose box protector

The VIC20 box protector also happens to be a perfect fit for the popular Commodore 64 Microprose style game boxes!