I’ve covered some storage solutions for Cassette tapes in the past but sadly they are no being made. With my own collection of tapes continuing to grow (both music and computer games) I needed a smart, attractive storage solution, and preferably one that would continue to be made for a long time to come.
There was really only one way to guarantee the latter so I’ve ended up designing and 3D printing my own rack and have made it available to purchase on my Etsy Store in case anyone else would like to get one.
Empty storage rack. Mounting holes at the top.
The finished storage rack measures 23cm x 23cm and is a shade over 5cm deep. I literally cannot make a larger capacity rack as that’s pretty much the maximum size of my printers’ build plates.
This slideshow requires JavaScript.
It has a couple of screw mounting holes at the top so it can be hung on a wall. Alternatively it can be placed free-standing on a shelf, or even on its back inside a drawer.
Lots of VIC20 games
The idea is that you can just keep adding more racks as your collection grows.
A rack full of VIC20 games.
Although you can just place them side by side or on top of each other when expanding I’d recommend fixing them to the wall if going vertically for stability. Nobody wants their collection of tapes falling on the floor if your cat decides to go mountaineering!
Expanding your collection – 3 racks together
These are produced on Bambu Labs printers using premium PLA and each one takes nine hours to complete. They’re really nice quality even if I do so so myself but you can judge for yourself by looking at the photos.
As I said if you want one you can get one from my Etsy store. If you’d like to order more than one then drop me a message and I can sort out a discount.
The SIDPlayer+ is a neat little hardware music player made by Arananet that is able to play C64 SID audio tracks. They have a strong tendency to be perpetually out of stock but you can register your interest and receive an email when a new batch is ready which is how I got mine.
I’ve actually been meaning to post about this for a while but only just got around to it. Anyway after ordering the device I received small package in the post containing a transparent cassette case with full colour J-card, the SIDPlayer+ PCB and a small A5 instruction sheet.
The SIDPlayer+ in cassette storage case.
The PCB has been created in the style of a compact cassette and the case provided offers a very practical means of storing it safely.
Front of the SIDPlayer+ PCB.
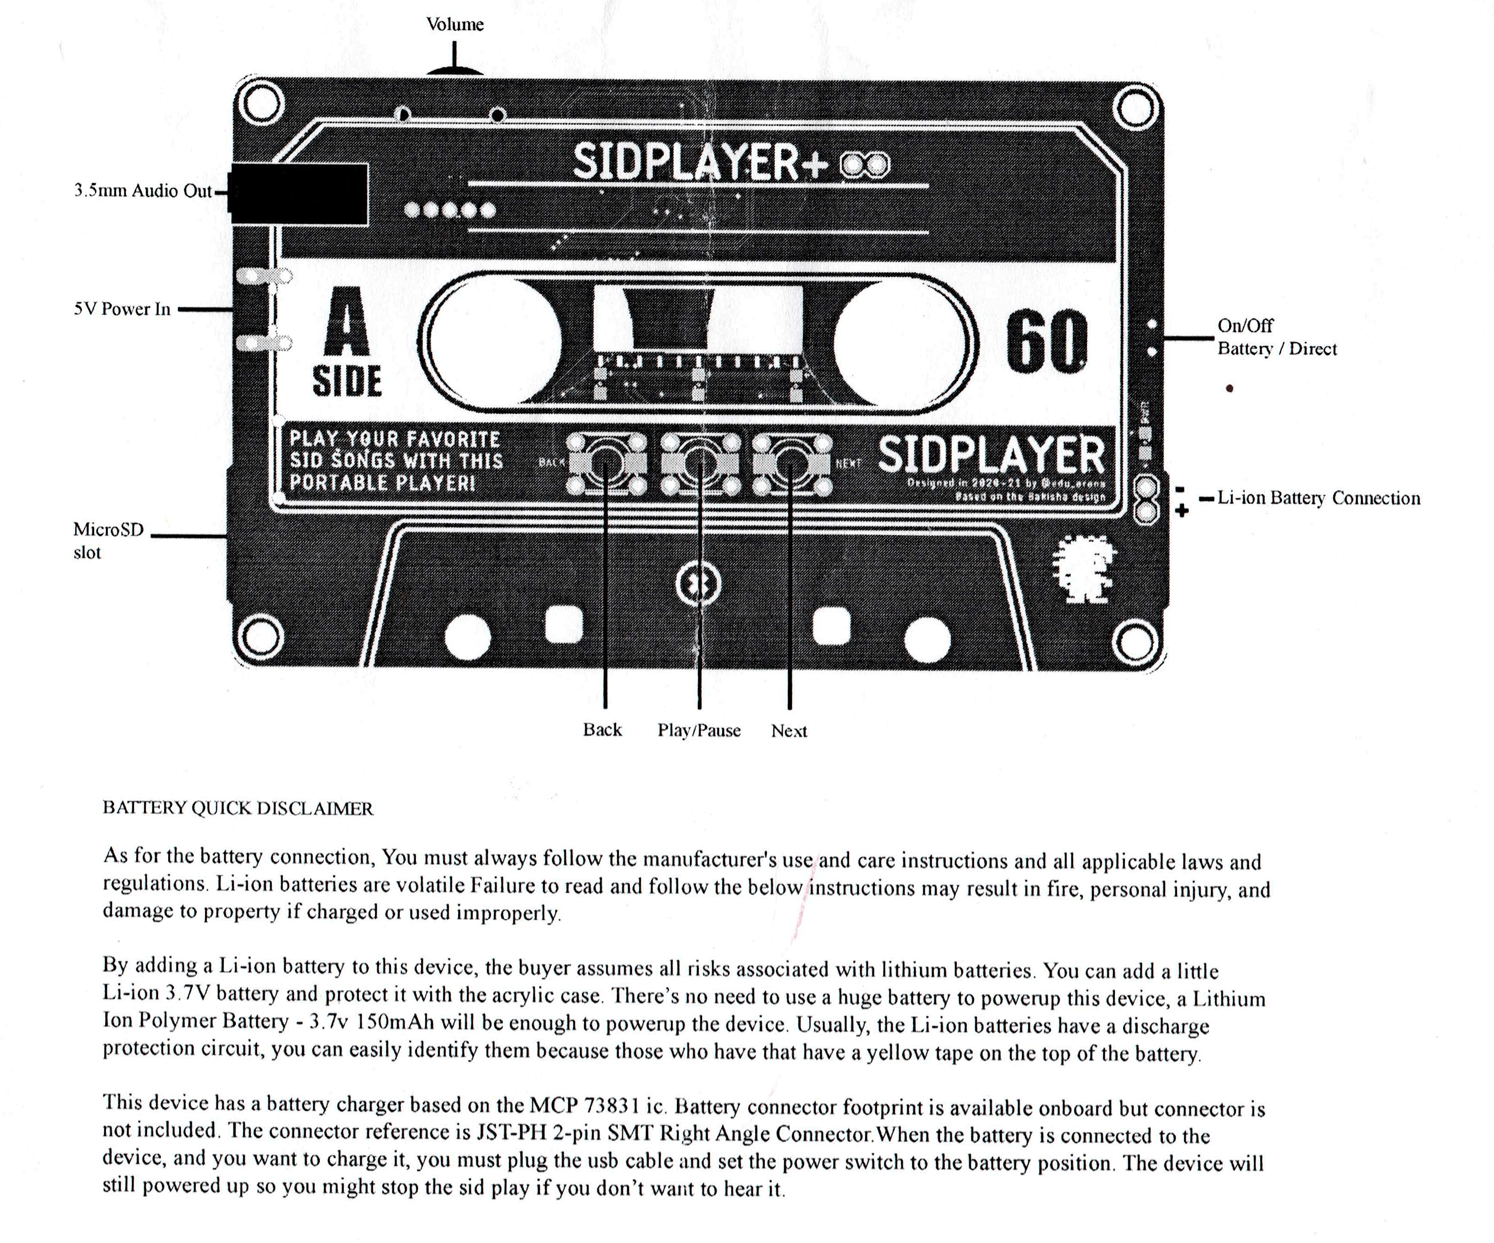
The front of the PCB features three physical buttons; back, stop/play and next which function exactly as you would expect. On the right-hand edge there is a small power LED which indicates whether the device is switched on or not. On the left edge is the 3.5mm stereo headphone socket (the player outputs mono sound so you get the same channels in both ears). In the centre there are three additional LED’s that light up when the corresponding sound channels are in use.
Back side of the SIDPlayer+ PCB.
Flipping the PCB over to the back side reveals an on/off switch on the left, rotary volume control along the top whilst on the right can be found a Micro USB power socket and the MicroSD memory card slot. There’s also shout outs to some of the people that helped to create the player printed on the board itself which is a cool touch.
SIDPlayer+ Instructions.
Adding a Battery
The instruction sheet (pictured above) provides a useful annotated diagram of the player showing where all the important parts are located and gives some guidance towards adding a battery.
The player can be used as is, straight out of the packaging by simply plugging in a micro USB cable to power it. However I wanted it to be portable, just like a Walkman, so I ordered myself a compatible battery off Amazon (it doesn’t come supplied with either a battery or micro USB cable).
LI-ION Battery.
The battery needs to be rated at 3.7V 150mAh and came supplied in oversized box displayed above. The battery itself is tiny, measuring just 30mm long, about 15mm wide and a couple of mm thick.
Battery with supplied connector plug.
There’s no connector on the board to plug the battery into but there are a couple of solder points for the wires so I just cut off the plug and soldered them in position.
Battery with connector removed and ends stripped ready to be soldered on the board.
I also used a couple of blobs of hot glue to hold the battery in place on the board to keep things neat and tidy.
Battery glued to PCB and wires soldered in position.
I gave it a quick test by flipping the switch to the ‘on’ position and the blue power LED lit up which was a reassuring sign.
SIDPlayer+ Powered on and headphones plugged in.
The board also incorporates the necessary circuitry to charge the battery. To achieve this you need to supply power via a Micro USB cable and set the on/off switch to the ‘battery’ position. One thing to note is that it continues to play music whilst charging so you need to press the ‘stop’ button to silence it.
As can be seen in the photo below, the board still fits nicely into the cassette case with room to spare, even with the battery attached.
Tucked away neatly into the cassette box.
Prepping the Card
With the SIDPlayer+ now powered it was time to turn my attention to sorting out a memory card to use with it. I didn’t bother buying one as I’ve built up quite a collection of memory cards of all types and sizes over the years. A quick rummage around the bottom of my desk drawer elicited a 128GB SanDisk card which was overkill really but would certainly do the job. It had been partitioned and formatted for something else in the past so I deleted all the partitions and formatted it as one big FAT32 drive using MiniTool Partition Wizard.
Partitioning and Formatting the MicroSD card.
I then copied a handful of some of my favourite SID tracks onto it and popped it into the card slot on the SIDPlayer+. The files have to be placed in the root of the card and it’s worth pointing out that it can only play the older style PSID files and not the more recent RSID ones.
Popping the MicroSD card into the slot.
Listening to Some SID Music.
With the headphones attached and the player powered on I was finally able to put the player through its paces. I played through a number of tracks and they all sounded terrific. It had plenty of power and I never needed to turn it up fully to get a decent sound level.
Although the player can be used ‘naked’ my preferred option was to keep it inside the cassette case at all times – in fact I will probably cut a small slot in the side of the case to accommodate the headphone jack. That way I can listen to the player with the case closed, maybe in my shirt pocket for example.
Playing some music with the card in the case.
Navigating from one track to the next was easy enough using the buttons but without a screen to show the track names it did get a little tricky at times. This is because many SID files actually contain a number of subtunes and/or sound effects within them so unless you make a note beforehand you can often find yourself clicking through all manner of unexpected tracks before reaching the one you want. Not a dealbreaker but definitely something to be aware of.
Listening to some music.
I recorded a couple of videos of the SIDPlayer+ belting out a two of my favourite C64 tunes. These were just recorded on my phone with the the sound playing through the headphones but it’s loud enough for you to hear what it sounds like. Obviously it’s miles better quality when listening directly through the headphones. The device is supposed to be capable of emulating both the original 6581 SID and the newer 8550.
Name that tune! I picked this particular track not just because it’s one of my all-time favourites but because the intro should make it easier to see the individual channel LED’s flicker on and off.
Sound Quality
The sound quality from the SIDPlayer+ is impressive for such a compact and inexpensive device but understandably falls a little short of the real deal. To give some idea of the difference I recorded the same track (Cybernoid by Jeroen Tel) into my digital sound recorder from both my real C64 and the SIDPlayer+. If you are able to, listen to them both whilst wearing headphones to get the best impression of the sound quality.
Zoom H2n hooked up to SIDPlayer+.
First off here’s a clip I recorded directly from my C64 via my SIDFX 3.5mm stereo output jack.
And here’s the same clip recorded directly from the headphone socket of the SIDPlayer+.
Initially they do sound very similar but between the 10-20 second mark you can hear a clear difference. I’m no audio expert and lack the vocabulary to describe the sound properly but the SIDPlayer’s rendition of this section of the the track sounds awkward with audible clicks and pops as it struggles to produce the right sounds. Reading through the specs of the player it does say; ‘Some filters are enabled but due to the hardware limitation, they do not cycle exact’. I’d hazard a guess that this is the reason for the issue.
Verdict
So the sound isn’t quite as good as a real Commodore 64 but to fixate on that alone kind of misses the point of this device. A C64 doesn’t fit in my shirt pocket and I can’t mow the lawn whilst listening to some classic Rob Hubbard tracks on it either. The SIDPlayer+ is an inexpensive and fun little gadget and if, like me, you adore C64 SID music then it’s definitely worth picking up to have a play around with.
It’s worth pointing out also that since I bought mine last year an updated version has now been introduced. This new version includes a Bluetooth module so you can listen to it with wireless headphones making it even more convenient!
The SIDPlayer+ is available to purchase from here. Just create yourself an Arananet account then sign-up for a notification of when the next batch is ready for sale.
As a fan of Anders Enger Jensen’s other releases I’ve been looking forward to Retro Grooves 3 for quite some time now. What I was not expecting at all was for him to release this on MiniDisc! When he emailed me to let me know it was coming out on this format I just had to get it, as well as the cassette version!
This slideshow requires JavaScript.
Both versions are really professionally presented with full colour inlays that unfold to reveal a lot of interesting information about each track. This is something you just don’t get with digital music. I loved being able to listen to each track for the first time whilst browsing Anders’ notes about what inspired him or the processes involved in creating a particular track.
This slideshow requires JavaScript.
He’s certainly pulled out all the stops for the MiniDisc release, the artwork on the disc has been printed directly onto the case itself – no cheap stick-on labels here. This is certainly the only MiniDisc in my collection that has been printed this way and it looks amazing! The cassette release still looks good too, coming in a transparent green case with the album details printed on it in contrasting white.
This slideshow requires JavaScript.
A lossless digital download of the whole album is included with both the Cassette and MiniDisc formats. Additionally the digital download includes an extra 16 bonus tracks not included on either the tape or disc releases. Alternatively, if you don’t mind missing out on the physical formats completely you can opt to just buy the album digitally if you prefer.
The entire Retro Grooves cassette collection to date…
Verdict
Regardless of which format you choose, if you enjoyed either of his previous Retro Groove albums, or even Troubled Hearts then I pretty much guarantee that you will also enjoy this. Anders’ signature style of upbeat ‘cheerful’ sounding synth music mixed with occasional samples is present and correct. My personal standout favourite track has to be ‘FM Love’ closely followed by ‘Isabella’s Dream’ which features some lovely harmonised female vocal samples.
MiniDisc version includes full track listings
There’s a couple of tracks with backing singers this time around that you may or may not enjoy depending on your taste. ‘Escape Your Fear’ sounds like it could have come straight from the Troubled Hearts album and I really enjoyed it. The other, entitled ‘Let’s Fly’, I didn’t like so much as the vocals are very processed and it just didn’t really click for me. It wasn’t bad enough that I’d want to skip it, but it’s definitely not something I’d want on repeat.
Anyway if you would like to get hold of a copy for yourself than head on over to EOX Studios website.
Retro Grooves vol 2 is something I’ve been looking forward to since I first heard Anders was working on it as I loved the first album. As usual it comes on a really awesome professionally presented cassette tape with a lossless digital version included with your purchase. You can also just buy the album digitally if that’s what you prefer.
Personally a big part of the pleasure of getting this album is the fact that it comes on an audio cassette. I love opening the cassette, unfolding the inlay, reading about each track and of course popping it in my cassette player to listen to it. It all adds to the experience whilst not being able to skip tracks encourages listening to the entire album instead of skipping through to find instant gratification.
Verdict
I’d say it was a little more mainstream than vol 1 as there aren’t as many chip tunes but if you liked the first album then you will no doubt like this too. I really enjoyed all the tracks except for the MarioKart 64 Remix where I found the Mario samples to be a little annoying. But who knows, maybe it will grow on me in time! Some of the tracks will be instantly recognisable if you watch ‘The 8-Bit Guy‘ on YouTube whilst others will take you straight back to the 80’s with riffs that wouldn’t be out of place in an episode of Miami Vice. Definitely recommended anyway and I personally can’t wait for vol 3!
If you would like to get hold of a copy for yourself than head on over to EOX Studios website.
Cassette tape with folding inlay
Retro Grooves vol 2 playing in my Sony WM-D6C Walkman
If, like me, you were disappointed to discover that your beautiful, highly specc’d Range Rover Sport Mk1 did not come equipped with Bluetooth Audio then I have a solution for you that will cost less than £20. Once you’ve got hold of the kit the whole job should only take you about 5 minutes.
Mk1 Range Rover Sport
What you need to buy…
The first thing you need to purchase is a USB car charger adaptor for your rear cigarette lighter socket. The more slimline the better, I used this one which works really well. In fact I’ve got one of these in my front power socket too!
Next you need purchase yourself this little gadget from Amazon which is a bluetooth audio receiver and will convert your bluetooth audio back into good old analogue for your Range Rover sound system to play.
UPDATE: You may want to check out a new, alternative Bluetooth option I recently discovered at the end of this article as it offer a few advantages, albeit at extra cost.
Once the above gizmos have arrived follow the super-easy instructions below to enjoy wireless music playing in your car.
Bluetooth Adaptor connected to Aux rear aux socket
Installation…
First off you need to plug the USB adaptor into the rear passengers power socket (it hides underneath a flap on the centre armrest). Now plug the Bluetooth receiver into that USB adaptor . Finally you need to plug one end of the (supplied) auxiliary audio cable into the socket on the end of the Bluetooth adaptor. Plug the other end into the aux socket on the back of the centre armrest, located just to the left of the power socket. That’s it for the hardware side of things, the next step is configuring your phone.
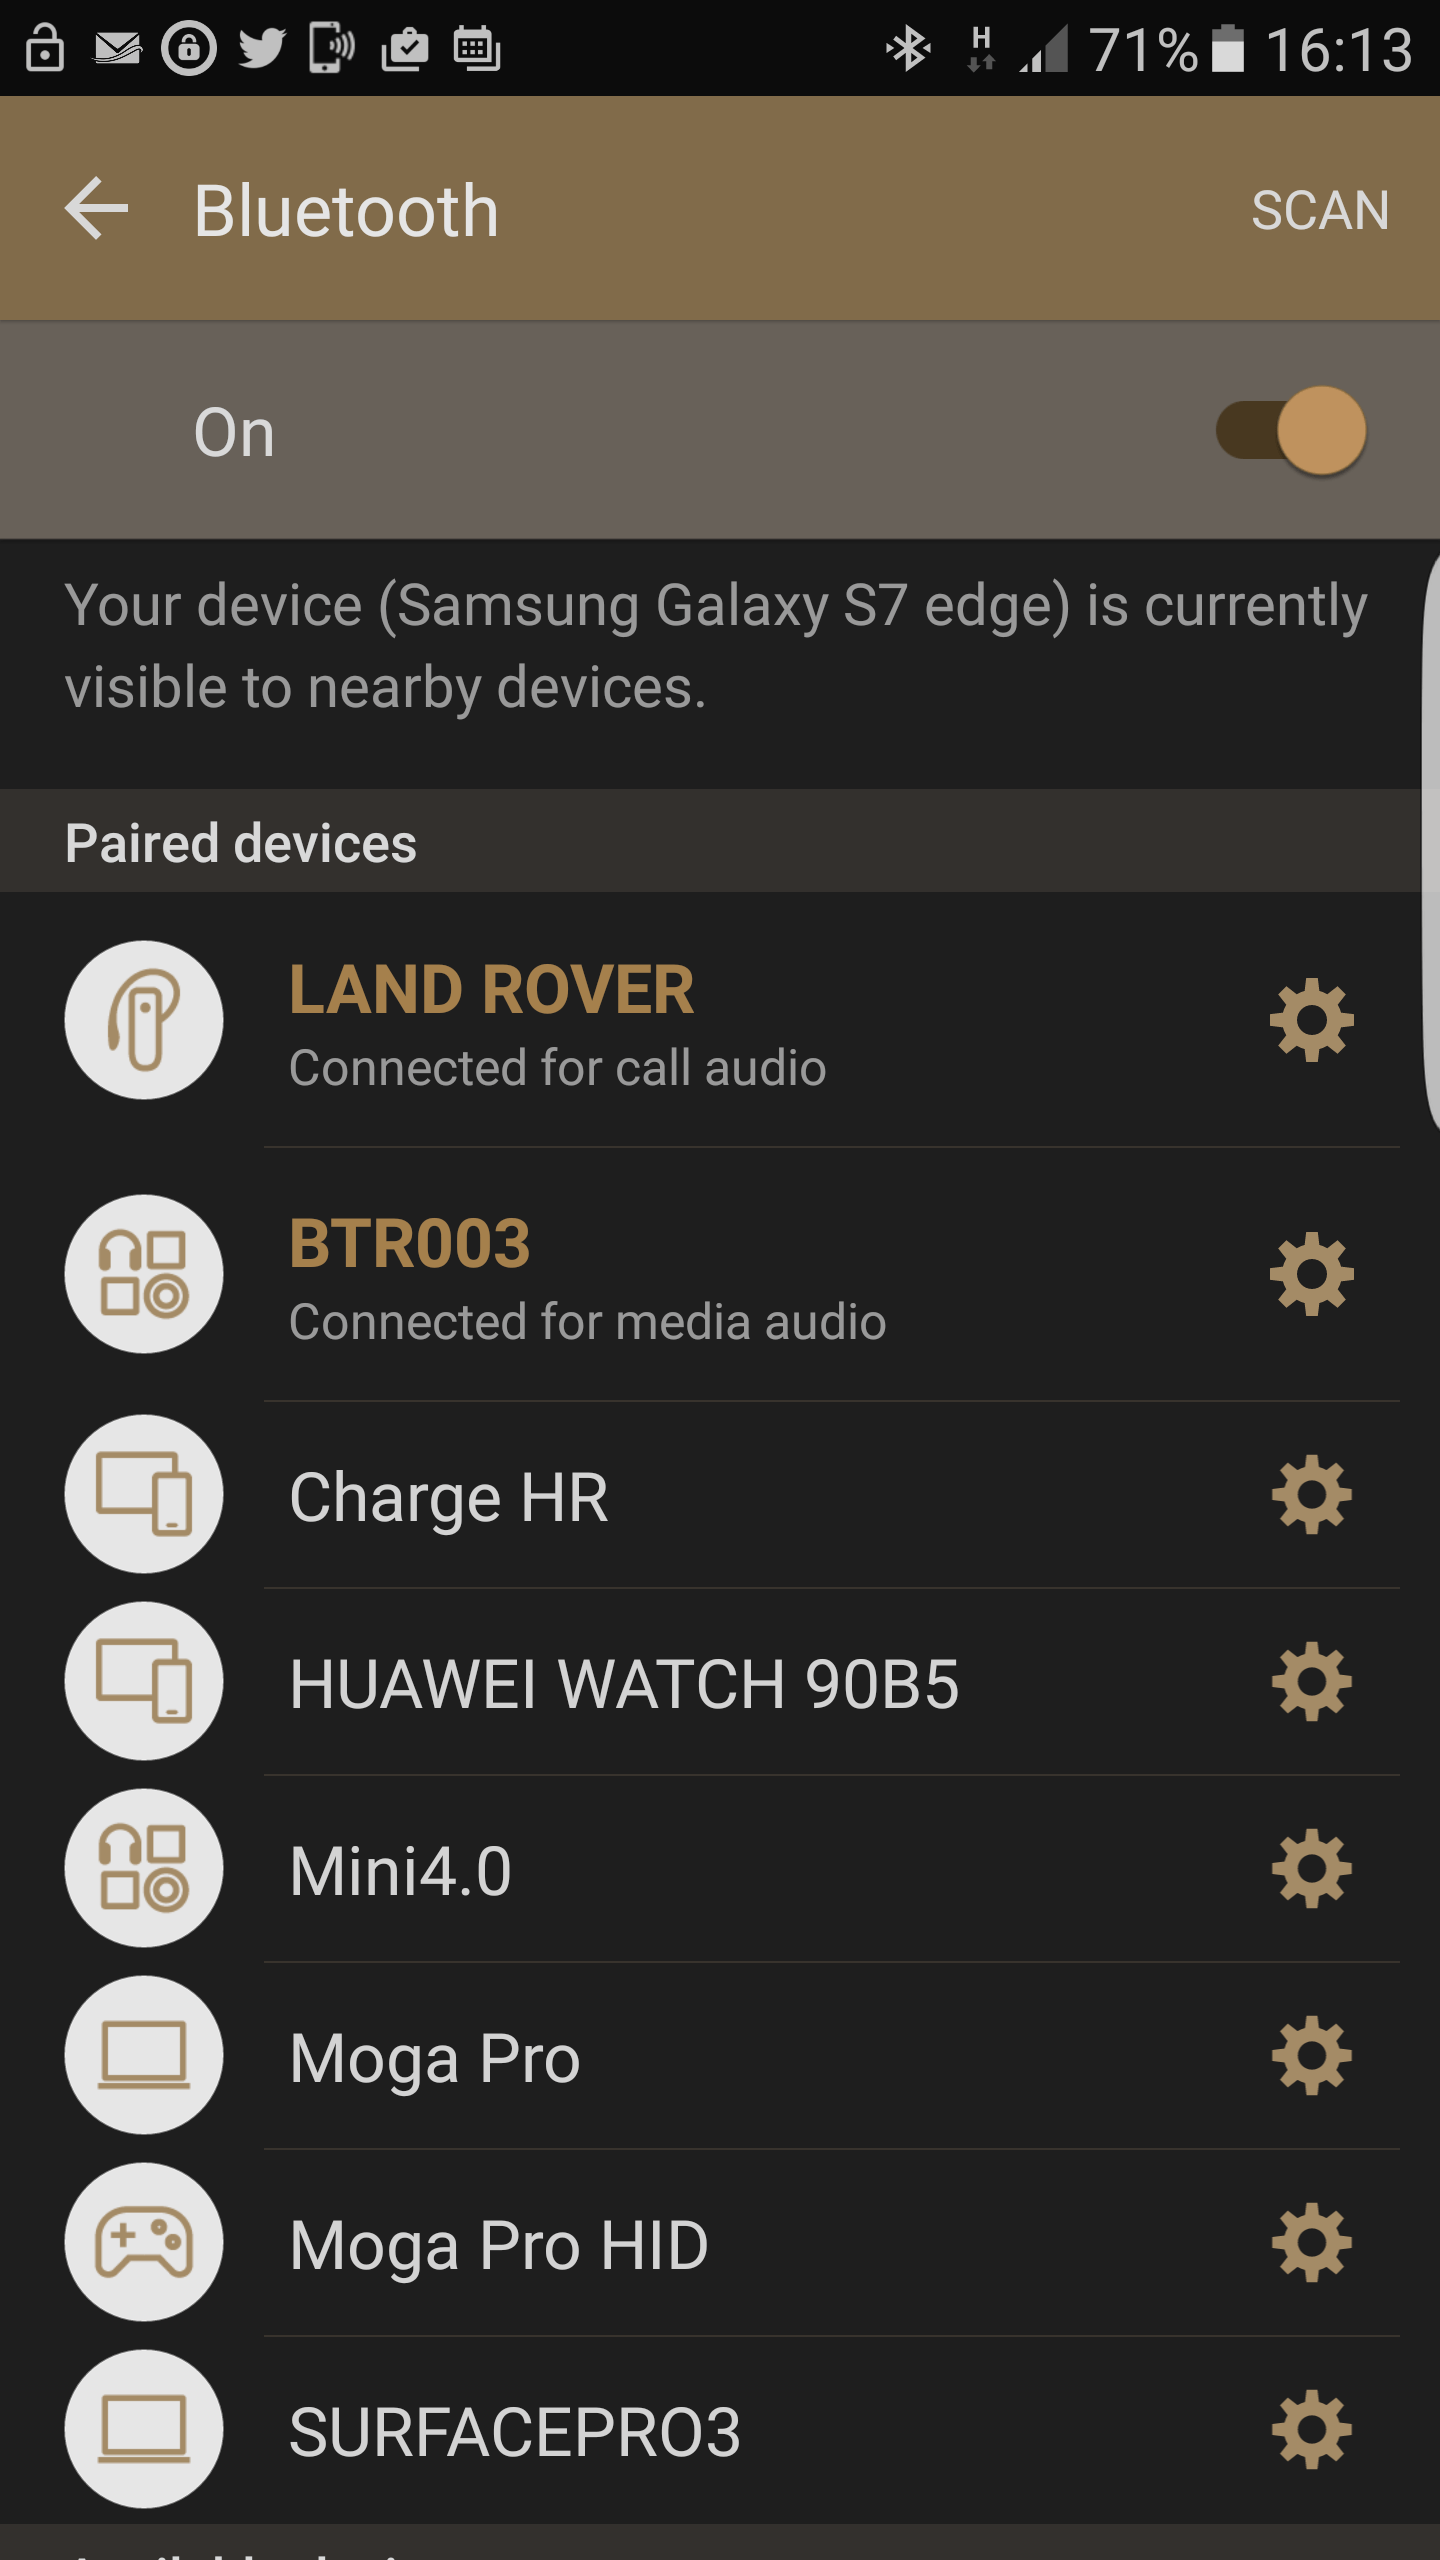
Screenshot showing Bluetooth adaptor paired.
The next stage of the install requires your backside in the drivers seat and turning on the ignition. Get your phone out and go to the ‘Add Bluetooth devices’ part of the phone settings. I have tested this with both an Android Marshmallow Galaxy S7 and an Android Nougat Huawei Mate 9 with no issues, although the settings on all phones will probably look a little different. (UPDATE: Have also tested with Android Oreo and Pie and on two more devices; a Huawei P20 Pro and a Huawei Mate 20 X). I see no reason why this wouldn’t work for an iPhone/iPod but I don’t have access to any Apple stuff so can’t guarantee it. I’d be very surprised if you had an issue though.
Once you have got to the ‘add Bluetooth devices’ screen, make sure your bluetooth is turned on and wait for the device ‘BTR003’ to appear. This is the bluetooth adaptor – add it as a paired device (there is no pairing code) for ‘Media Audio’ ONLY and you should be good to go. Turn on your Range Rover sound system and select AUX as the input and play some music on your phone and it should come through loud and clear! I find the AUX input a little on the quiet side compared to the CD and Radio but you can easily compensate by turning the volume up on your phone and/or the sound system itself.
Every time you get in your car and turn on the ignition your phone will automatically pair with the bluetooth adaptor so you should never have to mess with the settings again – it’ll just work. Your phone will still work for bluetooth handsfree calling through the car phone as that uses a separate ‘Call Audio’ bluetooth connection.
Range Rover Stereo Aux Input
Have fun and if you find a better way to do this or have any questions please contact me!
I know it’s not a perfect solution as the adaptor does stick out a few cm and if you have kids in the back it may not last long… but as it’s just me and the wife in our car I’ve not had a problem so far…
UPDATE: May 2019
OK so I wrote this article a few years ago now and the above solution has continued to work well for me. I’ve changed phones a few times since then (I currently have a Huawei Mate 20 x) and it worked with each and every one of them. However recently I had my hyperactive grandson in the back and he managed to kick the bluetooth adaptor and snap it off so I needed to buy a new one. Happily Amazon still sell the exact same device I bought originally… however I also spotted one that looked like it would be even better so I thought I would give it a try. It’s not as cheap as the Justop device but in the grand scheme it’s not very expensive either.
It’s called the ‘Firefly’ and it is claimed to be ‘The Worlds Smallest Bluetooth Receiver’. Not sure about that claim but what I do like about it is that the aux cable is actually built into the device. Not only does this make the whole thing look at lot neater when installed but it doesn’t protrude as far out making it less likely to be knocked by passengers. It comes in a range of different colours too (Black, Red & Gold) but I chose black to match the interior of my car.
This slideshow requires JavaScript.
When you first plug the Firefly Bluetooth Adaptor into the USB power adaptor in your car the tip will flash white signifying that it is in pairing mode. The setup process is exactly the same as described above for the Justop except you need to look out for ‘Tunai Firefly’ in your bluetooth devices. It should pair straight away once selected (no code is required) and the flashing white LED on the tip will become solid white to show that it has paired successfully.
Here you can see the ‘Tunai Firefly’ paired with my Mate 20 X as a media audio device.
In use I have found the Firefly to perform superbly, just like the Justop. My phone pairs with it quickly and automatically every time I get in the car and it looks terrific too.
This slideshow requires JavaScript.
As you can see from the above photos, the Firefly Bluetooth adaptor is definitely a neater, more compact solution. Only time will tell if it proves to avoid damage better than the Justop device though. I also noticed one unexpected improvement over the Justop – the audio is louder! I no longer have to crank the volume up louder than usual which is a nice bonus.
Overall I think the Firefly Bluetooth adaptor is worth the extra money as it looks neater and more professional. It also doesn’t protrude into the back of the car as much and it seems to output audio at a higher volume. The Justop is still a great solution and is hard to beat for the price – it’s also more ‘expendable’ if it does get kicked due to it’s cheaper price.
Whichever option you choose, rest assured that both devices will do the job. I just thought I’d update the article with my new findings in case it proves useful for someone.