Lyonsden Blog

Tag - Workbench

Getting ‘SAY’ Speech Synthesizer to Work on Workbench 3

I remember having an awful lot of fun with the speech synthesiser (called ‘Say’) on my Amiga 500 back in the day. As a teenager I would spend far too much time getting it to utter all sorts of obscenities and disparaging remarks to anyone within earshot. So imagine my disappointment a few days ago when I tried to revisit that memory on my Amiga 1200 and discovered the Say program was nowhere to be found!

Turns out that Commodore, in their infinite wisdom, killed off Say back in 1992 with the release of Workbench 3. As my A1200 is running the very latest Workbench 3.2.1. it simply wasn’t included and hasn’t been for a great many years.

I couldn’t leave it there though, I really wanted Say on my Amiga and wasn’t going to settle until I made it happen. Thankfully the fix turned out to be pretty simple, provided you can lay your hands on an old Workbench floppy disk that is! Luckily I have loads of old workbench disks going back to version 1.2 so finding the files wasn’t too difficult..

The first and most obvious thing to grab is the Say program itself. This can be found in the Utilities drawer on a Workbench 2 disk. Once you’ve found it copy it to the Utilities drawer on your Workbench 3 machine. Now you may be tempted to run it at this point and have it say something infantile like ‘I like boobies’ but you will be disappointed. There are some missing pieces of the puzzle we need to find before it will work.


Amiga Say

Everything you need to get Say working on a Workbench 2.0 disk.


There are three additional files that are required to restore the Amiga’s voice (which I found through trial and error with the help of good old SnoopDOS). The files we need are:- ‘narrator.device’, ‘translator.library’ and ‘speak-handler’ and thankfully all of these files can be found on that very same Workbench 2.0 floppy disk.

Now I realise not everyone has a bunch of Workbench disks to hand so I have gathered the files together and made them available for you below. This LHA archive contains all the necessary files you need so just download it and unpack it on your Amiga.

SayStuff.lha


Where to put the files?

The main ‘Say’ program itself can technically go anywhere but traditionally it was found in the Utilities drawer so I recommend copying it there. The other three files must go in the correct drawers otherwise the program won’t work. You can use any method you like to copy the files into place. I prefer using Directory Opus but you can use the Shell or Workbench too, whatever is easiest for you.

Here’s a quick rundown of where to put the files (and by extension, where to find them too, if you are using your own floppy to source them):

narrator.device -> Devs:

translator.library -> Libs:

speak-handler -> L:

Once all four files have been copied across you can finally run Say and have some fun. Enjoy!


Amiga Speech Sample

Below is a sample of speech from my Amiga 1200 just for fun. I think the quality of the speech is pretty good but in case your ears aren’t tuned to 80’s speech technology here’s a transcript of what it is saying:

“Hello there and a warm welcome from the Lyonsden Blog Amiga 1200 computer. I really hope you enjoyed this article about getting my voice back!”


Installing AmigaOS3.2

Seems like it was only yesterday that AmigaOS3.1.4 was released and yet here I am with AmigaOS3.2! I actually bought this in June last year but I’ve only just got around to having a play around with it. For the time being this release is only available physically on CD which is fine by me. Hyperion say there will be a digital download version of it at some point in the future.

I will preface this post by saying that things didn’t go smoothly during my first install attempt. Hopefully someone can benefit from the issues I experienced and how I overcame them.


A closer look at the what you get…

Anyway I ordered the CD along with the Kickstart ROMs for my A1200 from Amigastore.eu. I have to award top marks for presentation as the CD came in a very attractive DVD style case along with professionally printed jacket. Inside there is a 14 page manual and the silk-screen printed CD itself. Finally but by no means least there were 2 new Kickstart ROMs to replace the existing chips.


AmigaOS3.2

The AmigaOS3.2 case, CD and manual.


The serial number is on a little sticker affixed to the cellophane wrapping on the outside of the box – don’t make the mistake I did of throwing it in the bin. Luckily I realised before the bin was emptied! The code is needed to register your purchase on the Hyperion site in order to be eligible for future updates.


AmigaOS3.2

AmigaOS3.2 ROMS.


Workbench 3.2 actually spans a grand total of 35 floppy disks now which is why the decision was made to supply it on CD. Although half of those disks are either country or machine specific but it’s still a lot. The CD contains ADF images of all the discs should you wish to create your own physical versions. Likewise it contains the new ROM images so you can use them with a Vampire, map the ROMs to RAM or just use them with an emulator.


Fitting the 3.2 Kickstart ROMS


AmigaOS3.2 ROMS

Kickstart 3.2 ROMS Installed.


Naturally the first thing I did was to open up my A1200 and fit the two new ROM chips. If you are looking for detailed instructions on how to do this you can follow my detailed guide here. The important things are to get the ‘HI’ and ‘LO’ chips in the correct sockets (see photo above), that you orient them correctly (notched end of chip goes next to notched socket) and finally that you leave the last pair of pins in each socket empty as the sockets have 42 pins whereas the ROMS only have 40!


Compact Flash Card

My new A1200 hard drive – a 32GB SanDisk Extreme Compact Flash card.


Whilst I had the case open I thought it would be a good time to install the new Compact Flash card I’d bought for the occasion. I opted to go with a nice big 32GB card this time around as it’s surprising how quickly you fill these things up without even trying. The card I bought was a SanDisk Extreme 32GB Compact Flash. I wanted something that would prove reliable and SanDisk is a brand I trust.


Compact Flash Card

32GB Card installed.


With the ROMS and new Compact Flash card installed it was time to power up my A1200 and make sure everything was working.


AmigaOS3.2

The new 3.2 ROM boot screen.


Just a few moments after turning the power back on I was greeted with a brand new boot screen. Gone was the multi-colour tick that has been there for the last thirty years – replaced by the Amiga ‘boing’ ball. Commodore’s name has also been removed and replaced with Hyperion’s. Anyway, mixed feelings aside, so far so good! Now it was time to get cracking with the Workbench install.


Prepping the disks

(The Discovery of problem no. 1)

As I mentioned previously there are a whopping 35 disks in total for this install. Even after I weeded out all the language specific variations it still left 11 disks to install. Thankfully the CD contains all the disks as ADF images and if you have a Gotek drive available it’s a simple matter of copying them across to a USB flash drive and using that. This time around there are no snazzy pre-printed disk labels included either so that was another reason not to bother making physical copies of the ADF images. There are a bunch of PNG images included on the CD for you to print your own labels should you wish to though.


External Gotek Drive

The Install3.2 ADF selected ready to boot on my Gotek drive.


The journey starts with the ‘Install3.2’ disk so I selected that on my external Gotek and then selected DF1 as the boot device from the A1200’s Boot options screen. (Accessible by holding down both mouse buttons on bootup until the power LED flashes). If you have a Gotek configured as DF0 then you won’t need to do this.


Amiga 1200 Boot Options Screen

Amiga 1200 Boot Options Screen


A short while later I was greeted with a basic Workbench screen and I thought I was on my way. Well you know what thought did… Everything looked OK but the mouse pointer was completely frozen – likewise the keyboard wouldn’t respond either. I tried to boot a few more times with no success. I unplugged all my peripherals, PCMICA card, audio cables, SCSI devices until all that was left was power, video and my external Gotek. Still it wouldn’t work. Maybe it didn’t like my Gotek, or the fact it was hooked up as DF1? So I created a physical Install3.2 floppy disk, disconnected my external Gotek and tried again with a real floppy in DF0. Another fail. So it wasn’t that either.


AmigaOS3.2

AmigaOS3.2 Workbench Screen (with frozen mouse).


I tried all sorts of things like re-formatting my USB flash drive and copying across the ADF’s again. I even tried a different flash drive and removing my Indivision Mk3 flicker fixer, all to no avail.

Eventually I was left with one thing I hadn’t tried – removing my Blizzard 1230 MkIV card. Luckily I remembered that the card could be disabled by holding down the ‘2’ key on boot so I gave it a try. Just like magic after doing this Workbench loaded fine and I could use my mouse and keyboard without any issues. Clearly something was up with my accelerator card.


Blizzard 1230 MKIV

Blizzard 1230 MkIV – MAPROM feature disabled with jumper removed.


More head scratching and investigations ensued until I finally discovered the source of the issue. I had the MAPROM feature enabled on my card which is supposed to speed the Amiga up by copying Kickstart into FASTRAM. However for whatever reason OS3.2 didn’t like that because from the moment I disabled it by removing the jumper (see photo above) the problem simply vanished. Happy days!


Prepping the Compact Flash Card

(The beginning of problem no. 2)


Now I had a working 3.2 Workbench it was time to Partition that nice shiny new Compact Flash card. I loaded up HDToolBox from the disk and clicked ‘Change Drive Type’.


Amiga HDToolBox

Amiga HDToolBox – Defining a New Drive


Next I clicked ‘Define New…’  which brought up the Define/Edit Drive Type window shown below.


Amiga HDToolBox

Drive parameters screen.


The Amiga is perfectly capable of doing all the heavy lifting here – I just needed to click on ‘Read Configuration’ to get it to extract all the necessary parameters from the card. A little info window popped up and I clicked ‘Continue’.


Amiga HDToolBox

Info Message


A second or so later and all the parameters had been pulled from the card and filled out on the screen.


Amiga HDToolBox – Defining a New Drive

All drive parameters configured.


Clicking ‘OK’ brought me back to the ‘Set Drive Type’ window where I could see my newly created drive listed as ‘SDCFXS-0 32G’.


HDToolBox

Newly configured drive now listed.


Clicking ‘OK’ again brought me back to the main HDToolBox screen, shown below.


Amiga HDToolBox

Don’t click SAVE just yet…


Partitioning the Card

Now it was time to partition the drive by clicking on the appropriately named ‘Partition Drive’ button.


Amiga HDToolBox

Configuring my DH0 partition.


I chose to make my first partition 4GB, this would be my System/Workbench drive. To select the size I simply dragged the little triangle pointer and slid it along the bar. Annoyingly it’s still impossible to size a partition exactly so I just got it as close as I could which was 4011MB.

I called the first partition ‘DH0’ as this is the time honoured name for the Amiga’s boot drive and what most software expects to see by default. I also ticked the box to make it bootable as this is the first partition and the one the Amiga boots off.


Amiga HDToolBox

Configuring my DH1 partition.


I made the second partition 6GB (6018MB) and called it DH1. To do this I clicked ‘New partition’ and then clicked on an unused portion of the card in the visual representation on the screen.


Amiga HDToolBox

Configuring my last partition; DH2.


Finally I used all the remaining space to make one big 21GB partition and called it DH2. This will be were I install games, whether they be WHLoad or otherwise.

Once I was happy that all my partitions were sized and named exactly the way I wanted them I hit ‘OK’. (You can click each of the partitions in the bar to check their details before committing). This took me back to the main HDToolbox window shown below.


Amiga HDToolBox

Drive with changes waiting to be saved back to it.


To save all that configuration info and partition detail I clicked ‘Save Changes to Drive’ which flagged up a message (shown below) that a reboot was required. I then clicked continue to finish the process and write all the settings to the compact flash card.


Amiga HDToolBox

‘Reboot Required’ message.


Next I rebooted my Amiga off the Install3.2 ADF disk so I could begin formatting them. Unfortunately this was were I encountered problem number 2…


Missing DH0 partition

Spot the missing drive 🙁


There should have been three additional icons on the desktop, one for each of the partitions I had created. However for some reason DH0: was not being displayed. I tried going back through the HDToolbox configuration and making DH0 smaller and even making it the only partition on the card. Nothing worked.


Fixing the Problem

It turns out that for whatever reason, some cards are created with all the sectors on them filled with ‘1’s’ instead of ‘0’s’ and the Amiga doesn’t like that one bit.  So I had to remove the Compact Flash card from my A1200 and hook it up to my PC via a USB card reader.

I loaded up a piece of drive management software on my PC called ‘MiniTool Partition Wizard‘ (available as a free download). I then clicked on ‘Disk and Partition management’ which is the large green button near the bottom of the menu screen in the image below.


Mini Tool Partition Wizard

Main Menu Screen.


Next I needed to select my CF card from the list of available drives as can be seen in the image below. I knew my card was 32GB so it was pretty easy to spot – it appeared as a 29.82GB drive. It’s imperative to select the correct drive here – the consequences of picking the wrong one don’t bear thinking about!


Mini Tool Partition Wizard

Selecting my Compact Flash card from the list of drives.


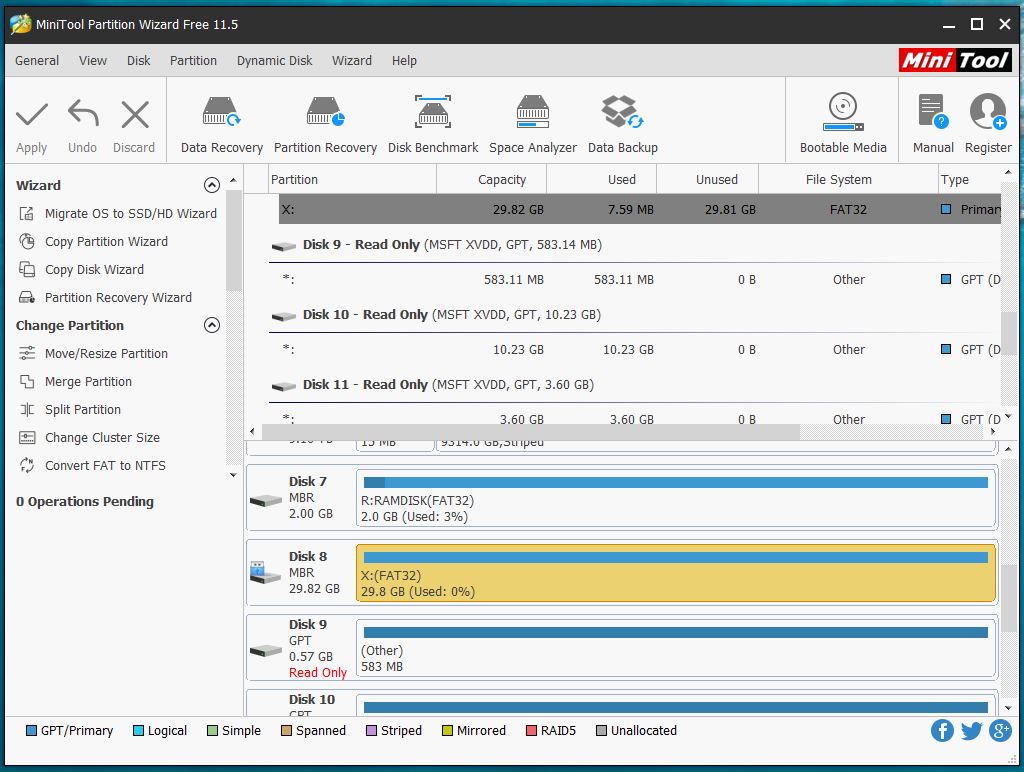
With my CF card highlighted I right clicked on it to bring up the menu and selected ‘Wipe Partition’.


Mini Tool Partition Wizard

Selecting the ‘Wipe Partition’ option.


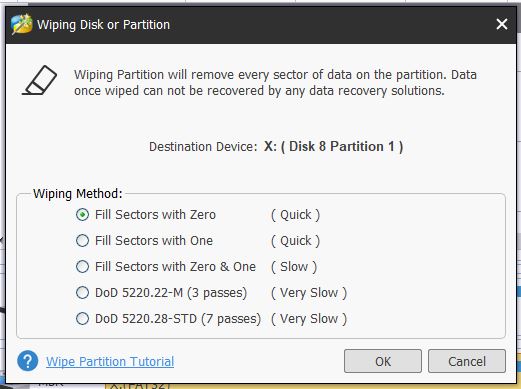
This brought up another window along with a warning that doing this is irreversible so once again I made absolutely sure I had the correct drive selected. Definitely better to be safe than sorry when messing with partitioning software! Anyway the option to fill all sectors with zeros was already selected by default so I simply clicked ‘OK’ here.


Mini Tool Partition Wizard

Choosing how to wipe the drive.


This took me back to the main screen. Up until this point no changes had actually been made to the drive. To actually wipe the drive I needed to click ‘Apply’ in the top left hand corner. A warning then popped up about not running any other applications whilst applying the changes and then I clicked ‘Yes’.


Mini Tool Partition Wizard

Applying the pending changes to the card.


Finally the ‘Apply pending operations’ window popped up and a progress bar slowly made its way across the bottom as my card was being fill with zeros.


Mini Tool Partition Wizard

Operation Progress Window.


The whole operation took around 5 minutes or so to complete successfully at which point I was able to close down the program and remove the card.


Mini Tool Partition Wizard

Mission Accomplished.


Back on Track.

Now that I finally had a correctly prepared Compact Flash card, I re-installed it into my A1200 and begin the entire Partitioning process again, choosing exactly the same options as before. When I rebooted at the the end of it this time I was greeted with the Workbench screen I’d been looking for. One with all 3 drive icons showing on the screen waiting to be formatted as shown below.


AmigaOS 3.2

Unformatted drive icons.


To format each drive I selected the relevant icon and then selected ‘Format disk…’ from the Icons menu.


AmigaOS 3.2

Amiga format disk window.


I named DH0 ‘Workbench’, DH1 ‘Work’ and DH2 ‘Games’. I also made sure that long file name support was ticked along with the Trashcan and Fast File System.


Amiga format disk request

Obligatory data loss warning.


I used the ‘Quick Format’ option otherwise I’d be waiting all day for the format to finish! It’s totally unnecessary for large drives anyway – the only time I ever do a full format is on floppy disks.

A couple of warning messages popped up reminding me that all data would be lost. I simply clicked ‘Format’ on both of them to get the job done.


Amiga format disk request

Last chance to bail if you’ve selected the wrong drive by mistake!


The format was almost instantaneous and once I’d done all three drives I ended up with a screen looking like the image below.


Amiga Workbench

All partitions successfully formatted.


Installing Workbench 3.2

Finally it was time to install Workbench for real. I opened the Install3.2 disk and ran the English(British) installer from within the Install folder.


AmigaOS3.2

AmigaOS3.2 English(British) Installer.


This invoked the first of many disk swaps. Thankfully I had all the ADF images on my USB flash drive so it was simply a matter of flicking through to the correct ‘disk’ and then letting the install continue.


AmigaOS3.2

Beginning the 3.2 install.


I clicked ‘Proceed’ on the first menu to appear as the other options are concerned with amendments/additions to an existing install.


AmigaOS3.2

Selecting the 3.2 Install option.


As I was doing a straightforward ‘clean install’ I left the Installation Mode set to ‘Novice User’ and then clicked ‘Proceed With Install’.


AmigaOS3.2

Selecting the Installation mode.


The next screen asked where I wanted to install OS3.2. I selected my ‘Workbench:’ partition and then clicked on Proceed.


AmigaOS3.2

Selecting where to install AmigaOS3.2.


The installer asked me which language(s) to install so being in the UK I naturally chose ‘English-British’ before hitting ‘Proceed’.


AmigaOS3.2

AmigaOS3.2 Language Selection Screen.


The next choice to present itself was whether I wanted to install GlowIcons or not. I most definitely did so I clicked on ‘Yes’.


AmigaOS3.2

GlowIcons option.


I spent the next several minutes swapping ADF disks as the installer plucked files from everywhere based on the choices I’d selected.


AmigaOS3.2

CPU Library warning.


Eventually the installation reached 100% and then popped up a message telling me I would need to install some CPU specific library files to support my 68030 CPU.


AmigaOS3.2

Installation complete.


Hitting ‘Proceed’ on that screen and then on the next concluded the first part of the install.


Booting Workbench for the First Time

A reboot was required to test out the new install so I reset my A1200 and hoped for the best…


AmigaOS3.2

Missing CPU library nag screen.


Soon I was greeted with yet another reminder that I had an 030 CPU but no library for it. I hit ‘Return’ to continue booting and a few moments later I reached the AmigaOS3.2 Workbench screen complete with backdrop and snazzy GlowIcons.


AmigaOS3.2

AmigaOS3.2 Workbench Screen.


Content with the knowledge that Workbench was working nicely it was time to fix that CPU library issue.


Installing CPU Support Libraries

Back when I installed AmigaOS3.1.4 I remember having to source the necessary MMULIBS files from Aminet. Thankfully that’s now a thing of the past as 3.2 can install the required files itself. In order to do so I needed to re-run the installer and this time select ‘Install CPU Support Libraries’ from that initial menu.


AmigaOS3.2

Installing CPU Support Libraries.


A confirmation window popped up and I simply responded with ‘Yes’ to proceed.


AmigaOS3.2

Confirming the location of my Workbench install.


The following dialogue wanted to know which model of accelerator card I had installed. As I have a Blizzard 1230 MkIV I chose ‘Phase 5’ from the list and then clicked ‘Proceed’.


AmigaOS3.2

Selecting my accelerator manufacturer.


A few moments later and the installation was complete – all I needed to do now was reboot my A1200 and make sure all the warning messages had all cleared. (They had).


AmigaOS3.2

CPU Library Installation Complete.


Configuring CD Access

There was one other quick configuration change I could make to round off my install and that was to get my CD drive working. OS3.2 includes a CD filesystem so I didn’t need to install anything extra.

The first thing to do was drag the CD0 device from STORAGE/DEVS/DOSDrivers to DEVS/DOSDrivers and bring up the Icon Information window to edit the Tooltypes. The Information window has changed a little bit under 3.2 so the Tooltypes now reside under a Tab called ‘Icon’.


AmigaOS3.2

Setting the CD ToolTypes.


There were two tooltypes I needed to alter; ‘DEVICE’ and ‘UNIT’. As I have a Blizzard SCSI card I needed to set ‘DEVICE=1230scsi.device’ as that is what my SCSI device is called. My CD drive has a SCSI ID of 3 so I set ‘UNIT=3’ and then saved my changes. As no CD device had been mounted up to this point I simply double-clicked the CD0 icon to test if the new settings worked and popped in my 3.2 CD. Happily a few moments later I could see a fancy little AmigaOS3.2 CD icon on my Workbench. Another job done.


AmigaOS3.2

Workbench 3.2 Installed and CD access working too.


With Workbench 3.2 successfully installed it was now time to get busy sorting out internet access and installing all my apps and games once more…

I’ve covered all that stuff before with 3.1.4 but if anything crops up that poses an unexpected issue I’ll add to this post.

Installing Amiga OS 3.1.4 – Part 5 – Finishing Touches

Amiga Workbench Wallpaper

In parts 1 through 4 of this guide I covered everything needed to install Amiga OS 3.1.4 on an Amiga 1200 from scratch. However there are still a few things that can be done to improve the installation.

I’m afraid this post ended up a lot longer than I anticipated so I’ve put some links below that will take you straight to each section.


Fancy Glowicons

If you’ve seen any screenshots of Amiga OS 3.1.4 on the internet you may well be wondering why we haven’t got any fancy new icons with our Workbench install. Well for some reason the installation of these was never automated so this is something you must do yourself. The good news is that these icons are tucked away on the ‘Storage’ disk and can be installed manually quite easily.

Boot your Amiga up and then insert the ‘Storage’ disk into the drive. Next, open up the Shell and enter the following command:

copy storage3.1.4:glowicons/#? sys: all

This will copy the icons off the floppy disk and onto your Amiga’s system partition.


Amiga CLI

This command will copy the new icons onto your Workbench drive.


There are quite a lot of icons to copy over so it will take a little while to complete. You should see a load of text scrolling up the window before the command prompt finally returns.


Amiga Shell or CLI

When you see the Workbench:> prompt appear the icons have finished copying over.


At this point you can close the Shell and reboot your Amiga.


Amiga Glowicons

New Workbench 3.1.4 Icons!


When it reboots you should be greeted by much more colourful Workbench screen filled with lovely new icons. You may need to spend a little time re-arranging them to your liking but they definitely look a lot better than the old ones!


Amiga Preferences

Here you can see all the new Preferences Icons.


Setting the Screen Mode


By default your Amiga will have configured the screen mode to either PAL (640×256) or NTSC (640×200) High Res mode. This results in a very stretched looking Workbench screen and doesn’t give you much space to work with either.


Amiga Screen mode

Vertically stretched Workbench screen in PAL Hires mode.


Assuming your monitor will support it, I recommend changing the display mode to High Res Laced. This doubles the vertical resolution providing the correct aspect ratio for your Workbench screen and twice the space for icons and windows.


Amiga Screen mode

Amiga Screen modes


And here’s what Workbench looks like once the screen mode has been changed – much better!


Amiga Screen mode

So much more space and our icons are now the correct shape!


I’m very lucky with the screen I’m using with my Amiga. It’s an old LCD TV with a 720P screen. It supports RGB SCART and is able to display all of the standard Amiga screen modes. What’s more, because it’s an LCD panel, interlaced modes do not flicker like they used to do on CRT monitors. This means I can get all the benefits of the extra resolution that interlaced modes offer without any of the negatives! Twenty years ago I would have needed a very expensive Multiscan monitor or a flicker-fixer/scan-doubler to achieve this (or have to put up with the flicker!).


Overscan Settings

I noticed something a bit odd after installing Workbench… my screen wasn’t centred and there was a weird border on the left, top and bottom of the screen. Basically dead space that I wasn’t able to utilise… until I cast my mind back 25 years and remembered about overscan border settings with CRT monitors.


Amiga Preferences.


In a nutshell the overscan settings were a way to tweak your display to maximise the available screen space. Most CRT’s were housed in plastic cases that partially shrouded the outer edges of the tube by varying degrees and thus hid a part of the image. Typically beyond the limits of the designated display area the borders used to be black and you would adjust the overscan settings to get rid of this and have as much ‘picture’ filling the screen as possible.

Modern TV displays and monitors no longer have overscan as they are able to display 100% of the image thanks to flat LCD panels so we should be able to get our Amiga to fill that display completely.

To achieve this load up the ‘Overscan’ preferences to get the display shown below.


Amiga Overscan Preferences

Amiga Overscan Preferences


Click on ‘Edit Text Size’ to bring up the overscan adjustment screen shown below.


Amiga Overscan Adjustment.


As you can see from the above image, the borders I was seeing on my screen are perfectly illustrated here. To get rid of them what we need to do is click on those black squares and drag them to the very edge of the outer box like in the image below.


Amiga Overscan Settings.


If you notice the resolution of the screen has increased from 640×256 up to 692×275 which is a nice bonus. Click OK to save these settings and then click on ‘Edit graphics size’ and repeat the exact same process. Finally click on ‘Save’ to ensure that these settings are stored permanently.


Amiga workbench screen

Look ma, no borders!


Amiga OS 3.1.4.1 Update

Amiga OS 3.1.4 was released in 2018 and in 2019 a small update (3.1.4.1) was released which fixed a number of minor bugs. This update can be found on the appropriately named ‘Update 3.1.4.1’ disk that we created back in Part 1.


Amiga OS 3.1.4.1 Update

Starting the 3.1.4.1 update process.


Pop that disk in the drive and then look inside the Install directory and choose the installer in the language of your choosing. Next, run it and click on ‘Proceed’.


Amiga Installation Mode screen

Choose an installation mode.


Now you must select the installation mode. As this is a straightforward upgrade I chose Novice.


Amiga Language Selection Screen

Choose your language.


Then the language required for the install…


Amiga Installer progress

Installer doing its thing.


After which the update started to install. I think it took around a minute to complete.


Amiga installation complete message

Installation complete.


When the files have finished copying across a new window will appear to confirm the install has completed. Hit ‘Proceed’ and then reboot your Amiga.

We’re not quite finished with this update though as there is also a FastFileSystem v46.20 upgrade to perform which we will tackle next.


Installing FastFileSystem Patch 46.20


To begin this part of the upgrade process we need to launch HDToolBox (found in the ‘Tools’ directory) and then click ‘Partition Drive’. If you have more than one drive shown here then make sure you select the one you wish to update.


Amiga HDTooBox Window

Amiga HDTooBox Window


When the partitioning window appears select your boot partition (the one on the far left) and then tick the ‘Advanced Options’ box. A bunch of extra settings should appear below as you can see in the next image.


Setting Direct SCSI Transfer option for DH0:


Now what we need to do is make sure that the ‘Direct SCSI Transfer’ box is ticked for DH0. (Mine wasn’t).


Amiga Direct SCSI Transfer

Direct SCSI Transfer


We then need to ensure that this is also ticked for each of your other partitions. To do this just click on each of your partitions on the top bar in turn and tick the ‘Direct SCSI Transfer’ box for each one.


This slideshow requires JavaScript.


The next task is to apply the FFS patch to the drives. To begin the process click on the ‘Add/Update…’ button at the bottom of the window.


Amiga HDToolBox add update button

Add/Update button.


This should bring up the following window that lists all of the available file systems you can use.


Amiga File System Maintenance Window

File System Maintenance Window


Now the readme supplied with the update seems to be rather vague here. The first time I tried this update myself it didn’t work. In the above window you can see two file systems listed. Custom File System and Fast File System. What actually needs to appear here is ‘International (FFS)’.  So in the end to get this to work I clicked ‘Add New File System…’


Don’t touch this.


I didn’t change the default path in the box that popped and also accepted the following details that popped up without altering them (below image).


Amiga File System DosType

Don’t touch this either.


After I clicked ‘OK’ I was dropped back to the System Maintenance screen and this time my file system was listed at the top with the correct version number.


International (FFS) Now on the list.


I clicked ‘OK’ and was dropped back to the initial screen where I could see that there were changes waiting to be written back to the drive.


HDToolBox - with changes to be saved to drive.

HDToolBox – with changes to be saved to drive.


After clicking ‘Save Changes to Drive’ I got a very scary message warning me that it was going to destroy all the data on my drives.


Amiga Commit to Changes message

Dire warning message!


However the readme file does warn you about this message and insists that it can be safely ignored. Feeling suitable comforted I pulled the trigger and clicked ‘continue’ then rebooted my Amiga. Happily it rebooted without a hiccup – phew!.

The last thing to do was do a quick test to make sure the update had been successfully applied. To do this I opened a Shell window and entered the following command.

version dh0:


Amiga Shell

Version DH0 command


The version command returned ‘Filesystem 46.20’ which was spot on. Mission accomplished.


Fixing my GlowIcons!

There now remained just one nagging problem – throughout my whole time preparing this guide the appearance of my icons bugged me. They didn’t look as good as the ones in the screenshots I’d seen. My icons were displayed on a sort of background ’tile’ which should have been transparent. Basically they looked ugly and needed sorting!


Amiga Workbench Preferences Screen

Amiga Workbench Preferences Screen


After rummaging around the Preferences directory I eventually found ‘Workbench Preferences’ which contained the settings I needed to modify. On the right hand side is an Icons section and for some reason mine was set to ‘Poor Quality’ and ‘Large Border’. I have no idea why this was the case but I changed them immediately to ‘Best’ Quality and set the Border Size to ‘No Border’. I saved the settings and like magic my Icons were transformed into the beautiful little works of art they should have been all along.

I have to confess I don’t remember this particular preferences program from back in the day which is why it took me a while to figure it out. It could be a new feature of Amiga OS 3.1.4… or I might just have completely forgotten about it!


Amiga WBPattern Preferences Screen

Amiga WBPattern Preferences Screen


At this point I also decided to throw on some wallpaper to brighten up my desktop. This is easily done by heading to the WBPattern Preferences and setting Background Placement to ‘Workbench’ and Type to ‘Picture’. Then it’s just a matter of clicking ‘Select Picture…’ and browsing to an image of your choice. Amiga IFF images of 256 colours or less work best here as they load instantly and don’t gobble too much of your precious Chip RAM. Pictures using over 256 colours will also be dithered which spoils their appearance which is another reason to choose wisely.

A few people have requested that I share the wallpaper I used for my Workbench backdrop so I’ve included the .iff image to download below.


AmigaWallpaper.zip


Incidentally if you are looking for a way to view Amiga .iff files on your PC then I highly recommend XnView Classic (shown below). Not only can it display .iff files but it can convert them to other more modern formats and vice versa. It’s completely free for personal use and can be downloaded here.


XnView Classic displaying an Amiga IFF image.

XnView Classic displaying an Amiga IFF image on a PC.


And that pretty much wraps up Part 5 of my Amiga OS 3.1.4 installation guide. Enjoy the fresh lick of paint and tune-up this gives your Amiga!

Installing Amiga OS 3.1.4 – Part 4 – Installing Workbench

Having created the physical floppy disks in Part 1, installed the 8GB CF card and ROMs in Part 2 and partitioned the CF card in Part 3 it is now time to look at installing Workbench 3.1.4.

The first thing to do is boot up the Amiga using the 3.1.4 ‘Install’ disk. Once the desktop has loaded open the Install disk and look inside the ‘Install’ directory. There will be a bunch of different language installers so run the one that you need, which for me was the English one.


Installing Workbench

Various Workbench installers in different languages…


This will load up the Installer and give you a little introduction about what it will do. Click ‘Proceed’ to begin.


Starting the installation.


Now you will be presented with another window that will allow you to add additional languages to an existing install. As this is a clean install just click on ‘Install Release 3.1.4’.


Requester giving option of installing another language.


Next you need to choose the installation mode – I chose Intermediate.


Installing Workbench

Selecting Installation Mode.


Installation Mode?

After selecting either Novice, Intermediate or Export User and then ‘Proceed with Install’ you are presented with the Installation Options screen. Here you can choose to ‘Install for Real’ or ‘Pretend to Install’. I believe this could well be unique to the Amiga? I certainly don’t recall ever having the option to do a pretend install on any other system. It can be useful to perform a pretend install on occasions as it lets you discover any potential issues and gives you a chance to fix them before committing to the actual install. However as this is a clean install we’re going to select ‘Install for Real’ and then boldly hit that ‘Proceed’ button.


Install for Real… or Pretend?


You should see a brief message about ‘Release 3.1.4’ being installed on the Workbench partition. This is because it has detected it is the first bootable partition – if you gave yours a different name back in Part 3 then it will be shown here.


Installing Workbench

This is where the actual installation starts.


Click the ‘Yes’ button to begin the installation and then choose which language(s) you want installing on the next screen. For my install I just wanted English so just left that option ticked.


Installing Workbench

Pick what languages you want installing.


Next you need to select what printer drivers you want. I selected them all because space is not an issue and you never know what you might want to hook up to your Amiga in the future.


Amiga Printer Driver Request Screen

Choosing a which printer drivers to install.


Another decision needs to be made on the next screen about which keymaps are required. Or in other words what language setting do you want for your keyboard. In my case as I live in the UK I chose a British layout before clicking ‘Proceed’.


Choosing a keyboard language or ‘keymap’.


Let the Disk swapping commence!

After a few moments you will be asked to insert the Workbench disk. There should be no need to click proceed, your Amiga should detect the presence of the swapped disk and continue automatically.


Installing Workbench

Insert Workbench Disk Screen


A bunch of files will be copied across to your new System drive.


Amiga copying files across.

Workbench install – copying files.


And then you will be asked to insert the Locale disk.


Insert Locale Disk Screen


Which will copy more files across… before asking for the next disk – Fonts.


Insert Fonts Disk Screen


Then the Storage disk…


Insert Storage Disk Screen


And then finally it will ask you to re-insert the Install disk.


Insert Install Disk Screen


Now at this point I was faced with the following warning as I had an accelerator installed with a 68030 CPU. I was able to click ‘Proceed’ and carry on but a version of this warning would pop up every single time I booted up my Amiga until I sorted it. Click here and then head down to the bottom of the page for information on how to resolve this issue.


Installing Workbench

CPU Warning.


And that should be your Worbench 3.1.4 install complete!


Installing Workbench

Congratulations – Workbench Install Complete!


Remove the floppy disk from your Amigas drive and reboot it. If all has gone to plan your Amiga should silently boot into Workbench 3.1.4 looking a lot like the photo below with all your partitions visible on the desktop.


Amiga Workbench

Amiga Workbench 3.1.4 Screen.


And that concludes Part 4 of my Amiga OS 3.1.4 installation guide – Installing Workbench.

Now we could leave it here, after all we now have a fully operational installation of Workbench 3.1.4 on our Amiga. However there are a few more things we can do to tweak and improve the install and I will cover these in Part 5.

Installing Amiga OS 3.1.4 – Part 3 – Partitioning a Compact Flash Card

Compact Flash Card

Having created the physical floppy disks in Part 1 and installed the 8GB CF card and ROMs in Part 2 it is now time to set about partitioning and formatting the compact flash card so we can install Workbench 3.1.4 on it (in Part 4).

To start the process of partitioning a compact flash card I booted my Amiga off the 3.1.4 Install disk. Once it booted I ran the HDToolBox program found inside the ‘HDTools’ directory.


HDToolBox

HDToolBox Program


This brings up the window below where you can see all of your installed hard drives. Mine is listed as a SCSI unit which is normal as this is how the Amiga sees the internal IDE controller.


Amiga HDToolBox

Amiga HDToolBox Main Window


Clicking on ‘Change Drive Type’ brings up the window below. As this is a new CF card there is nothing on it yet so you must click on ‘Define New’.


Amiga HDToolBox - Selecting a Drive

Amiga HDToolBox – Defining a New Drive


Which brings up the the ‘Define a New Drive Type’ screen. You need to click ‘Read Configuration’ at this point which will bring up another message. Simply click ‘continue’ to move on here.


HDToolBox

Informational Message


The software will then take a moment to scan the CF and identify the size and parameters needed to access it.  After the scan has completed it will display this info in the window as seen below.


HDToolBox

Drive Parameters


Now you can simply click ‘OK’ to get back to the ‘Drive Type’ window and then click ‘OK’ once more. At this point you will be warned ‘Are you sure you want to change the drive type for the current drive?’ Clicking ‘Continue’ will return you to the main HDToolBox screen once more.


Amiga HDToolBox

Back to the main screen but now with a ‘Changed’ drive status.


Now that HDToolbox knows the ins and outs of our CF card it is time to partition it into drives. Of course we could just make it one big 8Gb partition, after all Amiga OS 3.1.4 now natively supports large drives. However I always like to split mine into at least 2 partitions to keep things organised.

To start this process click on ‘Partition Drive’.


Partitioning a CF (Compact Flash) Card

Select ‘Partition Drive’.


Which should bring up the partitioning window as shown below.

I chose to make my first partition 500MB, this will be my System/Workbench drive. To select the size you simply drag the little triangle pointer and slide it along the bar. It’s virtually impossible to size a partition exactly so just get it as close as you can.

You need to give the partition a name – I called it DH0. I also ticked the box to make it bootable as this is the first partition and will be the one the Amiga will boot off.


Partitioning a CF (Compact Flash) Card

Creating the first partition.


To create another partition you click ‘New Partition’. Don’t be tempted to click the ‘OK’ button until you have finished creating all your partitions. For my second partition I called it DH1 and made the size approximately 1.5GB. I will be using this to install applications and save documents to. I will probably keep a small selection of music on this drive too.


Partitioning a CF (Compact Flash) Card

Creating the second partition.


I left my biggest partition for last so it could use all of the remaining space on the card. This worked out at a little less than 6GB in total. I called this partition DH2 and this will be where I install WHDLoad games.


Partitioning a CF (Compact Flash) Card

Creating the third partition.


You can click each of your partitions in the bar to check their details. Once you are happy that they are all exactly the way you want them to be, hit ‘OK’. You should then be back to the main HDToolbox window.


Partitioning a CF (Compact Flash) Card

HDToolBox with ‘changed’ drive status.


You must now click ‘Save Changes to Drive’ for all the settings you have configured up to this point to be written to the disk (CF card). The window should then change to look like this:


Amiga HDToolBox

HDToolBox back to ‘Not changed’ status.


Congratulations! Your new Amiga drive has now been prepped and partitioned! The final step is to format the partitions. To do this you need to reboot the Amiga whilst leaving the Install disk in the drive so it can boot off it.


Uninitialized Amiga Disks

The three partitioned but currently ‘uninitialized’ drives created earlier.


When your Amiga has finished rebooting you should see a screen similar to the one above. You will notice that the partitions show either as ‘Uninitialized’ or just as a weird name (or both in my case).


Amiga Icons Menu

The Format Disk menu item.


They now need to be formatted so that the Amiga can actually use them. To format a partition you just click on its icon and then select ‘Format Disk’ from the ‘Icons’ menu.


Formatting a Partition

Formatting and Naming DH0.


In the above example I called my DH0 partition ‘Workbench’ but you can call yours whatever you like. If you are interested in the new long file names feature of 3.1.4 now would be a good time to select that tick box.


Disk Format Warning

First format warning…


Make sure you select ‘Quick Format’ or you’ll be waiting a very, very long time for the format to finish. You will get a couple of scary warnings that give you an opportunity to back out if you’ve accidentally selected the wrong disk to format.


Disk Format Warning

Second and final format warning.


Click ‘Format’ in response to both of the warning messages to seal the deal. A few seconds later a drive on your newly partitioned and formatted compact flash card should appear on the workbench screen. Now simply repeat this process for each partition you created earlier.

And that concludes Part 3 of my Amiga OS 3.1.4 installation guide – Partitioning a Compact Flash Card.

I must admit I had originally intended to include the Workbench install in this part too but decided against it as I thought this post was long enough already. Therefore I will be covering the installation of Workbench in Part 4 shortly.

Installing Amiga OS 3.1.4 – Part 2 (Fitting a CF Card & Kickstart 3.1.4 ROMS)

Having created the physical floppy disks in Part 1 of this guide it is now time to fit the IDE Compact Flash adapter and the 2 Kickstart 3.1.4 ROMS.

Fitting the IDE Compact Flash Adapter

For this I needed to open up my A1200 to gain access to the mainboard.


Location of the 5 case screws.


Removing the top half of my A1200’s case was just a matter of turning it over and removing five screws. I’ve circled their locations in the photo above. There were three along the front edge and one each side of the case. The two rear edges of the case are held together by some little lugs and recesses in the case itself.


Pin 1 of ribbon cable aligned with pin 1 on mainboard.


Fitting the IDE Compact Flash adapter simply involved fitting the 44 pin cable connector to the IDE header on the board. Notice how the coloured strip of the ribbon cable aligns with PIN 1 on the board. I chose an 8GB CF card for my install as Workbench 3.1.4 now natively supports large drives. However a smaller card would work just as well. I think my original A1200 had an 80MB (yes I do mean Megabyte!) drive back in the 90’s so 8GB is an insane amount of storage!


Foam pad fitted to insulate underside of adapter.


As the compact flash adapter has lots of solder pads on the base, I stuck a thick foam pad on the underside. This will ensure that the contacts don’t short out when sat on top of the metal drive bracket. (This drive bracket would have been used to house a 2.5″ IDE HDD back in the day).


CF adapter in it’s final resting place.


Removing the old Kickstart ROMS

Luckily the Kickstart ROMS have their own little cut-out in the metal RF shielding so there is no need to remove the shield to access them.


Kickstart 3.0 ROMS

The original Kickstart 3.0 ROMs. Note the empty socket pins on the left!


I used my trusty chip puller to remove these, gently alternating pressure from one side to the other until they popped out. You could use a small flat bladed screwdriver to do this. Make sure to alternate from side to side, lifting the chips one millimetre at a time so you don’t bend the pins. If you want to make life even easier, use an old screwdriver and bend the blade 90′ at the end to make getting it under the chip easier.


Kickstart 3.0 ROMS

Pulling out the Kickstart 3.0 ROMS.


Fitting the new Kickstart ROMS

With the old ROMs removed it was time to fit the new ones. After making sure the pins would line up OK (they were splayed out a little too far) I began to fit them.

It’s vitally important they are fitted correctly and besides the usual static precautions there are three things to watch out for.

  1. The chips have to go in the right sockets. The chip marked as ‘HI’ must go in the front slot. The chip marked ‘LO’ must go in the rear slot.
  2. The chips must be oriented correctly. The end with the notch must be fitted so that it is on the same side as the notch in the socket.
  3. The sockets have 42 pins whereas the chips only have 40! You must make sure to leave the 2 pins on the left side of each socket empty.


Kickstart 3.1.4 ROMS

The 2 new Kickstart ROMS fitted correctly.


Thankfully testing the ROMS is pretty straightforward. Flicking on the power should display a brand new boot screen. That boing ball is definitely new! You can also see the updated ROM version and copyright message.


Kickstart 3.1.4 ROMS

The brand new Hyperion Amiga boot screen.


That concludes Part 2. In Part 3 I will deal with partitioning and formatting the Compact Flash card.

Installing Amiga OS 3.1.4 – Part 1 (Obtaining the Disks)

For my ‘new’ Amiga 1200 I decided I wanted to have the latest Workbench running on it so I ordered myself a copy of AmigaOS 3.1.4 from Sordan in Ireland. It arrived a few days later in a small cardboard box and consisted of a ROM Installation Guide, 2 Kickstart chips and a bunch of labels for you to stick to your own Amiga OS 3.1.4 Disks.


Amiga OS 3.1.4 Disks

This is what you get when you purchase Amiga OS 3.1.4


Registering my Purchase

To actually obtain digital copies of the disks I had to register my serial number (found on the top of the Kickstart ROM’s) on the Hyperion Entertainment website. After doing that I was able to download a bunch of ADF files and a few other things (Wallpapers, Icon packs and documentation mainly) on my PC.


Box of Blank 3.5" Floppy Disks

Time to crack open a nice box of 3.5″ Floppies.


It would have been nice to have received the disks in the box but it’s no real hardship creating my own and it cuts down the price quite a lot. I love working with real floppy disks anyway, the tactile feel of them in use and listening to the whirring of the drive as it accesses them*.

*I hate working with grotty, mouldy, faulty old disks that end up giving me nothing but aggravation and a headache.


3.5" Disk made in England

You don’t see this much any more…


I decided to use my trusty Amiga 500 to create the disks as it has an SD Card reader that makes transferring the files across from my PC a doddle. Once I’d copied the ADF files over I loaded up my favourite ADF software, GoADF and dug out a box of new 3.5″ DS DD floppy disks and set about creating my 6 Workbench disks.


GoADF


Creating the Workbench Disks

I started with the Workbench disk first, selecting it from the list of ADF files provided. Double-clicking the name of the ADF loads the image into the software.


Amiga OS 3.1.4 Disks

Here we can see all the Amiga OS 3.1.4 Disk images in GoADF.


Alternatively you can click the ‘Load image’ button on the bottom left of the screen.


GoADF

Load (ADF) Image.


As I wanted to create a physical disk from the ADF files I selected ‘Image to disk…’


GoADF

To write ADF images to a real floppy you must select the ‘Image to disk’ option.


Which loads up the disk creation window. Here you can select which drive you want to use and whether you want to format and/or verify the disk.


GoADF

My disks were IBM PC formatted hence the ‘not a valid DOS disk’ warning.


I opted to both format and verify the disk. You simply can’t be too careful when working with floppy disks these days. Most DS/DD floppy disks have to be at least 20 years old by now as new ones haven’t been manufactured in a long time.


GoADF

At this point it might be a good time to check that the disk you have inserted really is the one you want to use!


Writing the First Disk

Clicking ‘write image to disk’ brings up the obligatory warning that the disk will be overwritten. Clicking ‘yes’ begins the process which starts off with the disk being formatted.


GoADF

Formatting the disk…


GoADF features a neat virtual representation of the floppy disk marking each sector white as it’s formatted…


GoADF

Writing the data to the disk…


Then blue as the data is written to it…


GoADF

Verifying the disk…


And finally places a small black dot in it after the data has been successfully verified. A couple of minutes later a little box appears to confirm the disk has been created successfully.


GoADF

Hurrah – one down, five to go!


And here’s the completed disk with it’s snazzy label affixed.


Amiga OS 3.1.4 Disks

Amiga OS 3.1.4 Workbench Disk.


Now it was just a matter of repeating the process for the other 5 ADF’s to give me a complete set of Workbench disks.


Amiga OS 3.1.4 Disks

A full set of Workbench 3.1.4 floppy disks!


However there’s a couple of other disks that needed creating – ones that no labels are provided for. The first is the ‘Modules Disk’ and the second is a new ‘3.1.4.1’ update that has recently been released containing the latest Workbench bug-fixes. The update disk was a separate download from the Workbench disks but is provided free for registered users.


Amiga OS 3.1.4 Disks

The extra disks needed. Sadly no professionally printed labels for these!


In Part 2 I will cover installing the ROM chips and performing a clean install of Workbench on a new CF/HDD.

How to access IMAP email on an Amiga 500 in 2018


2021 Update – This article on how to access IMAP email on an Amiga 500 has been superseded by this one as unfortunately I have been unable to replicate this setup with the latest versions of AmiSSL 4.8+ and SimpleMail 0.45 on Workbench 3.1.4.


Yep, you read the title correctly, this article is a step-by-step guide on how to access IMAP email on an Amiga 500 in 2018! This works with any IMAP email system including Gmail!

Who would have thought 30 years ago that we’d be able to get electronic mail on our Amiga 500 computers in 2018. It really is a testament to both the original designers of the Amiga and to the ingenuity and tenacity of the current community that this is actually a real possibility now. In this guide I’ll show how to get it working, step by step. It’s entirely feasible and actually works really well! Read on to find out what you need and how to get it configured.

What you need

First things first, you need to head on over to the SimpleMail website to download the latest version of the software (currently 0.44). Click on the downloads page and select the appropriate installer file from the list. I’m using Workbench 3.9 so downloaded the simplemail-0.44-0s3.lha file. If you’re using anything less than Workbench 3 then I’m afraid you are out of luck.

access IMAP email on an Amiga

The SimpleMail page on the SourceForge website


access IMAP email on an Amiga

The download page – choose the OS3 version.

One you’ve download the installer go ahead and install it and meet me back here for the next step. If the program doesn’t run then go back and check the readme file. There are a number of additional custom MUI classes that it requires to run and you may need to download and install one or more of these too.

Launching SimpleMail

Find the folder where you installed SimpleMail and open it. Inside there should be a Readme, an AmigaGuide document and the program itself. Double-click the SimpleMail icon to launch the software. After a brief splash screen you should be presented with the main application screen. This is the point at which we can begin to configure the program to get our emails.

access IMAP email on an Amiga

The SimpleMail folder


access IMAP email on an Amiga

The SimpleMail Splash screen – very attractive!


access IMAP email on an Amiga

The main program window

How to Configure your email account

Select “Configuration…” from the Settings menu and then Accounts from the configuration screen that pops up. This is where we can add our account and do lots of other things later on to get the mail program working just how we want it.

access IMAP email on an Amiga

Here is how you access the configuration screen.


access IMAP email on an Amiga

The ‘Accounts’ section of the configuration screen.

Adding your email account

The next step is to add your email account and you start the process by clicking on the ‘Add’ button in the top right of the window. I should point out that the program has very helpful tool-tip descriptions that pop up if you hover the mouse pointer over a particular button or text entry box for a few seconds.

access IMAP email on an Amiga

Click this button to begin adding your email account

The account name can be anything you want – this is just a label so you know what the account represents in the future. Enter your name, email address and reply address (if you want one) associated with your email account.

access IMAP email on an Amiga

Entering the account name and personal info relating to the account

Setting up IMAP – the ‘Receive’ configuration

  1. Click the IMAP4 radio button in the ‘Receive’ section..
  2. Enter your IMAP server name in the ‘Server’ box.
  3. Enter the port number in the ‘Port’ box.
  4. Ignore the Fingerprint box for now – this will be automatically filled later on.
  5. Select the type of security your account uses next to the ‘Security’ drop-down menu (for SSL select TLS).
  6. Enter the username and password you need to authenticate with in the ‘Login’ and ‘Password’ boxes respectively.
  7. Lave the rest of the settings in this section as they are.
access IMAP email on an Amiga

Entering your IMAP details

Setting up SMTP – the ‘Send’ configuration

  1. Enter your SMTP server name in the ‘SMTP Server’ box in the ‘Send’ section.
  2. Enter the port number in the ‘Port’ box.
  3. Ignore the Fingerprint box for now – this will be automatically filled later on.
  4. Select the type of security your account uses next to the ‘Security’ drop-down menu (for SSL select TLS).
  5. If your SMTP server requires authentication (most do these days) then click the ‘Use SMTP AUTH’ tickbox.
  6. (If required) Enter the username and password you need to authenticate with in the ‘Login’ and ‘Password’ boxes respectively.
  7. Leave the ‘Login into POP3 server first’ and “Use IP as domain” boxes unticked.
access IMAP email on an Amiga

Entering your SMTP settings

Testing your setup

Now it’s time to see if everything works! Click the test button over on the far right. This will first test your IMAP settings and then run through your SMTP setup to make sure everything is in order.

access IMAP email on an Amiga

Testing your account settings

You will see the following error appear twice, firstly for the IMAP connection and secondly for SMTP. Click ‘Trust Always’ to have SimpleMail  save the certificate ‘fingerprint’ so this error doesn’t re-appear in the future.

access IMAP email on an Amiga

This error will appear but it’s OK to click Trust always as you know this is you email provider.

Now in order for these 2 fingerprints to be saved permanently, preventing any future warnings from popping up every time you try to download or send email you must save the configuration using the ‘Save’ button at the bottom left of the configuration window.

access IMAP email on an Amiga

Prompt reminding you to save the configuration.

Correcting Errors…

Now at this stage you might end up with the following screen with everything highlighted in red! Don’t panic – this just means that the test failed due to an error in one or more of your entries. Go through and double/triple check every piece of information you have entered. Make sure the ports are correct, there are no typos in the server name etc.

The problem in my case was the passwords as mine contain numerous weird and wonderful characters. Now this isn’t normally an issue but for some reason the keyboard mapping on my Amiga was wrong so these characters were actually appearing as something else entirely when typed…

You cannot see the password you are typing so I highly recommend opening up a shell window and typing your password into that just to check it appears correctly. Once you have ironed out any kinks with getting it to appear properly, go back to SimpelMail and enter it again in both boxes.

access IMAP email on an Amiga

This screen means you’ve made a mistake somewhere!

Final steps

Hopefully you’ve got every bit of information correct now and can see a screen similar to the one below with the fingerprint boxes fully populated.

access IMAP email on an Amiga

Success – IMAP and SMTP settings have been correctly entered and tested,

Don’t forget to click on ‘Save’ at the bottom left of the configuration window otherwise all your hard work up to this point will be lost!

access IMAP email on an Amiga

Don’t forget to SAVE the configuration!

After you have saved the configuration you will return the main program window. You should see your newly added email account appear at the bottom of the folder list. At this point it will not have downloaded any of your emails or even folders for that matter.

access IMAP email on an Amiga

Your new email account initially appears like this…

Accessing your emails

Now click on the name of your email account and SimpleMail will connect to your email server and download a list of all the folders within it. This will include your Inbox, Sent items etc. along with any custom folders your have created too. This might take a few seconds – you can see what is going on by checking the status bar at the bottom of the window.

access IMAP email on an Amiga

You will always know what is going on by checking the status area of SimpleMail


access IMAP email on an Amiga

Your email folder heirarchy

At this stage the program still hasn’t downloaded any of your emails. To do this you must left click on any of the folder titles for it to fetch the contents of it from the server. In the below example I clicked on my Inbox and it fetched 17 mails from the server. This took just a few seconds – if you have hundreds or even thousands of mails it will take a bit longer.

access IMAP email on an Amiga

This is the progress bar. If you have a lot of emails then it will move quite slowly


access IMAP email on an Amiga

Inbox with 17 new emails.


access IMAP email on an Amiga

Main program window with Inbox emails displayed in the top right pane

Finally – Viewing an email!

Even though the messages are now displayed in the list view, these are only email headers. The body of the messages have not been downloaded. Click on an email to download the message – the body will be display in the bottom right viewing pane. If you would like the program to automatically download full messages you can of course enable this but it will greatly slow down the process of fetching emails.

Unfortunately SimpleMail does not yet support HTML mails so you will only see the plain text version of them like the example below. Personally this doesn’t bother me too much as most HTML mails are sent from companies trying to sell you stuff. Friends and family send plain text emails so I can live with that.

access IMAP email on an Amiga

Example of how HTML mails are presented

Downloading Complete emails rather than just the headers

As I mentioned above, you can have SimpleMail automatically download complete messages, including the full body. It does make reading through your mailbox quicker, but at the expense of longer fetch times. Only you can decide if the trade-off is worth it. To do this, left click on the folder or Inbox you want to make the change to and select settings.

access IMAP email on an Amiga

Selecting the settings option

Now you should see a window like the one below. Select ‘Complete mails’ from the ‘Download’ drop-down menu and then click OK. The next time you perform a fetch/click on that folder it will download each and every message inside it in full.

access IMAP email on an Amiga

Getting the software to download Complete mails instead of just the headers

Renaming your email account

You may have noticed that your email account has an odd name. The program seems to name the account itself based off the server it connects to. Don’t worry though, you can easily change it to something more recognisable. Simply right-click on the mailbox name to bring up a folder menu and select ‘settings’.

access IMAP email on an Amiga

Selecting Settings option in the Folder menu

Here you can enter the name you want to appear in the folder list by entering it into the ‘Name’ box under Folder properties. Hit ‘OK’ at the bottom of the window when you are done.

access IMAP email on an Amiga

Entering your mailbox folder name

You should now be back at the main program window and your mailbox should be named correctly in the folder view.

access IMAP email on an Amiga

Mailbox now showing the correct name

Concluding

And that is it – you can now access IMAP email on an Amiga in 2018!

SimpleMail is constantly being worked on, so if you are reading this in the future there may well be a better version out with even more features.

I have only given you the bare minimum instructions here to get you started with accessing your email. There are plenty of other things this software can offer. Mail sorting rules, signatures, integrated address book and so on. You can also resize each of the viewing panes or remove them completely. Have a play around with it all and enjoy.

Gmail!

I run my own mail server but this should work for any IMAP email out there. I have personally tested it with Gmail and it works perfectly. Here’s a screenshot of the configuration screen so you can see what settings I used.

access IMAP email on an Amiga

Gmail configuration

Some extra info about system requirements

For the record I got this running on an Amiga 500 with a Vampire V500 V2+ accelerator card. The biggest advantage this offers is speed – up to 12 times faster than a stock A500! You certainly don’t need a Vampire to run SimpleMail though. What you will need is Workbench running off a hard drive or CF card solution, a TCP/IP stack and SSL software. I’m pretty sure you would also need at least an 68020 CPU or suitable accelerator card to get any of this running at all.

Of course this isn’t just limited to Amiga 500 computers, that just happens to be what I use. It should work just as well on the big box Amiga’s and of course the A1200 too.

Anyway, I really hope you found this article on how to access IMAP email on an Amiga both interesting and useful – if you did please let me know! If you have any questions or requests then drop me a message and I’ll do my best to answer them.

access IMAP email on an Amiga

Installing the Vampire V500 V2+ in my Amiga 500

Vampire V500 V2+

With the arrival of the weekend it was the perfect time to give my A500 the Vampire V500 V2 treatment!

Getting started – removing chips

First off I needed to remove the original Motorola 68000 CPU and the Kickstart chip.

Vampire V500 V2

Amiga 500 motherboard with empty 68000 CPU socket

Vampire V500 V2

Removing the Kickstart chip with a chip puller

Installing the card

The next step involved carefully inserting the Vampire board connector pins into the empty CPU socket. This actually took a hell of a lot more force than I thought it would. I’ll admit I was scared of damaging the CPU socket or the motherboard itself with the amount of pressure I had to exert. Anyway it eventually slotted in all the way and no harm was done. Please do make sure you remove both the CPU AND the Kickstart chip though – this wasn’t mentioned in my instructions (but they’ve been updated since I got mine to mention this). If you don’t remove the Kickstart chip then the Vampire board won’t sit flat and the CPU connections may be unreliable. Thanks to Igor Majstorovic for taking the time out to let me know about this!

Vampire V500 V2+

Vampire V500 V2+ fitted to A500 CPU socket

Cables & CF Card setup

The next step was to hook up an HDMI cable to the socket on the board and fit a Compact Flash ‘hard drive’ to the Vampire’s 44 pin IDE header. I opted for a 32Gb CF card as this is the size of the Apollo OS (Coffin) image. (This is a pre-configured Workbench 3.9 system that you can download and use with your Vampirised A500.

Imaging the card was simply a matter of downloading the Apollo OS image from here and using Win32 Disk Imager in Windows 10 to write that image to my Compact Flash card.

Vampire V500 V2+

Vampire V500 V2+ with CF Card and HDMI connected up

For once in my life everything went as it should and when I powered up my Amiga 500 it worked! As Hannibal would say; ‘I love it when a plan comes together!’ I was greeted with a really cool Vampire logo boot screen after which the Workbench loaded just a few seconds later.

Vampire V500 V2+

Vampire V500 V2 Boot Screen

Vampire V500 V2+

Vampire V500 V2 ‘Insert Floppy’ Screen that appears if no bootable device is present