Lyonsden Blog

Category - Gaming

July Issue of Freeze64 & Corruption Adventure Game

Freeze64 & Corruption

Just thought I’d share a couple of cool things that arrived in the post a few days ago. Namely the latest issue of ‘Freeze64’ and something I’ve been chasing down for about a year now – Corruption for the C64!

For those of you who are not aware, Freeze64 is a brilliant monthly Commodore 64 Fanzine that contains game reviews / cheats and interviews with game designers from yesteryear. Recently it has started to feature regular articles from Julian Rignall (of ZZap 64 fame) too. Anyway I heartily recommend it – it’s a very entertaining read. Take a look for yourself here.

Freeze64 & Corruption

Corruption – Box Contents

I’m a big adventure game fan, particularly of the Magnetic Scrolls graphic series. I’ve already got The Pawn, Guild of Thieves and Jinxter but tracking down the rest of the collection is proving quite difficult. I’m pretty pleased with this find though – it’s in superb condition and has all the Filofax pages that give you clues and background material for the game. Sadly it is missing the audio cassette so I still need to track that down, or at least an audio file of the contents! Now I just need to find copies of Wonderland and Fish! to complete my collection.

By the way, if you have any of these and would like to sell them – please get in touch!

How to access IMAP email on an Amiga 500 in 2018


2021 Update – This article on how to access IMAP email on an Amiga 500 has been superseded by this one as unfortunately I have been unable to replicate this setup with the latest versions of AmiSSL 4.8+ and SimpleMail 0.45 on Workbench 3.1.4.


Yep, you read the title correctly, this article is a step-by-step guide on how to access IMAP email on an Amiga 500 in 2018! This works with any IMAP email system including Gmail!

Who would have thought 30 years ago that we’d be able to get electronic mail on our Amiga 500 computers in 2018. It really is a testament to both the original designers of the Amiga and to the ingenuity and tenacity of the current community that this is actually a real possibility now. In this guide I’ll show how to get it working, step by step. It’s entirely feasible and actually works really well! Read on to find out what you need and how to get it configured.

What you need

First things first, you need to head on over to the SimpleMail website to download the latest version of the software (currently 0.44). Click on the downloads page and select the appropriate installer file from the list. I’m using Workbench 3.9 so downloaded the simplemail-0.44-0s3.lha file. If you’re using anything less than Workbench 3 then I’m afraid you are out of luck.

access IMAP email on an Amiga

The SimpleMail page on the SourceForge website


access IMAP email on an Amiga

The download page – choose the OS3 version.

One you’ve download the installer go ahead and install it and meet me back here for the next step. If the program doesn’t run then go back and check the readme file. There are a number of additional custom MUI classes that it requires to run and you may need to download and install one or more of these too.

Launching SimpleMail

Find the folder where you installed SimpleMail and open it. Inside there should be a Readme, an AmigaGuide document and the program itself. Double-click the SimpleMail icon to launch the software. After a brief splash screen you should be presented with the main application screen. This is the point at which we can begin to configure the program to get our emails.

access IMAP email on an Amiga

The SimpleMail folder


access IMAP email on an Amiga

The SimpleMail Splash screen – very attractive!


access IMAP email on an Amiga

The main program window

How to Configure your email account

Select “Configuration…” from the Settings menu and then Accounts from the configuration screen that pops up. This is where we can add our account and do lots of other things later on to get the mail program working just how we want it.

access IMAP email on an Amiga

Here is how you access the configuration screen.


access IMAP email on an Amiga

The ‘Accounts’ section of the configuration screen.

Adding your email account

The next step is to add your email account and you start the process by clicking on the ‘Add’ button in the top right of the window. I should point out that the program has very helpful tool-tip descriptions that pop up if you hover the mouse pointer over a particular button or text entry box for a few seconds.

access IMAP email on an Amiga

Click this button to begin adding your email account

The account name can be anything you want – this is just a label so you know what the account represents in the future. Enter your name, email address and reply address (if you want one) associated with your email account.

access IMAP email on an Amiga

Entering the account name and personal info relating to the account

Setting up IMAP – the ‘Receive’ configuration

  1. Click the IMAP4 radio button in the ‘Receive’ section..
  2. Enter your IMAP server name in the ‘Server’ box.
  3. Enter the port number in the ‘Port’ box.
  4. Ignore the Fingerprint box for now – this will be automatically filled later on.
  5. Select the type of security your account uses next to the ‘Security’ drop-down menu (for SSL select TLS).
  6. Enter the username and password you need to authenticate with in the ‘Login’ and ‘Password’ boxes respectively.
  7. Lave the rest of the settings in this section as they are.
access IMAP email on an Amiga

Entering your IMAP details

Setting up SMTP – the ‘Send’ configuration

  1. Enter your SMTP server name in the ‘SMTP Server’ box in the ‘Send’ section.
  2. Enter the port number in the ‘Port’ box.
  3. Ignore the Fingerprint box for now – this will be automatically filled later on.
  4. Select the type of security your account uses next to the ‘Security’ drop-down menu (for SSL select TLS).
  5. If your SMTP server requires authentication (most do these days) then click the ‘Use SMTP AUTH’ tickbox.
  6. (If required) Enter the username and password you need to authenticate with in the ‘Login’ and ‘Password’ boxes respectively.
  7. Leave the ‘Login into POP3 server first’ and “Use IP as domain” boxes unticked.
access IMAP email on an Amiga

Entering your SMTP settings

Testing your setup

Now it’s time to see if everything works! Click the test button over on the far right. This will first test your IMAP settings and then run through your SMTP setup to make sure everything is in order.

access IMAP email on an Amiga

Testing your account settings

You will see the following error appear twice, firstly for the IMAP connection and secondly for SMTP. Click ‘Trust Always’ to have SimpleMail  save the certificate ‘fingerprint’ so this error doesn’t re-appear in the future.

access IMAP email on an Amiga

This error will appear but it’s OK to click Trust always as you know this is you email provider.

Now in order for these 2 fingerprints to be saved permanently, preventing any future warnings from popping up every time you try to download or send email you must save the configuration using the ‘Save’ button at the bottom left of the configuration window.

access IMAP email on an Amiga

Prompt reminding you to save the configuration.

Correcting Errors…

Now at this stage you might end up with the following screen with everything highlighted in red! Don’t panic – this just means that the test failed due to an error in one or more of your entries. Go through and double/triple check every piece of information you have entered. Make sure the ports are correct, there are no typos in the server name etc.

The problem in my case was the passwords as mine contain numerous weird and wonderful characters. Now this isn’t normally an issue but for some reason the keyboard mapping on my Amiga was wrong so these characters were actually appearing as something else entirely when typed…

You cannot see the password you are typing so I highly recommend opening up a shell window and typing your password into that just to check it appears correctly. Once you have ironed out any kinks with getting it to appear properly, go back to SimpelMail and enter it again in both boxes.

access IMAP email on an Amiga

This screen means you’ve made a mistake somewhere!

Final steps

Hopefully you’ve got every bit of information correct now and can see a screen similar to the one below with the fingerprint boxes fully populated.

access IMAP email on an Amiga

Success – IMAP and SMTP settings have been correctly entered and tested,

Don’t forget to click on ‘Save’ at the bottom left of the configuration window otherwise all your hard work up to this point will be lost!

access IMAP email on an Amiga

Don’t forget to SAVE the configuration!

After you have saved the configuration you will return the main program window. You should see your newly added email account appear at the bottom of the folder list. At this point it will not have downloaded any of your emails or even folders for that matter.

access IMAP email on an Amiga

Your new email account initially appears like this…

Accessing your emails

Now click on the name of your email account and SimpleMail will connect to your email server and download a list of all the folders within it. This will include your Inbox, Sent items etc. along with any custom folders your have created too. This might take a few seconds – you can see what is going on by checking the status bar at the bottom of the window.

access IMAP email on an Amiga

You will always know what is going on by checking the status area of SimpleMail


access IMAP email on an Amiga

Your email folder heirarchy

At this stage the program still hasn’t downloaded any of your emails. To do this you must left click on any of the folder titles for it to fetch the contents of it from the server. In the below example I clicked on my Inbox and it fetched 17 mails from the server. This took just a few seconds – if you have hundreds or even thousands of mails it will take a bit longer.

access IMAP email on an Amiga

This is the progress bar. If you have a lot of emails then it will move quite slowly


access IMAP email on an Amiga

Inbox with 17 new emails.


access IMAP email on an Amiga

Main program window with Inbox emails displayed in the top right pane

Finally – Viewing an email!

Even though the messages are now displayed in the list view, these are only email headers. The body of the messages have not been downloaded. Click on an email to download the message – the body will be display in the bottom right viewing pane. If you would like the program to automatically download full messages you can of course enable this but it will greatly slow down the process of fetching emails.

Unfortunately SimpleMail does not yet support HTML mails so you will only see the plain text version of them like the example below. Personally this doesn’t bother me too much as most HTML mails are sent from companies trying to sell you stuff. Friends and family send plain text emails so I can live with that.

access IMAP email on an Amiga

Example of how HTML mails are presented

Downloading Complete emails rather than just the headers

As I mentioned above, you can have SimpleMail automatically download complete messages, including the full body. It does make reading through your mailbox quicker, but at the expense of longer fetch times. Only you can decide if the trade-off is worth it. To do this, left click on the folder or Inbox you want to make the change to and select settings.

access IMAP email on an Amiga

Selecting the settings option

Now you should see a window like the one below. Select ‘Complete mails’ from the ‘Download’ drop-down menu and then click OK. The next time you perform a fetch/click on that folder it will download each and every message inside it in full.

access IMAP email on an Amiga

Getting the software to download Complete mails instead of just the headers

Renaming your email account

You may have noticed that your email account has an odd name. The program seems to name the account itself based off the server it connects to. Don’t worry though, you can easily change it to something more recognisable. Simply right-click on the mailbox name to bring up a folder menu and select ‘settings’.

access IMAP email on an Amiga

Selecting Settings option in the Folder menu

Here you can enter the name you want to appear in the folder list by entering it into the ‘Name’ box under Folder properties. Hit ‘OK’ at the bottom of the window when you are done.

access IMAP email on an Amiga

Entering your mailbox folder name

You should now be back at the main program window and your mailbox should be named correctly in the folder view.

access IMAP email on an Amiga

Mailbox now showing the correct name

Concluding

And that is it – you can now access IMAP email on an Amiga in 2018!

SimpleMail is constantly being worked on, so if you are reading this in the future there may well be a better version out with even more features.

I have only given you the bare minimum instructions here to get you started with accessing your email. There are plenty of other things this software can offer. Mail sorting rules, signatures, integrated address book and so on. You can also resize each of the viewing panes or remove them completely. Have a play around with it all and enjoy.

Gmail!

I run my own mail server but this should work for any IMAP email out there. I have personally tested it with Gmail and it works perfectly. Here’s a screenshot of the configuration screen so you can see what settings I used.

access IMAP email on an Amiga

Gmail configuration

Some extra info about system requirements

For the record I got this running on an Amiga 500 with a Vampire V500 V2+ accelerator card. The biggest advantage this offers is speed – up to 12 times faster than a stock A500! You certainly don’t need a Vampire to run SimpleMail though. What you will need is Workbench running off a hard drive or CF card solution, a TCP/IP stack and SSL software. I’m pretty sure you would also need at least an 68020 CPU or suitable accelerator card to get any of this running at all.

Of course this isn’t just limited to Amiga 500 computers, that just happens to be what I use. It should work just as well on the big box Amiga’s and of course the A1200 too.

Anyway, I really hope you found this article on how to access IMAP email on an Amiga both interesting and useful – if you did please let me know! If you have any questions or requests then drop me a message and I’ll do my best to answer them.

access IMAP email on an Amiga

Project Cars 2 Collectors Edition Unboxing

Project Cars 2 Collector's Edition

A little late to the party but I was really impressed with my recent purchase of Project Cars 2 Collector’s Edition. It certainly seems to me that a lot of thought was put into the design of the packaging and the content. The whole package was simply a delight to open up with layer after layer of content to be discovered whether it be tucked inside something or hidden behind it. This is definitely a Collector’s Edition that I will cherish for years to come.

This slideshow requires JavaScript.

Commodore 64 Video over HDMI – a Solution

Commodore 64 Video over HDMI

Having recently picked up a 2nd-hand Toshiba LCD screen to use with my Vampire equipped Amiga I found myself in the position of needing to connect my trusty 35 year old Commodore 64 video over HDMI to a modern display.

The problem, and why I needed to use HDMI

Obviously I had already exhausted all the other options before going down the HDMI route. I tried a direct composite connection, composite and S-video over SCART and of course good old RF. I even tried a custom cable off eBay with a 300ohm resistor built in that other people have had some success with. None of these options worked. The best I could achieve over RF was a vertically rolling black and white image. All the other methods resulted in nothing – just a black screen. The annoying thing is when I plugged the 64 into my brand new Panasonic 4K TV I got a perfect picture with all the cables so clearly this was just an issue with the older Toshiba panel. For reference, in case anyone is reading this who has the same issue, my Toshiba TV’s model number is ’22DV714B’.

Now I do have a Commodore 1084S but with my current set-up there is simply no room for 2 screens – I needed a single screen that could handle everything. Native Amiga 500 screen modes, 720p screen modes from the Vampire output and of course the output from my C64C. One day when I get my man cave sorted I can have each machine with their own screen but until then this is my solution…

The Commodore 64 Video over HDMI solution

Clearly whatever video signal my 64 was outputting simply wasn’t compatible with my Toshiba screen. Determined to get it working I figured it would be worth trying to convert the signal into something that would work. I had a look on Amazon and settled on the device pictured below. It claimed to do exactly what I needed and was pretty cheap so it wouldn’t have been the end of the world if didn’t work.

Commodore 64 video over HDMI

Amanka RCA Composite CVBS AV to HDMI Video Audio Converter box with the mini USB power lead.

The box itself is very small, about the size of a book of matches and it came with just a short mini USB cable and some simple instructions in the box.

Commodore 64 video over HDMI

Amanka RCA Composite CVBS AV to HDMI Video Audio Converter – Composite and Left/Right Audio inputs

Commodore 64 video over HDMI

Amanka RCA Composite CVBS AV to HDMI Video Audio Converter – HDMI Out port

Commodore 64 video over HDMI

Amanka RCA Composite CVBS AV to HDMI Video Audio Converter – Mini USB socket for power and 720p/1080p output selector switch

Setting it all up

In addition to an HDMI cable and a USB charger (to plug the mini USB power cable into) you will also need a Commodore 64 Composite video cable like the one pictured on the left below. If you don’t already have one they are readily available on Amazon. Setting it up was really straightforward, I just needed to provide a 5v USB charger for the power lead and then hook up an HDMI cable and the composite video and audio connections from the C64 A/V port using the above type of cable.

Commodore 64 video over HDMI

Amanka RCA Composite CVBS AV to HDMI Video Audio Converter – With power, composite video, audio and HDMI cables all connected

The Amanka box can output at both 720p and 1080p. My LCD is only 720p so I selected that option and then powered everything on. I have to admit I wasn’t overly optimistic about my chances of this working given the failure of everything else I’d already tried. However I was ecstatic when I saw that familiar blue “Commodore 64 Basic V2” screen again! The C64 sound is also passed through HDMI so it would seem to be a complete solution for both video and audio!

Commodore 64 Video over HDMI

Success – Commodore 64 video over HDMI on my Toshiba 22DV714B LCD TV

So another success story – I would consider the Amanka device a permanent solution and am very pleased with both the cost and the end result.

There are are links to the exact box I bought in the article if you would like to make sure you get the same one that worked for me – I will get a few pennies to help pay for my hosting costs but you will pay the exact same price as you would if you went to Amazon to purchase one – win win! If you would like to know anything else about the above setup then just drop me a quick message and I’ll do my best to help you out.


Brand new Amiga A500 cases being manufactured in 2018

Just discovered an interesting Amiga 500 Indigogo Project that has launched. The team behind the project are aiming to manufacture a batch of brand new A500 cases that will replicate the exact design and quality of the original whilst also adding some fantastic new features and options never previously available. The most obvious new feature is that the cases come in a variety of colours, white, black, translucent and ‘original A500’. Much more interesting though, especially to owners of the Vampire series of accelerator cards like myself, is that they are integrating support for these cards right into the case itself! There is going to be an expansion bay over by the floppy drive which will facilitate the fitment of an HDMI port, SD card slot, Ethernet Port and USB port. All without any cutting of the case. (kind of ironic given I have just butchered my A500 case to achieve the same end!)


vampcaseaccessories

The extra Accessories available to integrate with your Vampire card


If you have any plans to buy the stand-alone V4 Vampire (when it becomes available) they even include a chassis for that too. Another nice feature is that they will include a trapdoor cover with built-in ventilation slots – a very welcome addition to get some extra cooling for the Vampire chips. Last but not least they plan to offer set of replacement keycaps so we can replace those tired and yellowed 30 year old keys for some shiny new ones.

The guys behind this have already successfully produced a range of well received replacement cases for the Amiga A1200 range of computers so I feel pretty certain they both know what they are doing and that they can deliver on the promise. I’ve already personally backed this project and look forward to getting my Vampire SE case in April 2019!

Find out about the project here: https://www.indiegogo.com/projects/new-compatible-case-for-amiga-500-plus#/

Adding an SD Card Slot and HDMI port to an Amiga 500

SD Card Slot and HDMI port to an Amiga 500

So you may be aware that the Vampire V500 V2+ Card gives your vintage Amiga 500 both a MicroSD card slot and an HDMI port for hooking up to a modern display.  Trouble is the ports are on the board itself which is rather inconvenient if you don’t want to leave the top of your Amiga’s case off.  After doing a little research and searching around I discovered that you can get some nifty little extension cables for both ports which will allow you to ‘move’ them to the exterior of the Amiga’s case.  This post will explain how to add both an SD Card Slot and HDMI port to an Amiga 500 computer.

SD Card Slot and HDMI port to an Amiga 500

Location of the HDMI and MicroSD ports on the Vampire card. Not exactly easily accessible once the lid is back on!

Purchasing the right cables for the job

The HDMI cable was a little tricky to locate at first as there are just so many options. Once I got the search term correct I stumbled into the right cable for the job.  The cable I bought (below) was an Adafruit Panel mount HDMI Cable – 40 cm which you can pick up from Amazon.  It’s just the perfect length and almost seems tailor made for the Amiga!

SD Card Slot and HDMI port to an Amiga 500

40cm HDMI extension cable

The MicroSD slot extender was a much easier product to locate.  This Micro SD to SD Card Extension Cable I picked up from Amazon is perfect.  You will find that you can actually get both MicroSD to MicroSD and also MicroSD to SD extender cables.  I decided to chose the MicroSD to SD option as I thought it would allow a little extra flexibility in terms of what cards I can use with it.  With it I have a choice of using both regular SD cards or  MicroSD cards now with the use of a MicroSD adapter card.

SD Card Slot and HDMI port to an Amiga 500

MicroSD Extension Cable

Deciding where to locate the ports

I decided the HDMI port needed to be at the back of my A500 but that the SD card would be much more useful if it was located somewhere along the side.  There is quite a lot of free space underneath the floppy drive, ample to accommodate the HDMI socket.  However because the SD Card Slot is housed in quite a chunky plastic case there wasn’t room for it under the floppy, plus I already have my floppy boot selector switch there anyway.  So, I chose a spot that sits just under the keyboard where there is plenty of space and it’s also super convenient for me to pop cards in and out.

SD Card Slot and HDMI port to an Amiga 500

Final Cable Routes


SD Card Slot and HDMI port to an Amiga 500

HDMI Socket secured with hot glue. It ain’t pretty but it’s very secure.


SD Card Slot and HDMI port to an Amiga 500

Plenty of clearance around floppy drive


SD Card Slot and HDMI port to an Amiga 500

SD Card Slot Hot Glued in position

Creating the SD Card and HDMI cut-outs in the Amiga case and securing the new ports

The slots for both ports were cut out using a Dremel tool (if you have one you should know instinctively how to do this!). Take care to use a low speed otherwise you risk melting the plastic.  The ports themselves are held in place with some hot glue, perfect for this sort of project as it flows freely around things before setting hard.  I used a few blobs of hot glue to keep the SD extension ribbon cable out of harms way too as it’s quite fragile.  It could easily become trapped and get damaged by the A500 keyboard when it is replaced if it was left unchecked.

SD Card Slot and HDMI port to an Amiga 500

Top view of HDMI Socket with floppy drive back in place


SD Card HDMI Amiga

Finished HDMI Port


SD Card HDMI Amiga

Finished SD Card Slot with MicroSD adapter sticking out

End Result

I’m pretty pleased with the end result, with hindsight I probably should have tidied up the HDMI cut-out a little with a file as there are a few rough bits left… but it’s around the back of the case and out of sight so no biggie.  The HDMI port is rock solid and should have no problem with me plugging and unplugging a cable in and out.  Likewise the SD card slot is nice and secure and more than up to the task of dealing with regular card swaps.  Perhaps a version in white (or off-white LOL) would have been better but I just couldn’t find one for sale anywhere.

Improvements?

Only other thing I might do in future is add an RJ45 extender when the Apollo Vampire team make the Ethernet port expansion option a reality.  Although I already have Ethernet through the use of the fantastic little plipbox device this is currently hogging my parallel port so I cannot print without first unplugging it – hardly ideal.

Formatting the SD Card

Incidentally, if you’d like to know how to go about formatting your SD Card check out my post – How to Format an SD Card for Amiga to PC File Transfer.


Fitting an SD Card Slot and HDMI port to an Amiga 500.

Installing the Vampire V500 V2+ in my Amiga 500

Vampire V500 V2+

With the arrival of the weekend it was the perfect time to give my A500 the Vampire V500 V2 treatment!

Getting started – removing chips

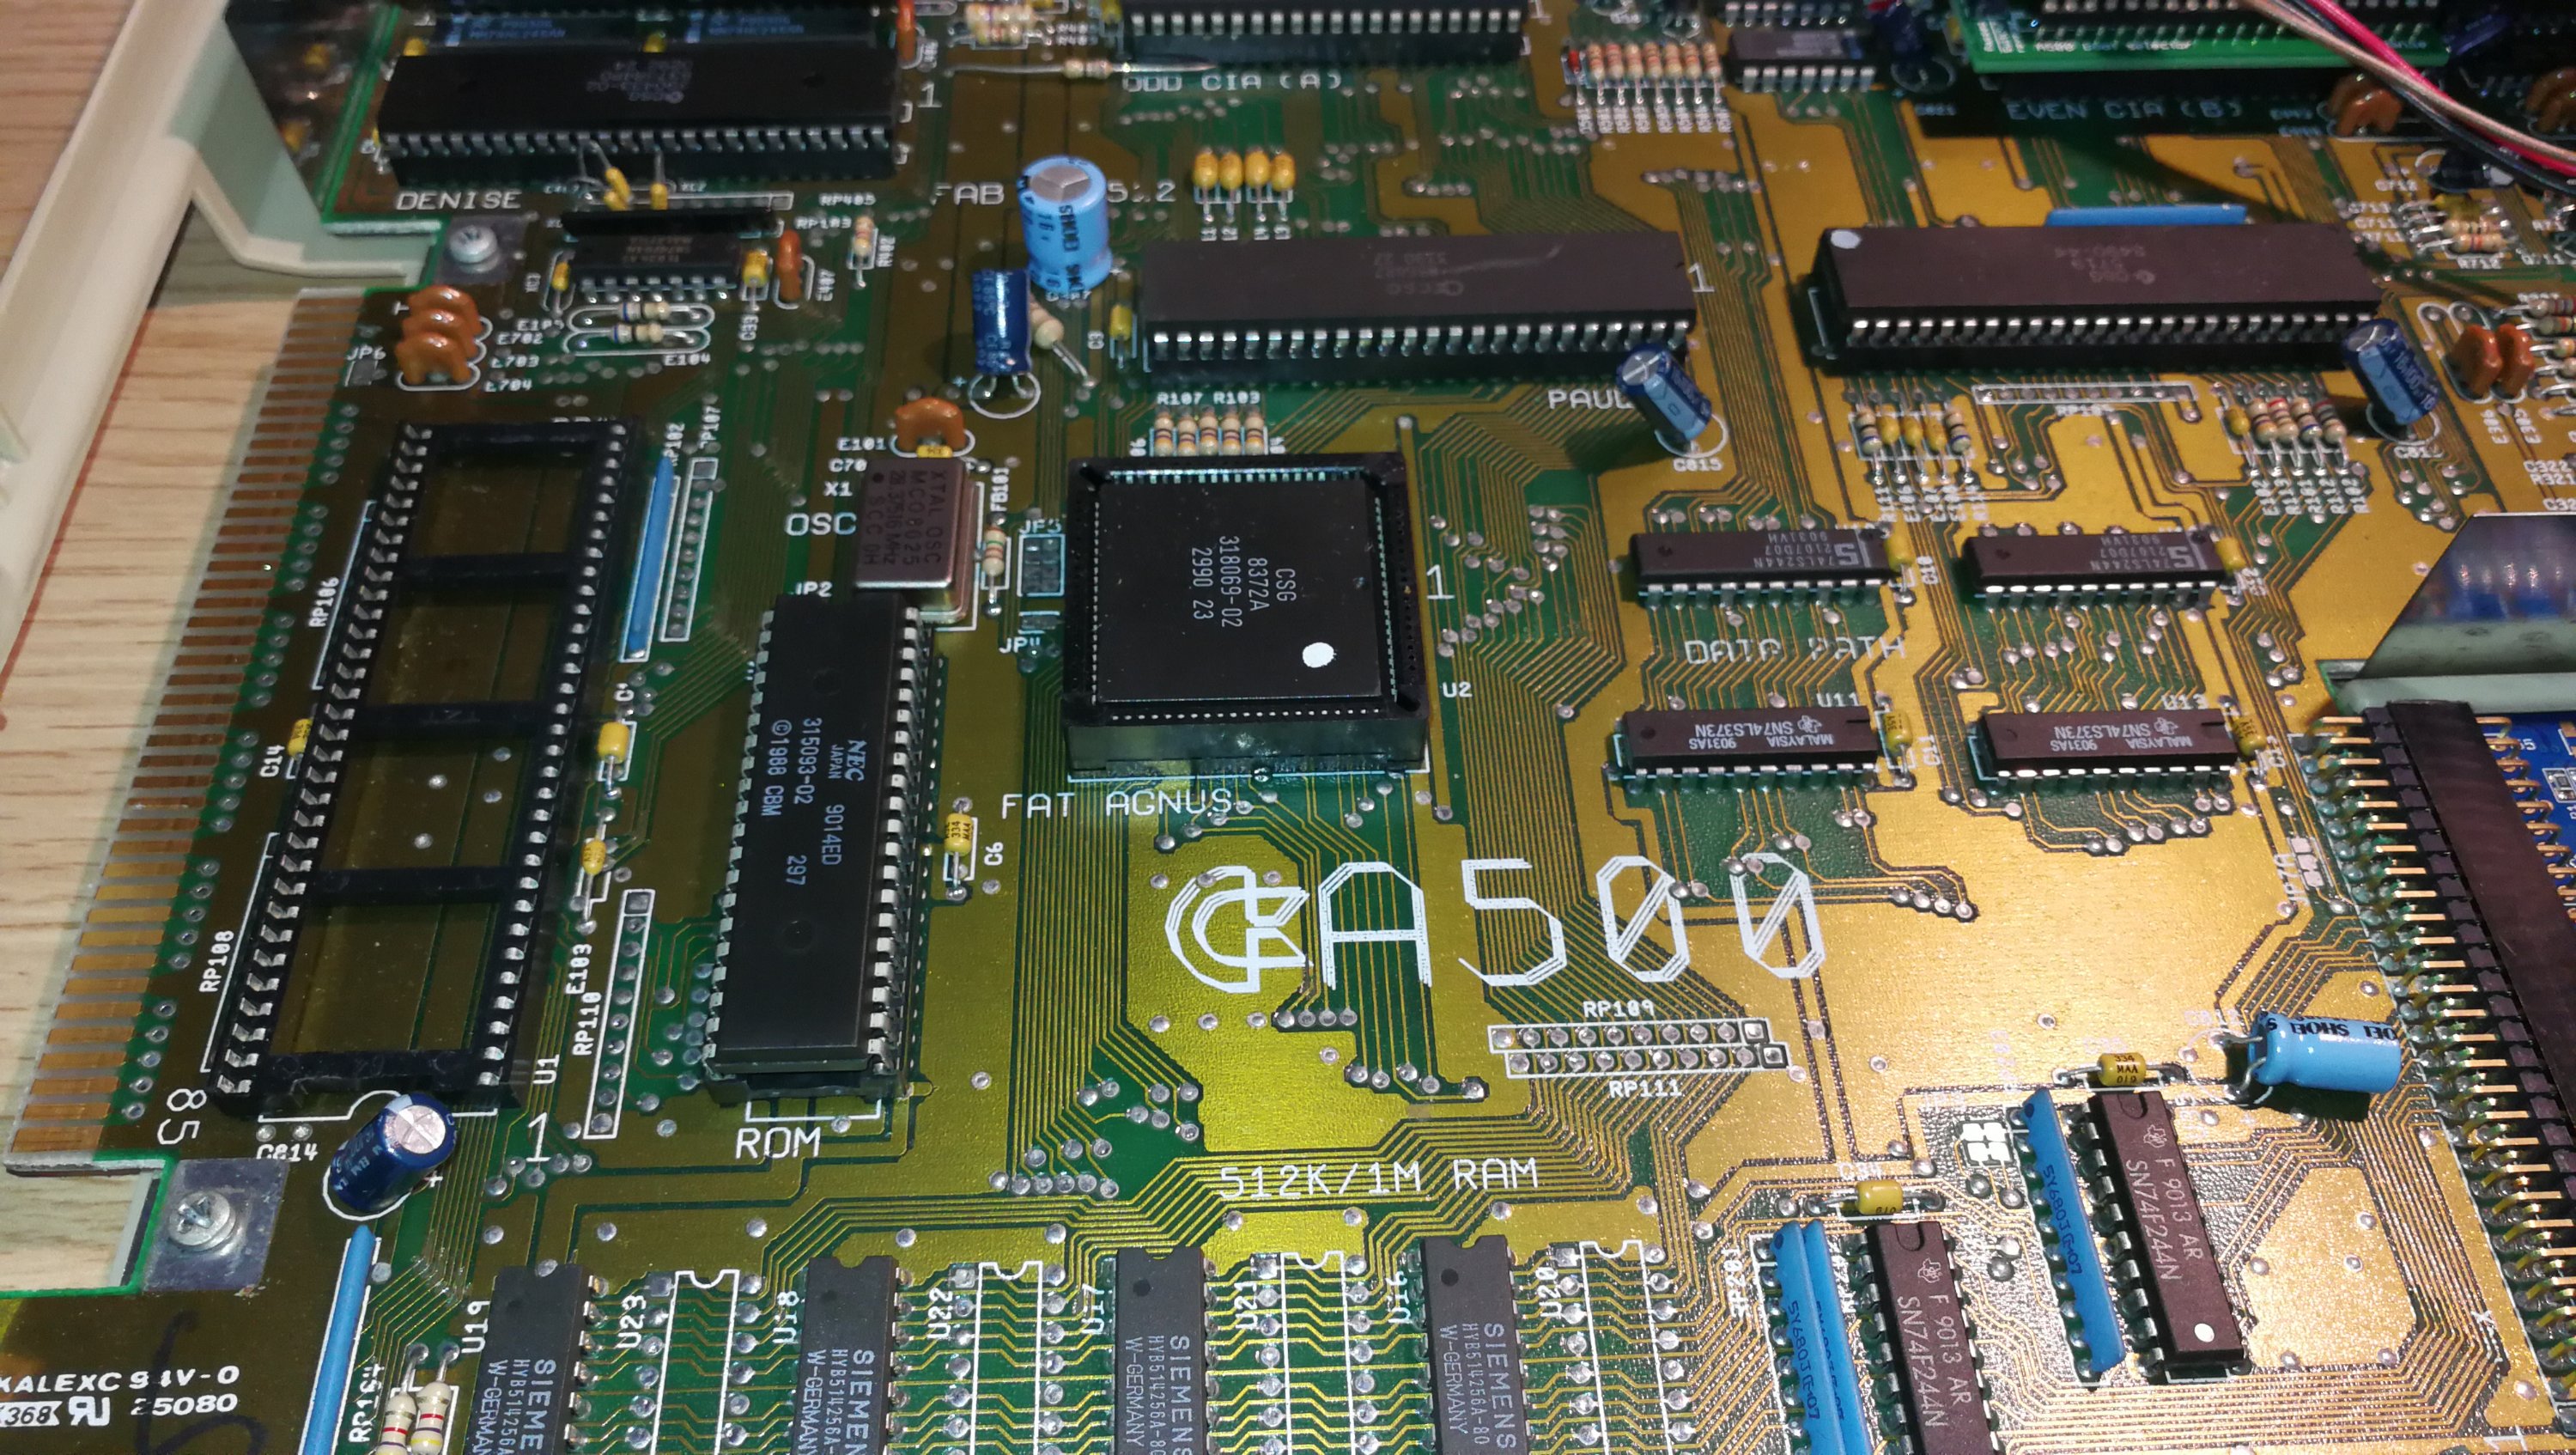
First off I needed to remove the original Motorola 68000 CPU and the Kickstart chip.

Vampire V500 V2

Amiga 500 motherboard with empty 68000 CPU socket

Vampire V500 V2

Removing the Kickstart chip with a chip puller

Installing the card

The next step involved carefully inserting the Vampire board connector pins into the empty CPU socket. This actually took a hell of a lot more force than I thought it would. I’ll admit I was scared of damaging the CPU socket or the motherboard itself with the amount of pressure I had to exert. Anyway it eventually slotted in all the way and no harm was done. Please do make sure you remove both the CPU AND the Kickstart chip though – this wasn’t mentioned in my instructions (but they’ve been updated since I got mine to mention this). If you don’t remove the Kickstart chip then the Vampire board won’t sit flat and the CPU connections may be unreliable. Thanks to Igor Majstorovic for taking the time out to let me know about this!

Vampire V500 V2+

Vampire V500 V2+ fitted to A500 CPU socket

Cables & CF Card setup

The next step was to hook up an HDMI cable to the socket on the board and fit a Compact Flash ‘hard drive’ to the Vampire’s 44 pin IDE header. I opted for a 32Gb CF card as this is the size of the Apollo OS (Coffin) image. (This is a pre-configured Workbench 3.9 system that you can download and use with your Vampirised A500.

Imaging the card was simply a matter of downloading the Apollo OS image from here and using Win32 Disk Imager in Windows 10 to write that image to my Compact Flash card.

Vampire V500 V2+

Vampire V500 V2+ with CF Card and HDMI connected up

For once in my life everything went as it should and when I powered up my Amiga 500 it worked! As Hannibal would say; ‘I love it when a plan comes together!’ I was greeted with a really cool Vampire logo boot screen after which the Workbench loaded just a few seconds later.

Vampire V500 V2+

Vampire V500 V2 Boot Screen

Vampire V500 V2+

Vampire V500 V2 ‘Insert Floppy’ Screen that appears if no bootable device is present

My Vampire Card has arrived!

Vampire V500 V2 Card

It’s finally here, after months of waiting, My Vampire V500 V2 Card! Still need to gather a few other bits and pieces before I can fit it but here is a quick look at it in all its’ glory for now.

Vampire V500 V2 Card

Amiga 500 Vampire V500 V2+ Box

Vampire V500 V2 Card

Inside the Vampire box

Vampire V500 V2 Card

Vampire V500 V2+ Card – 44 Pin IDE connector visible on the left

Vampire V500 V2 Card

Vampire V500 V2+ Card Reverse – pins on the right fit into the original 68000 CPU socket.

Vampire V500 V2 Card

Vampire V500 V2+ Card Ports: MicroSD on the left, HDMI, JTAG programming port, I/O Expansion port just behind and to the right.

Fitting an External, Boot – selectable Gotek Drive to an A500

Amiga Gotek External Cable

I wanted to avoid having to have one of these hanging off the back of my A500.

I wouldn’t really call this an upgrade as such, more taking advantage of the latest developments in the Amiga scene. In case you’ve never heard of it, the ‘Gotek’ drive is basically a 3.5″ Floppy Drive emulator. Instead of putting floppy disks in it you plug in a USB flash drive that can contain up to a thousands Amiga Disk Files or ‘ADF’s’ (floppy disk images).

There are quite a few versions of these floating around on eBay, internal and external. I decided pretty early on that I wanted mine external so I could keep my A500’s DF0 as a real floppy drive so I opted for an external drive. I wanted to have the install look as authentic and neat as possible so I opted to install my Gotek inside an old external floppy disk drive that I picked up off eBay for spares/repairs. If you want to do the same just be careful to pick one that houses a regular sized floppy drive and not a reduced height, slim one as the Gotek won’t fit. You can see what I mean from the photo below which shows my finished Gotek drive underneath a couple of Roctec slim drives – it should be pretty obvious that the slim drives don’t have the necessary height to accommodate the Gotek drive.

The other choices available now include the option to have an OLED screen that can display the name of the ADF file you select and the track info and also a built in speaker that can simulate the noises of the real thing. It’s more of a buzzer than anything else but it’s pretty effective and much better than sitting in silence waiting for Cannon Fodder to load!

Finished Gotek Drive

Finished Gotek Drive under my two Roctec slim external floppy drives

Close-up of Gotek Drive with OLED Screen

Close-up of Gotek Drive with OLED Screen

Boot Selector Installed in Even CIA Socket

Boot Selector Installed in Even CIA Socket

Mounting of Selector Switch

Mounting of Selector Switch

DF0 / DF1 selector switch

DF0 / DF1 selector switch

Sam’s Journey

Sam's Journey

Ordered Sam’s Journey months ago and it finally arrived today. A brand new cartridge game in 2018 for the Commodore 64! Presentation of the box and its’ contents is fantastic – can’t wait to play it!

If you would like to get hold of a copy yourself then you can buy it here.


Sam's Journey

Sam’s Journey


Sam's Journey Box Back

Sam’s Journey Box Back


Sam's Journey Inside the Box

Sam’s Journey Inside the Box


Amiga 500 Super Denise Upgrade

The A500 machines shipped with a graphics chip called ‘Denise’ that is responsible for handling sprites and also all the different screen modes and resolutions you can use with Workbench and other apps. The later Amiga 500+ model sported an updated chip called ‘Super Denise’ which offered quite a few more screen modes and resolution options. The Amiga 500 Super Denise upgrade is a very straightforward modification which simply involves getting hold of the newer chip and replacing the old one with it. (It is an exact pin-for-pin replacement). For more detailed info on the Denise chip look here.

Getting hold of a new chip

The ‘Super Denise’ has the chip number 8373-R4 whereas the old regular ‘Denise’ is 8362. You can usually pick up Super Denise chips on eBay – here.  I paid around £20 for mine which I though was fair… be patient and wait for one at a fair price – don’t get ripped off.

Removal & Replacement of the chips

You can remove the the old chip with just a small flat bladed screwdriver if you are careful. Just lever up each end slowly, alternating from one end to the other, making sure it lifts evenly from each corner so that the pins don’t bend. Ideally though, use an ‘IC Extractor’ – it makes the job a lot easier and is a useful tool to have in your retro computer toolkit anyway. Again these are readily and cheaply available on eBay – here. The new chip should just plug straight into the socket. Make sure the marked end of the chip matches up with the notched end of the IC socket. If it goes in the wrong way around it won’t work and may even damage the chip and/or the motherboard. If the pins don’t quite line up you can bend them gently into place using a pair of pliers.

Amiga 500 Super Denise Upgrade – In Pictures

Below you can see before and after screens showing SysInfo details, and available screenmodes along with the two different Denise chips fitted. The end result is a success with more screenmodes (eg Super-Hi Res modes) available straight away, even with my standard 1084S monitor. However in order to benefit from the rest of the modes the Super Denise chip offers (such as Productivity) I need to get hold of a proper Multi-Sync monitor that can handle the different refresh rates they need.

Amiga 500 Super Denise Upgrade

Sysinfo Screen with Standard Denise Fitted

Amiga 500 Super Denise Upgrade

Screen Modes Available with Standard Denise Chip

Amiga 500 Super Denise Upgrade

Standard 8362R8 Denise Chip Fitted

Amiga 500 Super Denise Upgrade

Replacement 8373R4 Super Denise Chip Fitted

Amiga 500 Super Denise Upgrade

Sysinfo Screen with Super Denise Fitted

Amiga 500 Super Denise Upgrade

Screen Modes available after fitting Super Denise Chip

Repairing a Roctec Floppy Drive for an Amiga

Repairing a Roctec floppy drive

This is a guide to repairing a Roctec floppy drive for an Amiga 500 computer.  I thought I’d write this up as much for my own benefit as other peoples so I can refer back to it in another 20 years! LOL.

Roctec Amiga external floppy drive

Roctec Amiga external floppy drive

If you ever pop a disk in your external Roctec drive and hear a strange whirring noise and can’t read any of your disks then the chances are you are suffering from a perished or broken drive belt.

Perished Drive Belt

Perished Drive Belt

These drives use a rubber belt to connect the drive motor to the spindle hub. The rubber belt only has a finite life and given most of these drives are getting on for 30 years old now it’s hardly surprising that they expire.

cof

No tension in old perished belt

The good news is that it’s pretty easy to replace them and I’ll give an overview of what you need to do here.

Getting Started on the Repair

The first thing you need to do is undo the 6 screws on the underside of the drive case using a small philips screwdriver.

Underside of drive case

Remove these 6 phillips screws.

This particular drive case is made from a solid metal rectangular tube so you need to slide the floppy drive out. The aim here is to slide everything out of the BACK of the case. The first step is to gently slide the floppy drive forward out of the case far enough to detach the plastic fascia from the front of it. Unless you do this it won’t slide right into the case and out the back. There are 2 small tabs on each side of the fascia which you can gently bend with a small flat-bladed screwdriver and it will pop right off. Don’t force anything or it will break – it should come off easily.

Drive Fascia removed

Drive Fascia removed

Now you need to prise the back part of the drive out of the case using something thin enough to slide into the tiny gap between the case and the backplate, I found the blade of my pocket knife to be perfect for this but be careful not to injure yourself or damage the plastic/paint on your drive! Once you’ve got it moving slide it out slowly (a slight side to side wiggle can help here). It will be attached to the floppy drive via a ribbon cable so keep going until you’ve got the floppy drive out too.

Roctec floppy drive detached

Roctec floppy drive detached from controller board

The floppy drive has a thin metal cover that protects the mechanical innards and it is held in place by some little tabs on the edges and a solitary screw at the back right (when viewed from the front).

Roctec Floppy Drive Rubber Belt Path

Roctec Floppy Drive Rubber Belt Path

Replacing the Belt

Once the top is off you can see the drive mechanism, motors, heads and so on. Carefully remove what’s left of the old belt with a pair of tweezers. Be careful not to touch the drive heads with anything metallic or you may damage them. The photo above shows the path the rubber belt follows, indicated by the yellow line.

The next step is to remove the drive motor which is attached to a metal bracket that runs across the back of the drive. It is held in position by one screw in the far left corner and another on the right a few cm down from the corner. Don’t touch the two screws with the large flat heads either side of the motor. Be careful you don’t pull the bracket too much as there are two tiny wires connecting the motor to the circuit board here so be careful to support the bracket whilst you are handling the drive to replace the belt.

How to detach the motor and bracket

How to detach the motor and bracket

Drive motor and bracket removed

Drive motor and bracket removed

Once the bracket and motor are out of the way you can carefully thread a replacement belt around the large drive wheel, small tension wheel and keep a loop ready at the top right to go on the motor spindle. Follow the yellow path in the earlier photo and take your time as it can be a little tricky to get the belt into place. A small flat bladed screwdriver and a pair of tweezers are essential for this. Don’t forget the belt needs to thread behind the small silver pully wheel as this is what tensions the belt.

Close-up of the small tension wheel you need to thread the belt behind

Close-up of the small tension wheel you need to thread the belt behind

Once you’ve got it threaded around the wheels correctly you need to get the final loop onto the motor spindle. It helps if you grab the loop with some needle nosed pliers here and pull it taught with one hand whilst guiding the motor spindle into the loop with the other. Once this has been achieved (it may take a few goes as it’s quite fiddly) place the bracket back in place and rotate the large drive wheel slowly and check the belt stays on, is running where it should and isn’t fouling any components.

Look carefully through the tiny gaps in the top of the drive motor you should be able to see the motor armature slowly rotating as you move the belt. If it is then job  done, time to put it all back together! If it isn’t then don’t fret, just double check the belt is following the correct path, isn’t twisted anywhere and hasn’t slipped off any of the wheels.

Congratulations, your Roctec drive should now be fit for active duty for another several years now!
