Lyonsden Blog

Category - Gaming

Freeze 64 Issue #37 Fanzine is out now

Freeze 64 Issue #37

Looks like the post is finally getting back to normal after all the disruption brought about by the Coronavirus pandemic. How do I know this? Because I’ve just received the latest issue of Freeze 64, Issue #37 within a week of it being posted out!


Freeze 64 Issue #37

Here’s a look at the front cover of issue 37.


Here’s a rundown of the contents of this issue taken straight from the magazines’ directory listing! As always there’s no shortage of interesting Commodore 64 articles to get stuck into.


Freeze 64 Issue #37

Freeze64 Issue 37 Contents Page.


If you fancy getting hold of your own copy of Freeze 64, Issue #37 then head over to the Freeze64 website and show your support by purchasing this issue.

Physical copies (it isn’t available digitally) are priced at £3.99 plus postage. There are also subscriptions available which offer the opportunity to save a little money.

Finally, here’s a link to my previews of several earlier editions of Freeze64. If you’re new to Freeze64 and would like to check out what you’ve been missing all this time then this is a great place to find out!

How to Build Your Own Cassette Tape Winder

I’ve always wanted a cassette tape winder so when I stumbled across this plan on Thingiverse I thought it would make a great little project for my 3D printer. Sure I could search on eBay and maybe pick up an old one but where’s the fun in that? So here’s a little guide to how I built my own cassette tape winder.

Computer Stuff

First off I had to download the zipped STL files from the Thingiverse site. (STL files contain 3D CAD objects that you can print).

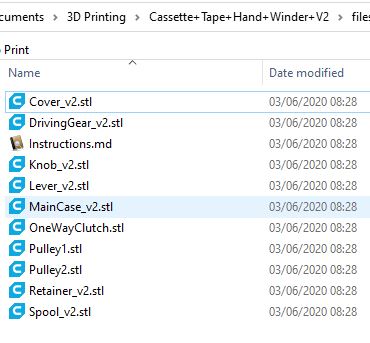
Each component has it’s own STL file and there were 10 of them for this project. You can see them all listed in the folder screenshot below.


These are the components that you need to 3D print.


You cannot print STL files directly so I use a piece of free software called Cura to work with them. This software allows you to see the STL files as an interactive 3D model. It also processes STL files by ‘slicing’ them into layers that can then be saved as GCODE files and printed on a 3D printer. If you’ve never 3D printed something this might all sound very complicated but it really isn’t.


Build Your Own Cassette Tape Winder

Winder case as viewed within Cura software.


The image above shows the main case for the winder in Cura. I have already sliced it and it shows an estimate of how long it will take to print, over 7 hours in this case. 3D printing is not a fast process!


Beginning the 3D Printing


Freshly printed winder case.


Above you can see the finished case print… but there’s some extra support material that will need to be removed from underneath it. 3D printers can’t print (over long distances at any rate) in thin air so they need to create a kind of scaffolding system (supports) in order to do so.


Removing the 3D printed support material.


Support material is designed to break away easily from the main print. In the above photo I used a sharp craft knife to break away the support material. It only took a couple of slices and then I was able to get my fingernail under it and simply pull it away in one piece.


View showing the support material removed.


With the support material removed you can now see the winder start to take shape. In the above photo you can see the latticed support material too. It’s made this way to minimise plastic wastage and also allow it to be broken away easily. The fewer points of contact it has with the main build, the easier it is to break off.


Here the few little pieces of support material that were clinging on have been removed with a craft knife.


In the above photo I have cleared away the few little straggly bits of plastic left by the supports with my craft knife.


This is the case viewed from the other side.


This is what the inside of the winder case looks like. There are 8 posts to support the case screws, a hole for the winder spool and 3 protrusions where the gears will sit.


Gathering the parts together


Build Your Own Cassette Tape Winder

All the 3D printed components ready for assembly.


This photo shows all the parts of the winder fully printed a few days later. The instructions advise printing the cogs on rafts because they can be difficult to remove from the print bed. However I didn’t bother… I have glass bed and things pop off very easily once it cools down. It also means the finished prints are smooth and clean but of course YMMV. I did use supports for everything where the instructions recommended to do so and carefully removed them after printing.


The bearings and screws needed.


What you will need

In addition to the 3D printed parts a few bits of hardware are also required. Some bearings, screws and a rubber belt. Here’s a rundown:

  • 6x  4x8x3 miniature ball bearings for the gear wheels – I used these.
  • 1x  3x8x3 miniature ball bearing (for the winder knob) – I used these.
  • 14x  3x12mm pan head self-tapping screws – I used these.
  • A 1mm square rubber belt approximately 55mm in diameter.
  • Philips screwdriver.
  • Craft Knife.
  • Side cutters (to help remove support material if necessary).
  • Silicone Grease (optional but recommended).
  • 3D printer!


Gears with bearings fitted.


The next step was to fit the 6 bearings into the gear wheels. The two pulley cogs are fitted with two bearings, one each side whilst the driving gear and spool take just one.


Gears with bearings fitted.


The bearings were a snug fit but I didn’t have to force them in at all. Once fitted they remained in place by friction alone so there was no need to glue them in.


One-way clutch.


The winder incorporates an ingenious little one-way clutch mechanism that will only rotate in one direction. The benefit of this is it prevents you from accidentally winding a tape in the wrong direction causing it to unspool inside the case. Impressively it prints in situ too – there are 6 moving parts which are all printed as one complete mechanism together.


Putting it all Together


Start with these gears first.


Next came the exciting part – putting it all together. The driving gear, both pulley’s and spool went in first, making sure the bearings all seated correctly on the pegs.


Then add these. Note that pulley 1 and the clutch have already been assembled in this photo.


Next to go in was the one-way clutch which fitted onto the hexagonal shaft of pulley 1.  It can fit either way around but needs to installed so that it ‘sticks’ when turned anti-clockwise but free-wheels clockwise. The instructions said to glue this in position but I didn’t bother as its going nowhere once the lid is attached.


Build Your Own Cassette Tape Winder

The rubber belt is added last.


The belt went in next and simply needed stretching around the clutch and pulley 2. There was a fair amount of tension here with the clutch being pulled over to one side, however once the lid goes on and the pegs slot into the bearing top and bottom, it sorts itself out.


A minor issue…

I did have one issue at this point when putting everything together. There was too much friction with the spool and it wasn’t turning freely. I tried shaving/filing plastic from the cog teeth, adding a drop of oil to the bearing and adding a little silicone grease to the teeth but none of this really helped.

In the end I reprinted the part scaled down slightly to 98% which allowed the spool to spin freely. I also had to enlarge the bearing recess slightly with a Dremel so the bearing would still fit inside. Possibly if I’d persevered a little longer with the file I could have got the original part to work. However given how everything else fits together perfectly I figured the part needed re-designing slightly for a better fit. Regardless, I’m happy with my fix and how it now operates.

Before I screwed the back cover on I also added a tiny bit of silicone grease to the other gear wheels just to help keep them lubricated.


The Finished Winder


View of the back of the assembled winder.


Here’s the winder with the back screwed on and the handle and knob attached.  The knob also has a bearing inserted into it so that when it’s screwed to the handle it will still spin freely.

I had no issues screwing things together but the instructions did advise caution in case the plastic splits and suggested drilling out the holes further as a precaution. Again I didn’t bother as I felt my screws were a good fit for the holes but again YMMV.


Front of Winder with retaining clips attached.


The two retainer clips attached to the front of the case using a couple more screws. The dimples are positioned such that they face the back of the winder.


Tape held captive by retaining clips.


The screws need to be tightened just enough so that the clips can move with a little force but remain in any position. These are used to hold cassette tapes securely in place whilst winding.


Build Your Own Cassette Tape Winder

View of the winder looking down.


Video of winder in use

And here’s the finished winder. I have to say it works extremely well and will be a great help in minimising wear and tear to my various C2N Datasette’s, Walkman’s and tape decks. It’s fast too, I managed to rewind a C90 tape in around 30 seconds. The use of a belt helps to ensure that when reaching the end of a tape, any excess force results in the belt slipping rather than damaging the tape.

 

Retro Format – A Brand new Retro Computer Magazine

Retro Format

Believe it or not there is now another Retro Computing magazine on the block! It’s called Retro Format and it’s a multi-format magazine that caters for all retro 8/16/32-bit systems. Born from a successful Kickstarter campaign, this magazine is mostly focussed on games, specifically reviewing them, much like you’d imagine an all format ZZap!64 might look.


Retro Format

Retro Format Cover.


Initial impressions are very good indeed. It’s a full-size magazine, 64 pages in length (cover to cover) and all printed in full colour. There are over a dozen full reviews of games for retro systems inside. The games themselves are almost exclusively new ones created recently for retro systems. The two main exceptions to this are John Wick (a new NES styled game for modern PC’s) and Strike Commander – an old DOS game.


Retro Format

Retro Format Contents Page.


The Reviews

I really like the review style. It breaks game scores down by Graphics, Audio, Playability, Lastability and then gives an Overall score. This is how games used to be reviewed back in the day and I welcome seeing this format again.


Retro Format

Retro Format Game Scoring System.


As for the reviews, the bulk of the magazine is split almost 50/50 between Commodore and Spectrum games with the remainder made up of a handful of MSX, CPC and PC titles.

There’s also a future classics section which looks at a couple of modern games for the Vita and Playstation VR systems. I’d say the jury is out on this section though as I’m not sure I felt it was relevant.

Besides the games there was a really interesting 8-page feature on the SEGA Dreamcast system along with some of the best games available for it. I ended my SEGA experience with the Mega Drive but this definitely piqued my interest and made me think about getting one…


More than just games…


Retro Format

A look at the Christopher Reeve Superman Movies.


The magazine is rounded off by a classic Movie and TV section which I enjoyed a lot. It features the Christopher Reeve Superman movies and also delves into some past episodes of The Twilight Zone. As a big  Sci-Fi fan I found these articles to be right up my street.


The original Twilight Zone – NOT the recently re-hashed abomination.


Here’s a peek at some of the reviews featured in the magazine.


This slideshow requires JavaScript.


How to get your own copy…

If you are interested in purchasing your own copy of the magazine then head on over to the Retro Format website.

Latest Retrokomp Issue 2 is now out

Retrokomp Issue 2

Just received my copy of Retrokomp Issue 2, the multi-format retro magazine.


Retrokomp Issue 2

Retrokomp Issue 2 Cover


Once again there is plenty of content with a hefty count of 72 thick glossy pages and over a third of them devoted to Commodore machines. If you are interested in other machines besides Commodore then there’s even more on offer with the like of ZX Spectrum, Atari, Amstrad, Apple 2 and even old IBM PC’s covered.


Retrokomp Issue 2

Contents of this issue


Here’s a few highlights of this issues contents.


C64 Restoration project.


Retrokomp Issue 2

A look at Simon’s BASIC on the C64.


How to clear the Hi-Res screen on a C64.


A look at the Pi1541 disk drive emulator.


Retrokomp Issue 2

Part two of the Project Stealth Fighter article.


Comparison between Atari and CBM BASIC.


A look at file backup on the Amiga.


24-bit datatypes on the Amiga.


A look at archiving software for PowerPC equipped Amiga’s.


Card readers on the Amiga.


Amiga Modula-2 Programming.


A quick run-down of the Commodore-centric articles in Retrokomp Issue 2:

  • Sysres
  • Commodore 1541 Drive – Typical Problems
  • Simon’s BASIC – Sprites mean strange objects on the screen
  • Raspberry Pi 1541
  • Commodore PET vs Atari BASIC
  • Using the USR statement
  • Clearing the high resolution screen
  • Commodore 64 Restoration
  • Modula-2 Programming
  • 24-Bit datatypes for Workbench
  • Simple file backup
  • Memory card readers

If you’ve never come across Retrokomp magazine before you might like to read through my preview of the first issue here and the second, here.

Alternatively if you’d like to purchase a copy of Retrokomp Issue 2 for yourself then visit the publishers website here and show your support.

Fusion Magazine #11 just arrived

Fusion #11

Received the latest edition of Fusion Magazine, issue #11, a couple of days ago. This little magazine has really grown in terms of content and quality over the past year thanks in no small part to the diverse range of contributors. This issue see articles from Retro Man Cave, Octav1us and Dave Perry to name but three.


Fusion #11

A look at the cover of Fusion #11.


I’m focussing on the retro gaming content here but there is more to it than that as it covers a smattering of modern games along with retro toys and memorabilia. All in there’s 60 pages worth of content, which for £3.99 is great value for money and should ensure that even if some of the content doesn’t interest you, there should be plenty that will. I’ve got a discount code for 15% off the price at the bottom of this page too.

Here’s a little peak at some of the stuff in this new issue:


This slideshow requires JavaScript.


Here’s a little look the contents page so you can see what else features in this issue:


Fusion #11

Fusion #11 Contents.


If you want to pick up a copy of Fusion #11 magazine then head on over to their website. The mag is only £3.99 plus postage, a very reasonable amount for such a well produced magazine. If you use the code ‘LYONSDENBLOG’ at the checkout you will also get 15% off the price making it just £3.40! I will also receive a tiny bit of commission which will help towards the hosting costs of running this blog.

Freeze 64 Issue #36 Fanzine is out now

Freeze64 #36

I’ve finally just received the latest issue of Freeze 64, Issue #36 – hurrah! Sadly this has been another victim of the Coronavirus situation with the postal services. I remember Vinny informing subscribers that this had been posted weeks ago. Still, better late than never!


Freeze 64 #36

Freeze 64 pictured alongside the featured game on the cover. (The game is from my collection).


Here’s a rundown of the contents of this issue taken straight from the magazine. I’m looking forward to reading this over the upcoming weekend.


Here’s a quick peek at the contents of this issue – image take straight from the magzaine.


If you fancy getting hold of your own copy of Freeze 64, Issue #36 then head over to the Freeze64 website and show your support by purchasing this issue.

Here’s a link to my previews of several earlier editions of Freeze64 if you’d like to check out what you’ve been missing!

K&A Plus #15 Magazine has arrived!

K&A Plus #15

Received my copy of K&A Plus #15 today. This was another magazine heavily impacted by the current Coronavirus situation but it was definitely worth the wait. As with the previous issue I paid an extra €5 for the cover disk. This issue came with a second compilation of 11 super C64 games; ‘Good Old 8-Bit Games #2’.


K&A Plus #15 Front Cover

K&A Plus #15 Front Cover.


I have to say I really love the fantasy artwork on cover of this issue. The  illustrated colour disk jacket is pretty awesome too, a really nice touch.


The CoverDisk


Good Old 8-Bit Games #2

Good Old 8-Bit Games #2.

Even better, an extra matching jacket was included for the previous ‘Good Old 8-Bit Games #1’ disk!


Good Old 8-Bit Games #1

Good Old 8-Bit Games #1 wearing it’s snazzy new jacket!


There’s some superb games on the cover disk. Highlights for me are PowerGlove, Bruce Lee – Return of Fury and PO Snake. Amazing value for money for just €5!

Here’s a full rundown of what’s included…


K&A Plus #15 disk contents.

Good Old 8-Bit Games #2 – Disk Contents.


Magazine Preview


There’s a big emphasis on gaming in this issue with game reviews galore. There’s reviews for every major Commodore system from the VIC 20, the C64 through to the Amiga and CD32. The reviews cover a mixture of old and modern games.

Of course there’s some other non-gaming stuff featured too. There’s a look at how to get a C64 emulator running on the Nintendo Wii, RayCasting on the VIC20 complete with (partial) program listings, news and lots more.

Here’s a quick look at the contents page of K&A Plus #15.


K&A Plus #15 Contents.

K&A Plus #15 Contents.

And here’s a little preview of some of the stuff in this issue:

This slideshow requires JavaScript.

If you’ve never come across this magazine before you might want to take a look at some of my previews of previous issues here.

If you want to find out more about K&A Plus #15 or order yourself a copy, head on over to the Komoda & Amiga Plus website. The magazine is produced in Poland but they produce an English language version too. Shipping to the UK (before COVID-19 at least) only takes a few days.


Amiga User 9 (Print Edition) has arrived!

Amiga User 9

This issue of Amiga User 9 has been a long time coming. Unfortunately due to the inescapable Coronavirus the physical shipment of the magazine from Poland was severely delayed. Anyway I’m glad it has finally arrived as there’s plenty to get stuck into during lockdown.


Amiga User 9

Amiga User 9 Front Cover


In this issue there’s a big focus on the various FPGA systems and their strengths and weaknesses as modern Amiga systems. Maintaining that theme there’s an interesting article that delves into setting up emulation on a Raspberry Pi device too. Rounding off the Amiga emulation topic there’s also an informative little review of the AmiKit Crystal USB kit. As a long time user of AmiKit I’ve often wondered what I was missing from this kit and now I no longer have to.

Elsewhere there’s a very intriguing article about fitting a CD-ROM drive inside an A1200 case. One day soon I hope to add an A1200 to my collection and this is one mod that I would love to try. There’s also some good guides to creating Zip archives, using TrueType fonts and creating DMS/ADF disk images on the Amiga.


This slideshow requires JavaScript.


Here’s a peek at the contents page so you can see what else is covered in this issue as there’s a lot more than I’ve mentioned.


Amiga User 9 Contents

Amiga User 9 Contents


If you fancy getting hold of your own copy take a look at the Bitronic.pl website. Amiga User is produced in Poland but the English is jolly good. Delivery to the UK (normally!) only takes a week or so. If you’d rather get a digital version they offer that option too.

If you’d like to take a look at some of my previous previews of the magazine then please click here.

Amiga Future #144 – May/June edition out now.

Amiga Future #144

The latest issue of Amiga Future (Amiga Future #144) for subscribers has arrived. It features artwork from the game Tiny Little Slug on the front cover.


Amiga Future #144

Amiga Future #144 Front Cover.


What’s in this issue?

There’s a good mix of stuff in this issue with plenty of reviews to get stuck into. I’m a big fan of adventure games so the three page article looking into ScummVM 2.1.1 on MorphOS instantly caught my eye. There’s also a look at the new text adventure; The Curse of Rabenstein which I quickly decided would be my next port of call.


Amiga Future #144 CD

Issue #144’s cover CD.


There’s a healthy dose of new game reviews in this issue and some retro ones too. Titles such as Rotator, Tiny Little Slug and Atomic Bomberman are all critiqued. Software wise there’s a review of AmiCygnix v1.5 and Font Tester v1.05.

For the hobbyist there’s another helping of AmigaOS 3.1.4 tips and the latest uploads to Aminet plus the latest Amiga news across 68K, OS4 and MorphOS.


Amiga Future #144 Index

Index of what’s in Issue #144


The Cover CD

Sadly the cover CD is a bit of a wash-out for me this issue. The main event is a couple of games; Cyber Force and Dan Wilder. I must admit they looked pretty promising and I was looking forward to playing them. However when I loaded them up I discovered that they are both Polish games and all the text/menus are in Polish too. I didn’t have a clue what was going on so quickly quit out of both of them which is a shame. Still, I’m sure there will be plenty of readers in Poland who will have plenty of fun with them.


Amiga Future #144

Full versions of Cyber Force and Dan Wilder on this issues CD.


Below is a little peek at some of the stuff inside Amiga Future #144. If you’d like to purchase a copy then do please take a look here and support what is now the last remaining commercially printed Amiga magazine!


Never come across Amiga Future magazine before? Perhaps you’d care to take a look at some of my other Amiga Future magazine previews here.

Replacement C64/TheC64 Maxi badge

Even though I have a real C64 I also own a TheC64 Maxi computer. Cosmetically this machine is indistinguishable from a real breadbin 64 bar one thing… the badge. For whatever reason (probably copyright) the TheC64 Maxi doesn’t have a proper Commodore badge which has always irked me.


This is the standard label that comes on the ‘TheC64’ machine.


Thankfully I will be irked no longer thanks to an eBay seller in Australia who manufactures replica badges. Mine came supplied well packaged with a stiff piece of hardboard inside the envelope to make it impossible for the postman to bend it.


A close-up of the badge.


The badge itself is beautifully made with proper chrome lettering and features the authentic Commodore ‘chicken head’ and rainbow colours.


A close-up of the badge.


The badge is 0.8mm thick so it’s quite obvious that this isn’t some cheap vinyl print. It’s the same quality as the one found on the 1501 Power Monitor I have previously reviewed from the same seller.


Fitting the Replacement C64 badge

This has to be one of the easiest projects I’ve ever done. The first task is to peel off the old badge – it’s quite thick and the new badge won’t sit flush unless you remove it. I used a hobby knife to carefully lift the edge at one end and then gently peeled it off. I took my time and managed to get it off in one piece leaving virtually no residue behind.


Peeling the old label off.


I performed a quick clean up with some Isopropyl alcohol and then peeled off the protective film from the back of the new badge. It fitted the oval recess perfectly which made aligning it a simple task.


Replacement C64 badge

New badge fitted in all its glory.


Once fitted I think it looks fantastic, almost indistinguishable from the real thing. The only slight difference for aficionados is that the original had raised lettering but regardless it’s a massive improvement over the rubbish badge that it came supplied with.


Replacement C64 badge

The finished result. Very satisfied with it myself.


I’d definitely recommend this to anyone that wants to make their TheC64 Maxi a little bit more authentic. So if you fancy one then for the very reasonable sum of £7.50 plus postage you can purchase one these replica badges off his eBay store yourself.


Looks just like a real C64 now!

Hedaka Multi-Function HED-1 Joystick

Hedaka Joystick

While I was looking for a new gamepad for my Commodore 64 a while back I stumbled across this bad boy. It’s called the ‘Hedaka Multi-Function HED-1’ joystick and I spotted it on the German eBay site and imported it to the UK. All in with postage I think it cost me around £40.

Using the interactive 3D display immediately below you can take a look at the box it came in. Just click inside the box and then when the hand icon appears drag to rotate and zoom in and out.

I honestly don’t know too much about the origins of this device – I simply bought it because it looked interesting. From the German language used on the box it appears to have been made for the German market. However all the text on the device itself is in English which seems a little odd. It’s worked out great for me though as I know instantly what everything should do!


Hedaka Multi-Function HED-1 Joystick Specs

Using my amazing multi-lingual abilities Google translate I was able to glean the following information from the specifications listed on the box:

  • Control knob for computer games, suitable for many computers, Atari all types, Commodore VIC20, C64, 128 and C16 & Plus/4 with adaptor.
  • Additionally 2 integrated paddles
  • Particularly sensitive control by micro-switch
  • Auto-fire infinitely adjustable
  • Extra large fire-buttons
  • Stable metal housing
  • Practical suction feet for safe stand
  • Extra long connection cable

Basically this device looked to have been aiming to be the only controller you would ever need to use with your computer!


This slideshow requires JavaScript.


Construction

This thing is built like a tank with the entire case being constructed from 1mm thick powder coated steel. The base measures 20cm x 12cm and the height to the top of the joystick is 10cm. A very generous 3m long cable is provided which means you can use this device from pretty much anywhere in the room.


Hedaka Joystick

Closer view of the joystick controls.


The stick itself is very comfortable in use and the micro-switches ensure you get a nice tactile ‘click’ as you move it around. The oversized fire buttons provide similarly satisfying feedback when pressed. The joystick requires only light pressure to operate and about 5mm deflection from centre to register a click.


View of the base showing the four sucker feet.


On the underside of the joystick are 4 large rubber suckers that allow you to stick the base to a desk or table. These work really well and on a completely smooth surface possibly a little too well. When I placed the joystick down on a glass coffee table I really struggled to get it off!

When firmly affixed to a surface it gives a great arcade-like experience. I tried using it on my knee but it quickly became uncomfortable. However sticking it onto a place mat first and then on my knee offered a comfortable compromise.


Hedaka Joystick

In this view you can see the red LED just to the right of the auto-fire speed control knob. This visually displays the rate of fire.


Auto-Fire

For shoot-em-ups you can opt to turn on auto-fire mode using the toggle switch. Once this is engaged there is a speed selector knob which can be rotated to fine tune the rate of fire. This is completely analogue and the knob rotates through 270′ so you really can set it to anything you desire. There is a red LED above the speed control knob that lights each time the fire button is activated providing instant visual feedback of the rate of fire. The auto-fire only engages whilst the fire button is held down too which makes perfect sense.


Hedaka Joystick

Close-up of the joystick itself.


Paddles

The real ace up its sleeve for me though is the inclusion of paddle controls. This means if I fancy a quick game of Panic Analogue (easily my favourite paddle game) I no longer need to dig out my Atari Paddles.


Hedaka Joystick

Close-up of the paddle controls.


Both paddles are implemented and of course each has its own fire button. The button for paddle 2 is activated by selecting another toggle switch. The paddle knobs do take a little getting used to as they are much smaller than a typical paddle wheel (1cm diameter v 6cm). However they work effectively and allow very smooth and precise movement.


A Look inside

Just out of curiosity I decided to open up the case and have a peek inside. There are four philips screws along the lower edge of the base keeping the cover firmly attached. These screws fit into four little slots cut into the sides of the cover so they only need to be loosened a few turns and the cover will slide up and off.


View of the inside with all the electronics attached to the top cover.


Close-up of the joystick micro-switches.


This is a close-up of the two micro-switch fire buttons (left) and the Paddle potentiometers (right).


Verdict

This is a terrific joystick and I’m so glad I took a chance and bought it. The auto-fire feature is superb, probably the best implementation I have seen. Furthermore, the design of the joystick with its large base, oversized fire buttons and limpet-like suckers means it offers a very arcade like experience. Playing the classic Gorf or the much more recent Galencia with this joystick is a real pleasure. When I want to play the odd paddle game, not having to swap controllers to do so is incredibly convenient. Definitely a recommended pickup if you see one up for sale.

Ballyhoo by Infocom – Classic C64 Purchase

Infocom Ballyhoo

I recently managed to pick up another adventure to further expand my Infocom collection – this time it was Ballyhoo from 1986. It arrived in a lovely condition throughout with just a few worn edges and corners to bear witness to its 34 year lifespan. I was really impressed that the ‘The Travelling Circus That Time Forgot’ balloon was not only still in the box but also in once piece.


Infocom Ballyhoo – back cover


This particular adventure takes place in a circus setting, beyond which ‘lies a seedy world of deception and crime’ according to the description on the box. A young girl has been kidnapped and it falls upon you to investigate her disappearance. The description continues; ‘…watch your step. As the night progresses, you realise you’re in as much danger as the little girl… the kidnapper is lurking right on the lot, trying to set you up for a permanent slot in the freak show!’


Infocom Ballyhoo

The Ballyhoo opening screen on my Commodore 64


Ballyhoo’s difficulty level is rated by Infocom themselves as ‘Standard’ which means it is supposed to be playable by normal mortals. I’ve never played this particular adventure before so that remains to be seen. However they do have two higher difficulty levels of Advanced and Expert so that does encourage me somewhat. The easiest difficulty for reference is ‘Introductory’ which they say is suitable for kids aged 9 and above.


Official Souvenir Program

In many Infocom games there’s often a short story to set the scene for the game. In Ballyhoo the scene is set within an ‘Official Souvenir Program’ that actually forms part of the box cover. It provides a brief history of the circus and introduces several of the ‘acts’ that perform in it, both past and present. The program then gives way to the games instruction manual, describing how to play the game and even giving tips on drawing a map and so on. It’s an essential part of the packaging for sure.


This slideshow requires JavaScript.


Inside the Infocom Ballyhoo box


As with all Infocom games there’s more than just a disk inside the box.


Infocom Ballyhoo

View of the box compartment with plastic ‘lid’ in place.


Infocom’s Ballyhoo offers a number of circus themed extras tucked away inside its box.


View of the box compartment with plastic ‘lid’ removed.


Normally there would be a reference card included that gives directions for loading the game but it looks like that is missing from my copy. However the 5.25″ disk is present and correct and in really good condition too with no signs of mould on the label. It loads fine as well although when I play it I’ll be using a copy or just using a disk image to preserve the original disk.


Infocom Ballyhoo

Ballyhoo game contents laid out.


Also included is a single ‘Admit One’ circus ticket and a trade card for Dr. Nostrum’s ‘Wondrous Curative’, ‘Guaranteed to sooth all ills’. As I mentioned at the beginning, the balloon is still in the box too which I’m delighted about. Admittedly it is now rock solid and could never be blown up but as a memento of a gaming period gone by it’s a terrific addition. Many of these little trinkets are missing from the games now as they were easily lost over the years.


Infocom Ballyhoo

A closer look at the ‘feelies’.


Quite a lot of effort has gone into the creation of these extras. For example, reading the reverse side of Dr. Nostrum’s trade card reveals the ailments it can be used to treat. These include Toothache, Grippe & Catarrh, Constipation, Pin Worms and even ‘Singer’s Throat’, whatever that is. It even gives directions on exactly how to use it for each type of ailment. Snake oil remedies like this were commonplace in this time period so this all helps to build atmosphere.


A closer look at the ‘feelies’ – reverse side.


The back of the ticket gives details of the acts you will be seeing and also warns you to be wary of pickpockets, gamblers, thugs and thieves which doesn’t bode well! It also reminds you that you are entitled to three sessions with ‘Rimshaw the Incomparable’. Apparently he will read your palm, the bumps on your head and even hypnotise you!

It definitely has the foundations of a good mystery thriller and I look forward to getting stuck into it one day very soon!

If you enjoyed looking at this page then here’s a look at some of the other Infocom games in my collection that I’ve posted about.